-
Welcome to the Contour Enthusiasts Group, the best resource for the Ford Contour and Mercury Mystique.
You can register to join the community.
You are using an out of date browser. It may not display this or other websites correctly.
You should upgrade or use an alternative browser.
You should upgrade or use an alternative browser.
What did you do to your Contour today?
- Thread starter SHOspazz92
- Start date
AGrayson84
CEG'er
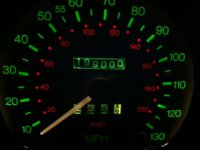
Looks good! I actually did my own gauge faces last week and need to get a little more lighting in some dim areas. May I ask if you added any additional lighting behind the cluster? I bought an LED strip at AutoZone. Really bright and took care of most of my dim areas, but I definitely need to get another LED strip, and wire some trimmed ones in the tight areas where it's dim. Your lighting looks fairly consistant... good job, whatever you did!
Dreamt about working on my CSVT
LOL! I have a similar dream often!
GnarCar
New CEG'er
Looks good! I actually did my own gauge faces last week and need to get a little more lighting in some dim areas. May I ask if you added any additional lighting behind the cluster? I bought an LED strip at AutoZone. Really bright and took care of most of my dim areas, but I definitely need to get another LED strip, and wire some trimmed ones in the tight areas where it's dim. Your lighting looks fairly consistant... good job, whatever you did!
That's actually just the stock bulbs lol, its still got some hot and cold spots, but all in all its more even then I was expecting!
AGrayson84
CEG'er
Wow, yeah I would say you have a lot less dead spots than you should have had... looks good! Did you do the transparent/paper/paper combination to make your gauge faces? I did it in that order first, but the areas lacking ink (for all the white spots that the paper layer creates) were too shiny and gave reflection when the sun shined toward the gauge faces. So I ended testing paper/paper/transparency for now to see how that goes.
GnarCar
New CEG'er
Those are actually two transparent layers with a paper back. To get rid of the shine of the transparency I just hit them all with a few coats of matte clear which had the added bonus of making the blacks richer and keeping the glare down!
AGrayson84
CEG'er
Great idea! I wouldn't have thought that a matte clear-coat would have helped with that. Going to try that next time because the ink comes out looking much more consistent on the transparency versus the regular paper. I might have to add a 4th layer to block out the extra light I'm going to add. Might try transparency/paper/paper/transparency and see how that goes. Should be less messy peeling a transparency final layer from the cluster versus a final layer in paper. If you want, I'll let you know how it goes!
AGrayson84
CEG'er
Anyone else get tired of deciding you want to get in your trunk, having to walk back to the front of the car, open the driver's door, and pull the manual trunk release, and then walk back to the trunk when you don't have your keyless entry remote in your pocket to pop the trunk? Happens to me often enough.
I planned this out a few weeks ago, ordered a nice, flush momentary switch, and got around to wiring up the relays and everything yesterday. Sorry for the crappy cell phone pics.


I wired this switch up so that it will only unlock the trunk if the vehicle is unlocked (doesn't matter whether you lock/unlock it with the keyless remote or the button on the front doors). Once you lock the car, power is no longer going to the switch in order to pop the electronic trunk latch mechanism. This was done via 2 relays and a diode, wired to the wiring at the factory keyless entry module (thanks to forum member j-ritt99 for the schematic for the keyless entry!). The switch is a black, aluminum switch that I got on EBay. Nice and flush. You can't even see it when at eye-level with where it's mounted... you have to be at license-plate level (below the switch) to see it.
My original rear reflector panel was drilled for a backup camera system by the previous owner. All holes were left open, and this switch happened to fit right in there. I plugged the other 3 smaller holes with silicone for now, but have an un-molested reflector panel that I received recently (thanks contour_r_us!) where I will be drilling only one hole from the switch, centering it a little better between both license plate lamp lenses.
Works like a charm though, and no security concerns since, again, the trunk cannot be opened externally via this switch if the car is locked. Next electrical project will likely be an express open and close relay setup for the moonroof, change all incandescent bulbs for LEDs, and that's probably all for now until I order a Viper alarm/remote start for it. I already tied the power sunroof and power windows to the Accessory circuit, and wired the Accessory circuit so it stays on after shutting the car off until the driver's door opens. Getting this 16-year-old car up-to-date.
-Andrew
I planned this out a few weeks ago, ordered a nice, flush momentary switch, and got around to wiring up the relays and everything yesterday. Sorry for the crappy cell phone pics.


I wired this switch up so that it will only unlock the trunk if the vehicle is unlocked (doesn't matter whether you lock/unlock it with the keyless remote or the button on the front doors). Once you lock the car, power is no longer going to the switch in order to pop the electronic trunk latch mechanism. This was done via 2 relays and a diode, wired to the wiring at the factory keyless entry module (thanks to forum member j-ritt99 for the schematic for the keyless entry!). The switch is a black, aluminum switch that I got on EBay. Nice and flush. You can't even see it when at eye-level with where it's mounted... you have to be at license-plate level (below the switch) to see it.
My original rear reflector panel was drilled for a backup camera system by the previous owner. All holes were left open, and this switch happened to fit right in there. I plugged the other 3 smaller holes with silicone for now, but have an un-molested reflector panel that I received recently (thanks contour_r_us!) where I will be drilling only one hole from the switch, centering it a little better between both license plate lamp lenses.
Works like a charm though, and no security concerns since, again, the trunk cannot be opened externally via this switch if the car is locked. Next electrical project will likely be an express open and close relay setup for the moonroof, change all incandescent bulbs for LEDs, and that's probably all for now until I order a Viper alarm/remote start for it. I already tied the power sunroof and power windows to the Accessory circuit, and wired the Accessory circuit so it stays on after shutting the car off until the driver's door opens. Getting this 16-year-old car up-to-date.
-Andrew
Shoulda made it a motion-activated switch under the bumper lol
AGrayson84
CEG'er
j-ritt99
CEG'er
Ahhhh that is a great mod! Much like some newer cars have from the factory. Im glad i could help!
AGrayson84
CEG'er
Yeah I noticed how handy it was on the company car and decided I needed it on the Contour. Thanks again for the help with the schematic!!!
formulad3
CEG'er
i installed new moog problem solver ball joints, next is moog p/s tie rod ends.
hoping to have it ready for the tuner by end of may. big, big car show coming up in the
wisconsin dells tourist town. called automotion. amazing car show. come up guys, great time.
oh, and if i ever find an lsd i would like to install one b4 the tune.
have a great day
hoping to have it ready for the tuner by end of may. big, big car show coming up in the
wisconsin dells tourist town. called automotion. amazing car show. come up guys, great time.
oh, and if i ever find an lsd i would like to install one b4 the tune.
have a great day
Replaced the serpentine belt to get rid of an odd squeak... Didn't help. Oh well at least I have a new belt now lol. I also lined up the rear sway bar bushing to get rid of some creaking when cold.
formulad3
CEG'er
Installed a fresh set of autolite xp104
Enjoyed this beautiful day and spent some time cleaning under the hood a bit. Still a long ways to go but it's getting there one little step at a time!
Trimmed one coil on BG springs, Brembo blanks in front, new pads all around and flushed the brakes, oil change. Some parts came in the mail. Headlights to restore, window motor, map light and cover, coolant reservoir. Still dirty.
formulad3
CEG'er
started to install my 3 gauge pillar pod and gauges.
vac/boost gauge
fuel pressure gauge
wideband o2 gauge
very nice!
vac/boost gauge
fuel pressure gauge
wideband o2 gauge
very nice!
Last edited:
Installed a high flow cat. Also got my pre cats hollowed out and welded up the hole. Much better sound now!


