• Welcome to the Contour Enthusiasts Group, the best resource for the Ford Contour and Mercury Mystique.

    You can register to join the community.

"Getting my svt looking great again" log

even factory scoops, vents, and spoilers arent always functional. but you do get a bonus if you make it actually functional. not just by cutting a hole in the hood lol make some sort of ducting to the intake!
 
nakayamarsx518inch.jpg

I hate it when people post that car.
 
got some older sails
imgp3923s.jpg


painted the spoiler, i hung it from a tree lol. just have to wetsand the clearcoat and mount it. i also put alittle tint on the 3rd brake light (not shown).
imgp3907.jpg

imgp3910x.jpg


gettin the bumper back in good health, i sanded it down and im primering it tomorrow and hopefully painting it in the next few weeks with my dads spray gun.
imgp3921.jpg


getting the scoop in the right spot was mad annoying, took 3-4 hours. trial and error measuring, i finally got it and measured from random spots to the scoop and from everywhere its within less than an 8th of an inch on each side. then drilling the holes was fun with a wood drill bit that was smaller than the scoop's screws, and cutting away stuff under the hood with a pliers so i could fit the nuts in. whatever i got it :p

imgp3913.jpg

imgp3926.jpg


only problem is, i couldnt sand the scoop down to make it fit cause i wouldve had to cut off the screws. so im thinking about making a mold out of resin and gluing it in and then putting more fiberglass and resin over top. any better ideas?
imgp3929b.jpg
 
No to the fiberglass. Bondo might be a better plan but it could easliy crack from any flex in the hood..

You should cut a hole for the hood scoop. The air would be directed right at the UIM which would keep it cool? That or just keep the underhood temps down in general.
 
you could make a mold out of fiberglass but it most likely will crack.. even with temperature changes you're risking cracking.

and evercoat sells a flexible body filler

i'll leave it to the experts for advice

I hate it when people post that car.
inspiration sure does suck doesn't it :rolleyes: get over it
 
+1 for the scoop. We dont all want to drive around in Eggplant. (although I do love it :) )


Hahaha, just caught this.....


Anywho, adding the scoop was something you just didn't need to worry about just yet. You should focus on the main parts of the car first. Progress is good though.
 
only problem is, i couldnt sand the scoop down to make it fit cause i wouldve had to cut off the screws. so im thinking about making a mold out of resin and gluing it in and then putting more fiberglass and resin over top. any better ideas?

Kerfs. You cut multiple straight cuts at 90 degrees to the edge. Then it will curve to fit the surface. Then you glass over your cuts on the outside. Remove scoop. Glass the inside, smooth and paint. You might have to elongate your holes just a tad. Because once the scoop is curved, it will move the bolts inward some due to the radius of the curve.

Here's what I'm talking about, done with wood. Same concept.
564d1174357433-cutting-kerfs-curve-wood-dsc00547.jpg
 

Attachments

  • 564d1174357433-cutting-kerfs-curve-wood-dsc00547..jpg
    564d1174357433-cutting-kerfs-curve-wood-dsc00547..jpg
    15.7 KB · Views: 0
Kerfs. You cut multiple straight cuts at 90 degrees to the edge. Then it will curve to fit the surface. Then you glass over your cuts on the outside. Remove scoop. Glass the inside, smooth and paint. You might have to elongate your holes just a tad. Because once the scoop is curved, it will move the bolts inward some due to the radius of the curve.

Here's what I'm talking about, done with wood. Same concept.
564d1174357433-cutting-kerfs-curve-wood-dsc00547.jpg
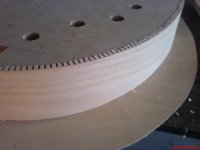
well the thing is, the screws are on the scoop, not just holes. so to cut down the scoop id have to cut off the screws too.
Hahaha, just caught this.....


Anywho, adding the scoop was something you just didn't need to worry about just yet. You should focus on the main parts of the car first. Progress is good though.
the hood was one of the mainest parts IMO. mechanically the car is 100% and i had to paint the hood either way. had some scratches and stone chips. so i figured i better just throw the scoop on it
No to the fiberglass. Bondo might be a better plan but it could easliy crack from any flex in the hood..

You should cut a hole for the hood scoop. The air would be directed right at the UIM which would keep it cool? That or just keep the underhood temps down in general.

i dont understand how bondo will work? or do you mean put in the resin molds like i was saying and then fill the rest with bondo?

and yes ill be cutting a hole in the hood for now, ill be doing some ducting to the intake down the road

p.s. heres a new pic (bad cell pic) of the bumper all fixed up, sanded, and primered, ready to paint. as soon as i get this hood scoop problem remedied, the bumper and hood will be painted and thats just about all the svt needs yet. the rest can be done in like a day
mail
 
my friend just suggested bondo too. i dont understand how thatll work? how does the bondo stay? its just a hole. nothings there to stop it, if you keep pushing the bondo, itll keep going under the scoop.

?
 
Just say no to the bondo. Either my suggestion or 3xzsucof's are the best bet.

The kerf method is easily doable with that scoop. Looking back at the picture, you've got three bolts across the back of the scoop, and one more on each leading corner. The three bolts in the back will remain exactly as they are. Press the back of the scoop flush with the hood and see where the hood starts to curve away from the scoop. Mark a spot on each side a couple of inches rearward from there on the scoop. Then press the front corners down and see where the hood starts to curve away towards the rear. Mark a spot a couple of inches FORWARD of that curve on each side. Depending on the distance between your front and back marks, you'll divide that distance evenly and make marks for each cut. You'll make your kerfs between those two marks, cutting perpindicular to the edge, up to within a 1/4 inch or so of the bend over to the top of the scoop. You want the top of the scoop to bend easily without distortion. That will leave you with a bunch of little flaps. Secure the rear bolts, then curve the scoop into place. If your front bolt holes will not allow the scoop to curve smoothly down and meet the hood, then you'll need to elongate the two front holes towards the rear with a Dremel. Just grind out a little bit of material at a time. Say 1/16" at a time. Remember, it's always easier to take more out than to put it back. Keep refitting the scoop and massaging the bolt holes on the hood until the scoop meets the hood smoothly. Secure the front bolts. Now the scoop is bolted to the hood with a bunch of slots cut out of the side. Take strips of fiberglass and glass the sides (make sure you put plenty of painter's tape on the hood under the scoop to protect it from the resin). Once you have one layer on each side, you can remove the scoop. Glass the inside and outside until you're satisfied with the strength and stability of the sides. Fill, sand, primer, and paint. It's not complicated, but it is labor intensive.

Otherwise, scribe the curve from the hood to the scoop, and sand away the excess. If I did it this way, I would try and split the gap evenly between the front bolts and back bolts. That way you keep it as even as possible and don't risk having to mess with your holes.

Trying to fill that gap with Bondo alone is a recipe for disaster. It will not support itself, especially on a part that is subject to as much vibration and shock as the hood. You need to CLOSE the gap, not fill it.
 
Last edited:
thanks man, i didnt use a kerf but i just sanded for awhile. and i actually needed to drill a longer hole in the one spot (i just drilled through the top of the hood, no the underside "support" thing, since i wasnt gonna bolt up that screw), so the one screw wasnt going down the whole way lol, im an idiot. so with just alittle sanding it fit perfect except the back is up a tiny but, but im not worried about it.

imgp3944.jpg

imgp3948.jpg


figured id do some eyelids, why not, just gotta clearcoat em yet
imgp3946.jpg


got a new resonator, i read alot about them here, heard they sounded pretty awesome
imgp3947z.jpg


bumpers ready for paint too, should be painting the hood and bumper sometime next week hopefully
imgp3931v.jpg


anybody know what "Jet" black is? is it like a universal SVT black? i found this "Paint shop" duplicolor paint at advanced auto for like $22 a quart, and the clear is also 22. they have normal colors, but their black is called "jet black." thatll save me like $80 on paint. can anyone chime in? should it match?
 
yup hes admiring it lol. im hoping to paint it wednesday if its nice, or thursday. i need 2 nice days in a row, one for the base and one for the clear. anyone have any input on my "jet black" delima? i wanna make absoloutly sure itll match the svt black before i buy it and paint it
 
i would just match color code. maybe its just me but if something is worth doing...its worth doing right. but i do understand that budget doesn't always help sticking to that. progress is coming along great! looking forward to seeing the hood painted and on...need that before i pass judgement.


hate to jack your thread but just curious...what bumper was that on the car posted on the second page with the multitude of colors?
 
Back
Top