• Welcome to the Contour Enthusiasts Group, the best resource for the Ford Contour and Mercury Mystique.

    You can register to join the community.

IC: Rear Strut Tower Bar

Status
Not open for further replies.
hey Mike... looks good! If you haven't already, make sure you check the amount of room in the strut tower. When I went from stock springs to H&R springs, I had to shorten the bolts to only 1/4" with Bradness's RSTB... and just got it welded in shortly after. The H&R (and probably all aftermarket springs) were too wide, so the bolts were hitting the springs.
 
hey Mike... looks good! If you haven't already, make sure you check the amount of room in the strut tower. When I went from stock springs to H&R springs, I had to shorten the bolts to only 1/4" with Bradness's RSTB... and just got it welded in shortly after. The H&R (and probably all aftermarket springs) were too wide, so the bolts were hitting the springs.

Won't be a problem.

Also here are the brackets powder coated.

bracketpc1.jpg


bracketpc3.jpg
 
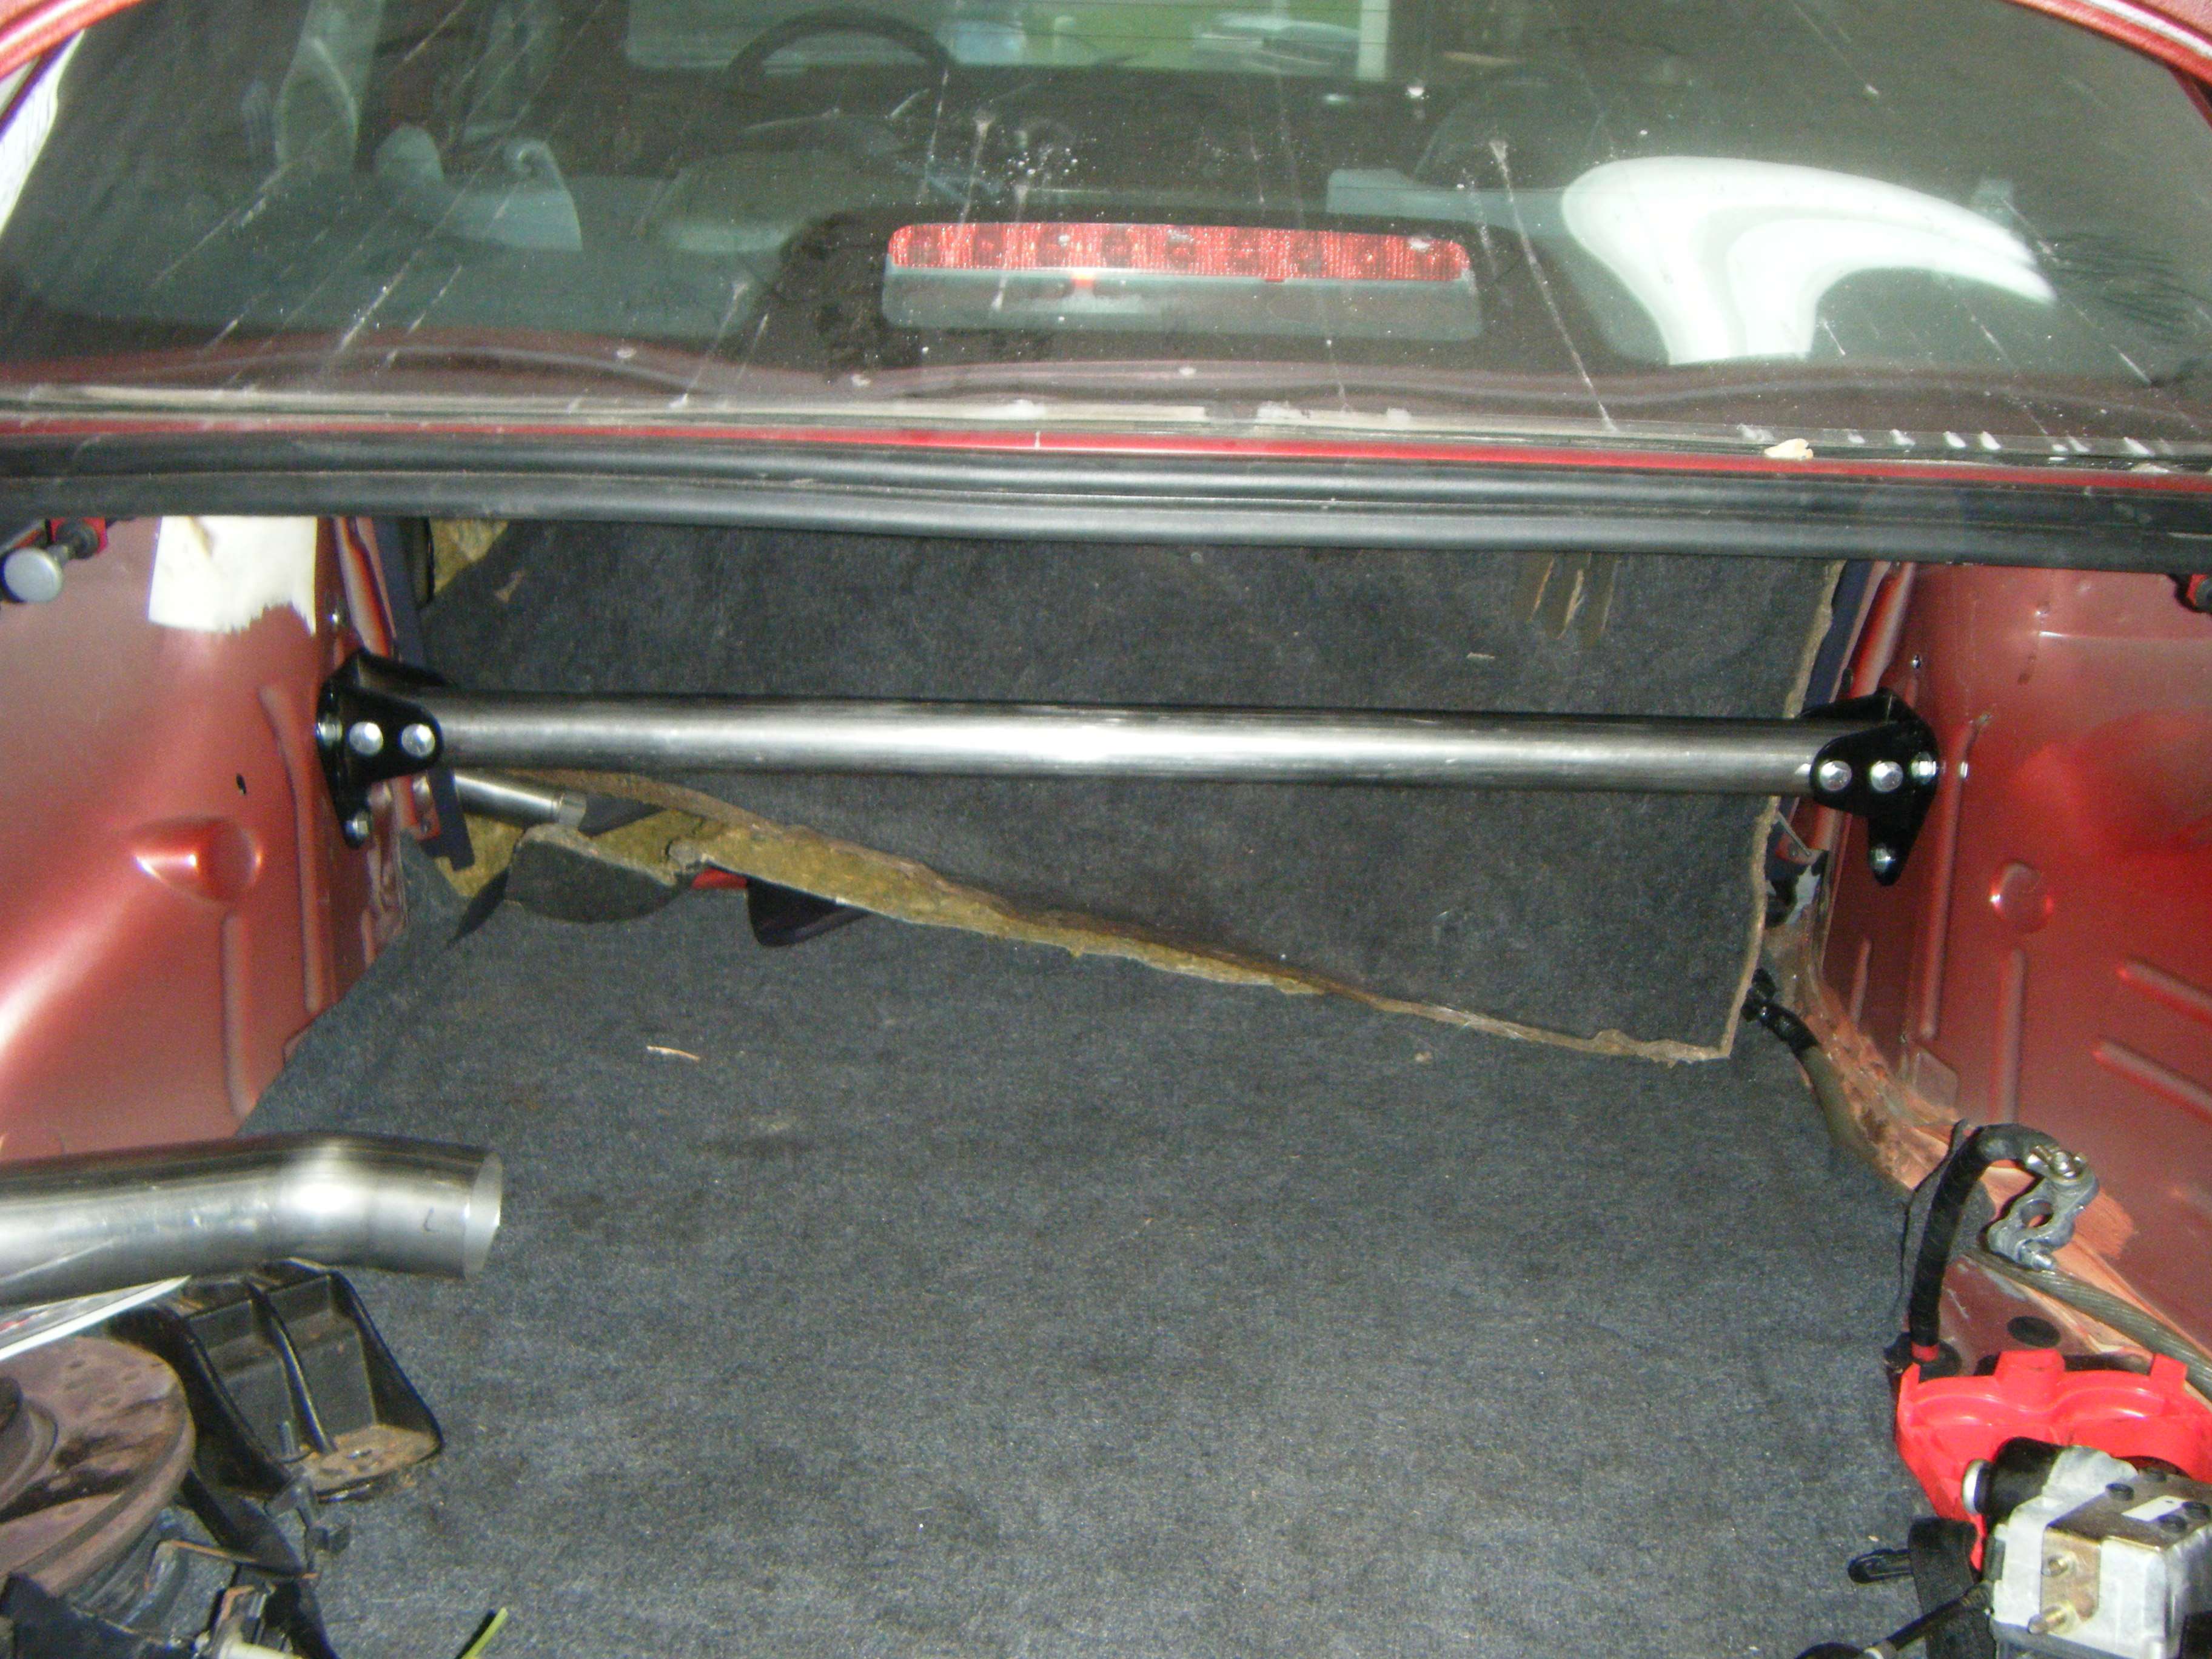
Installation pics. This is the first prototype so I want to run a few tests, but so far it's working out really well. I'm a little concerned with the clearance to the spring in the wheel well, as it is tighter then I had planned. However the inner fender brackets are not production intent and I believe the clearance will be better. Prototype number two will be production intent.

drillmarks.jpg


brackt2.jpg


bracketinstalled.jpg


rstbinstalled.jpg
 
the bar looks really nice, I know it's early but do you have a some kind of price range for a final product?

what's your review on it so far? Can you feel a difference?

Why are the plans for the next prototype? What about just welding it in?
 
the bar looks really nice, I know it's early but do you have a some kind of price range for a final product?

what's your review on it so far? Can you feel a difference?

Why are the plans for the next prototype? What about just welding it in?

I'm targeting between $150-210. It would be more on the higher end if I provide it fully painted. I've been thinking of offering the cross brace painted in Silver, T-Red, Black, or green to match the paint work of the car. Because paint is fairly expensive (T-red the worst is going to run me $95 for a pint) I'd have to up the price to accommodate this. Black would probably be the standard as it is a lower cost with the other colors available at a slightly higher cost. The other option is shipping the RSTB with the hardware, powder coated brackets (mirror black), and the cross bar in bare steel or primer at a reduced cost. This would put the painting in the hands of the buyer and helping bring the cost to a minimum. Also the other option I've been pursuing, to assist in turn around time, is having a third party weld the bracket assemblies. Hope that helps. I think I will present all of these as options to be honest when I got to production. Something like bare steel +$0, black +$20, t-red, silver, green +$30. However again this is all ball park because I haven't priced paint lately.

As for reviews, that is to come. I plan on sending out this prototype and the second one to CEG'ers to install and test to gain opinions and to determine whether any changes are necessary to the design. My car as you may know doesn't have an engine, transmission, or interior, and is not driveable ;)

Next prototype is not really a prototype, but a prove design (PD) unit. This means that it is all production intent and built with production intent parts. In reality it is not very different from the first prototype except for a slight change in the inner fender bracket. I opted for this design because of the following:

1 - Uses OEM stampings for orientation leaving out guess work.
2 - Only modification's to install is the drilling of 4 holes (no welding, since not everyone has access to a welder)
3 - Installation to the average person can be completed in ~20min. (Only need to jack up the car in the rear corners to lift the suspension up to allow access above the tire, no need to take the car off the ground)
 
I like the idea of the bracket... that should help reinforce the weak towers. For the spring clearance, you could weld countersunk bolts in the bracket, then use nuts from inside the trunk. That would save a lot of space, as well as making it easier to install. The bolts would hold the bracket in place while you attach the bar... making it a single person job. Though... there may not be enough room for that. Just a thought though...
 
I like the idea of the bracket... that should help reinforce the weak towers. For the spring clearance, you could weld countersunk bolts in the bracket, then use nuts from inside the trunk. That would save a lot of space, as well as making it easier to install. The bolts would hold the bracket in place while you attach the bar... making it a single person job. Though... there may not be enough room for that. Just a thought though...

I came up with a design change for it already actually... sucks since I already drilled holes in my car to figure it out though.

I'm going to change the bracket so that the mounting points are on the sides rather then on the top and bottom. This will reposition the bolts to the outside edges of the spring where there is a lot more clearance. However it is going to make the bracket quite wide, because the bolts will need to be on the outside of the cross brace. However as long as the bolts stay within the flat surface and away from the other stampings there I should be fine.

Also I already have a method down, which makes it a single person job. Although I'm not so sure it will work as well with the design change. I had my wife help me with the installation of one side, but because she complained about it the entire time when I was ready to do the other side I put a little more thought into it. I threaded a bolt in backwards on the top hole of the bracket then, from the wheel well side, I placed the bracket up into place putting the bolt through the hole and resting the bracket on the outward stamping. Then on the inside of the trunk I took the longer 3" bolts for the cross brace and stuck it through the hole and got it threaded into the bottom weld nut. I then pulled the bracket into place, unthreaded the 3" bolt and started the 3/4" bolt in it's place tightening it to retain the bracket in position. I then went out to the wheel well and unthreaded the top bolt and continued on the inside of the trunk bolting up the other side of the bracket. No wife needed ;) ... and she appreciated it :laugh:
 
Alright guys I've redesigned the mounting. I'm working on mockups, but I'm certain this will make for a better installation. Should have something in the iron soon to show off. Then I can start having people put some test miles on these and hopefully have these ready to go in a few weeks.
 
Just an update. The revised brackets should be arriving at my house today. I should have everything welded up, powder coated, and installed by Sunday night. I'm also going to follow up with my paint supplier to see what my pricing will be on the various paint options. However again I plan to offer unpainted at a cost reduction so that you guys can paint it whatever color you want. After this I'm going to go ahead and start the official GB thread. I'd be looking to get a 30% deposit by May 13th. With balance due by May 27th. I'd be shipping all parts out that following weekend.
 
Still waiting for an angled bar version to clear my sub box :cool:
 
Alright it's been a while without an update. I apologize as I've been busy with a few of my friends having the big 3-0 b-day parties and some rugged weeks at work (supporting the assembly of the initial prototype machines we've been working on designing :cool:)... anyway I powder coated the new brackets last night. Looking to have everything installed Sunday morning/afternoon before I head off for a mother's day dinner at my folks place.

I will be sending this first one down to gomach1 to install and test drive next week and will also start an official GB with finalized options and pricing. The bent version will follow shortly after this GB, but will cost a little more because of the extra fabrication costs associated with the mandrel bending (yet to be determined).
 
The bent version will follow shortly after this GB, but will cost a little more because of the extra fabrication costs associated with the mandrel bending (yet to be determined).

I'll be ordering 2 as long as it follows the lines of the one I posted!
 
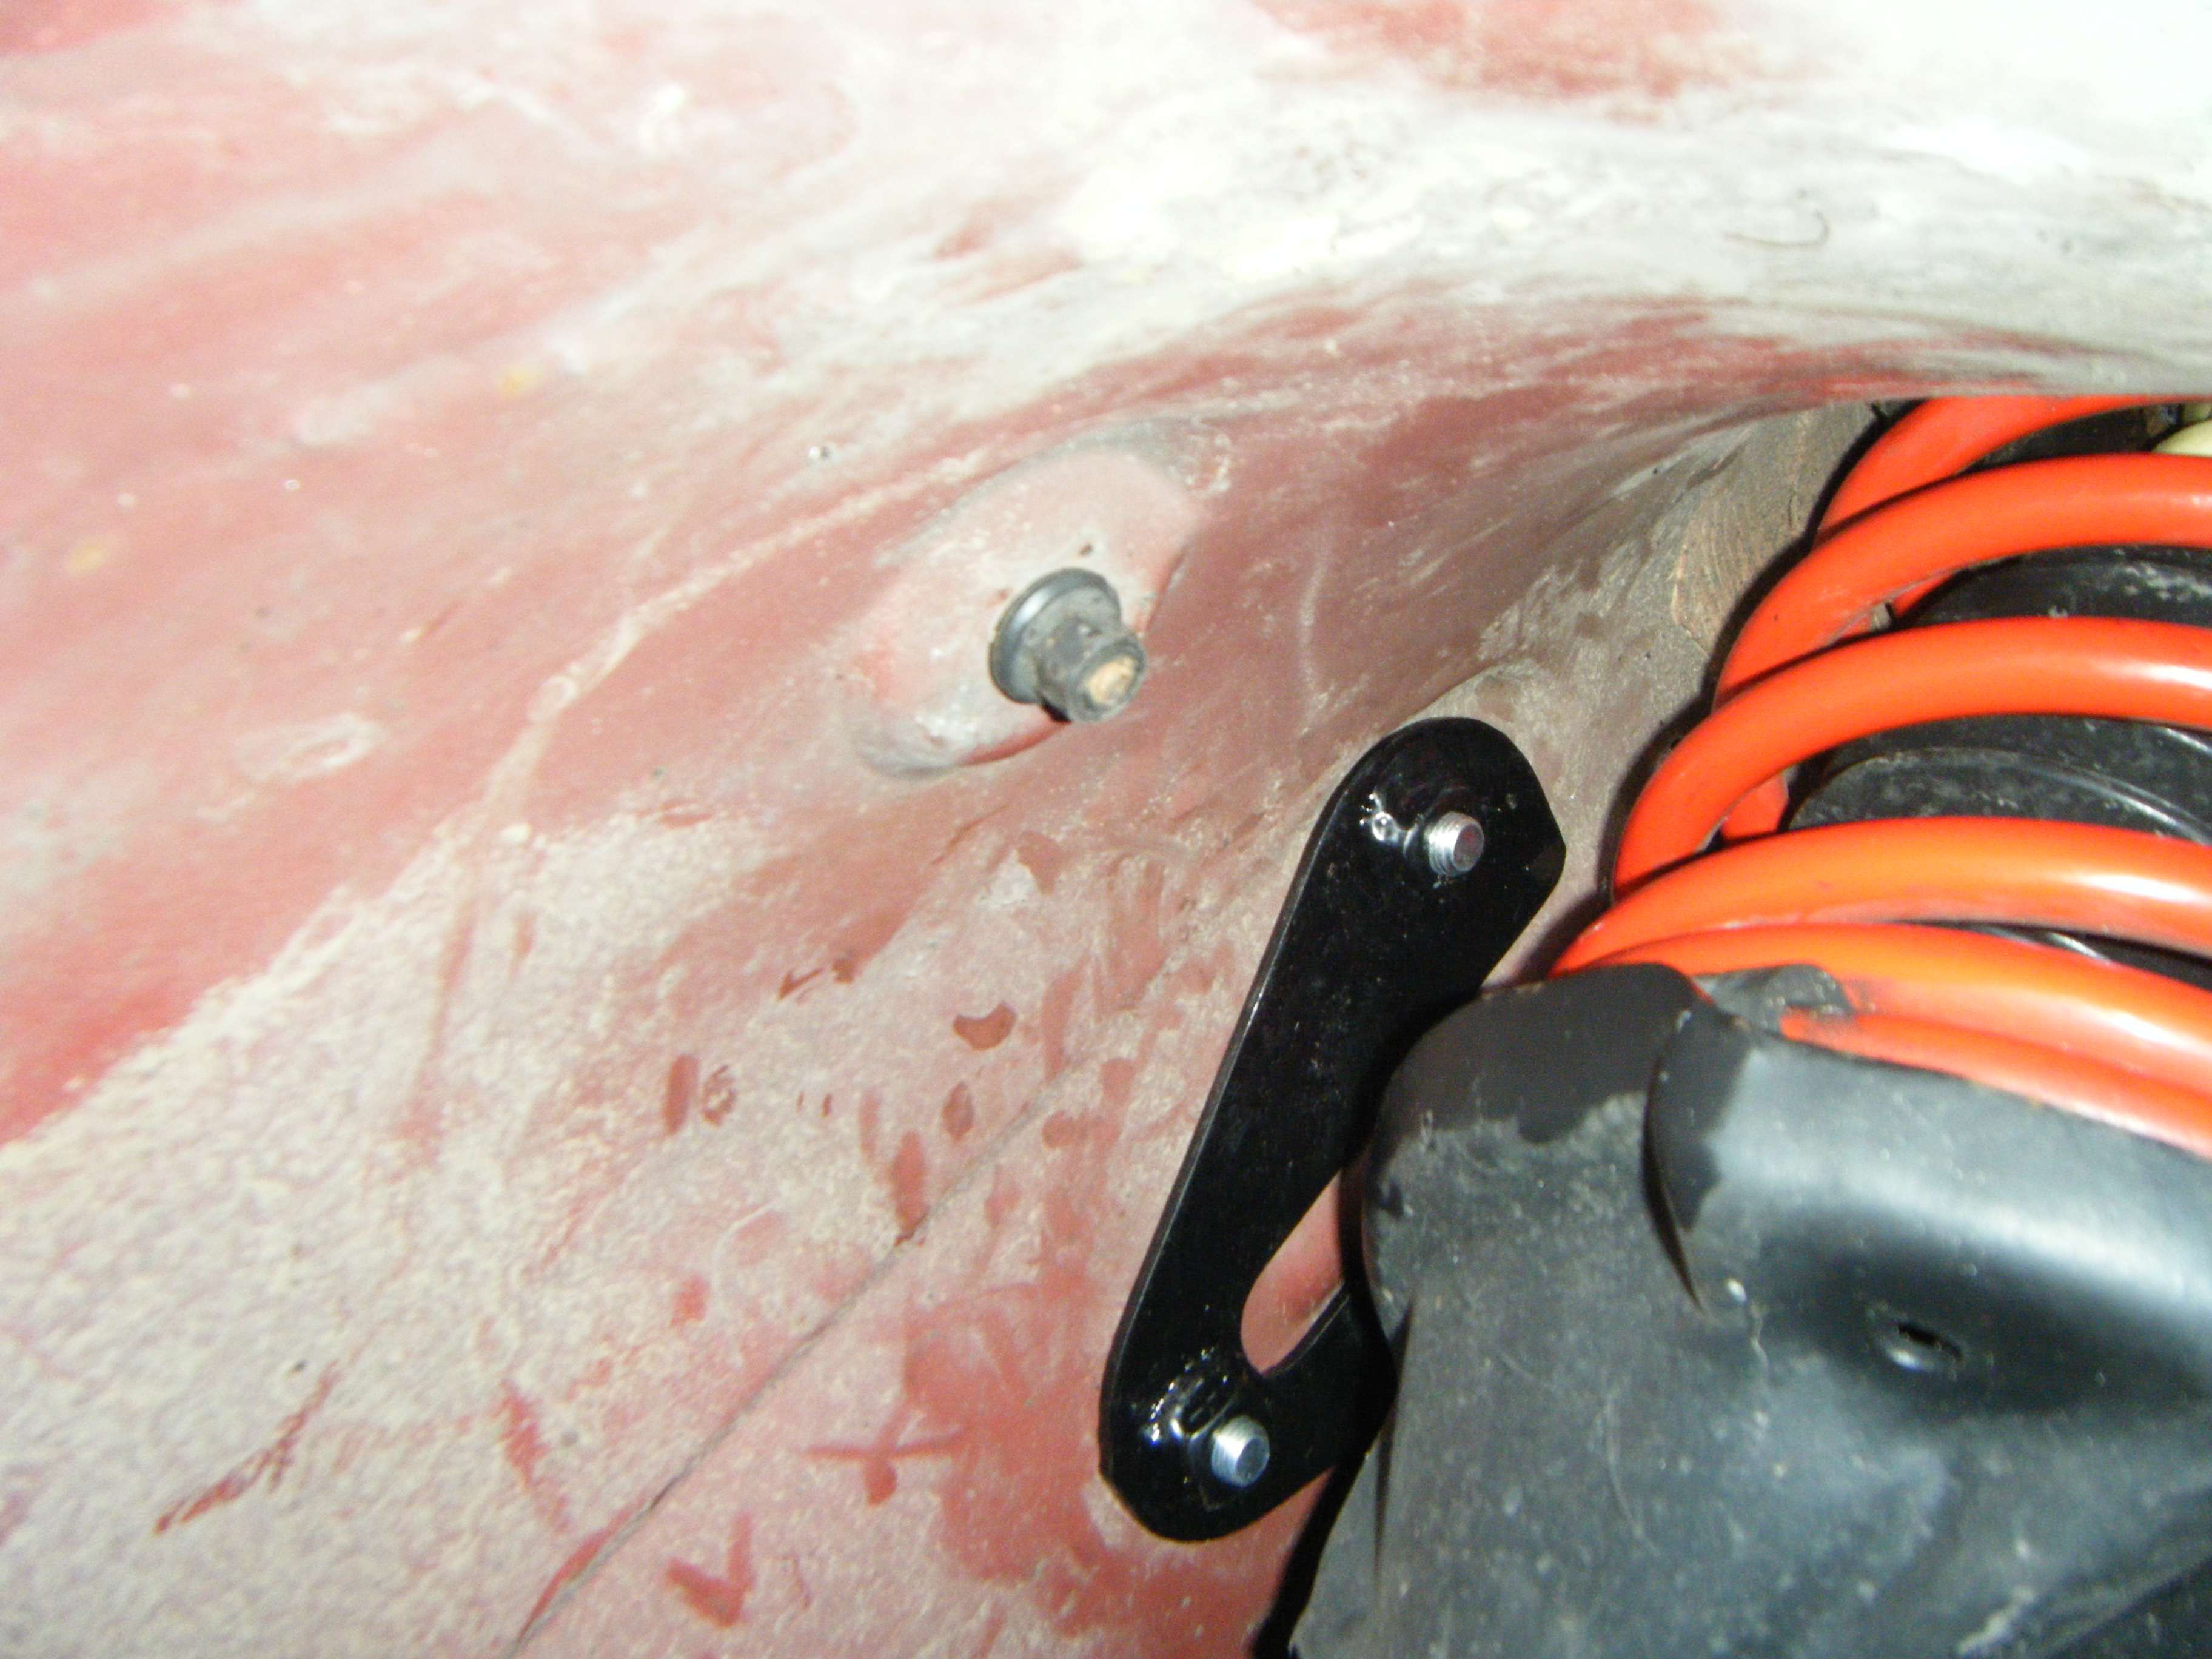
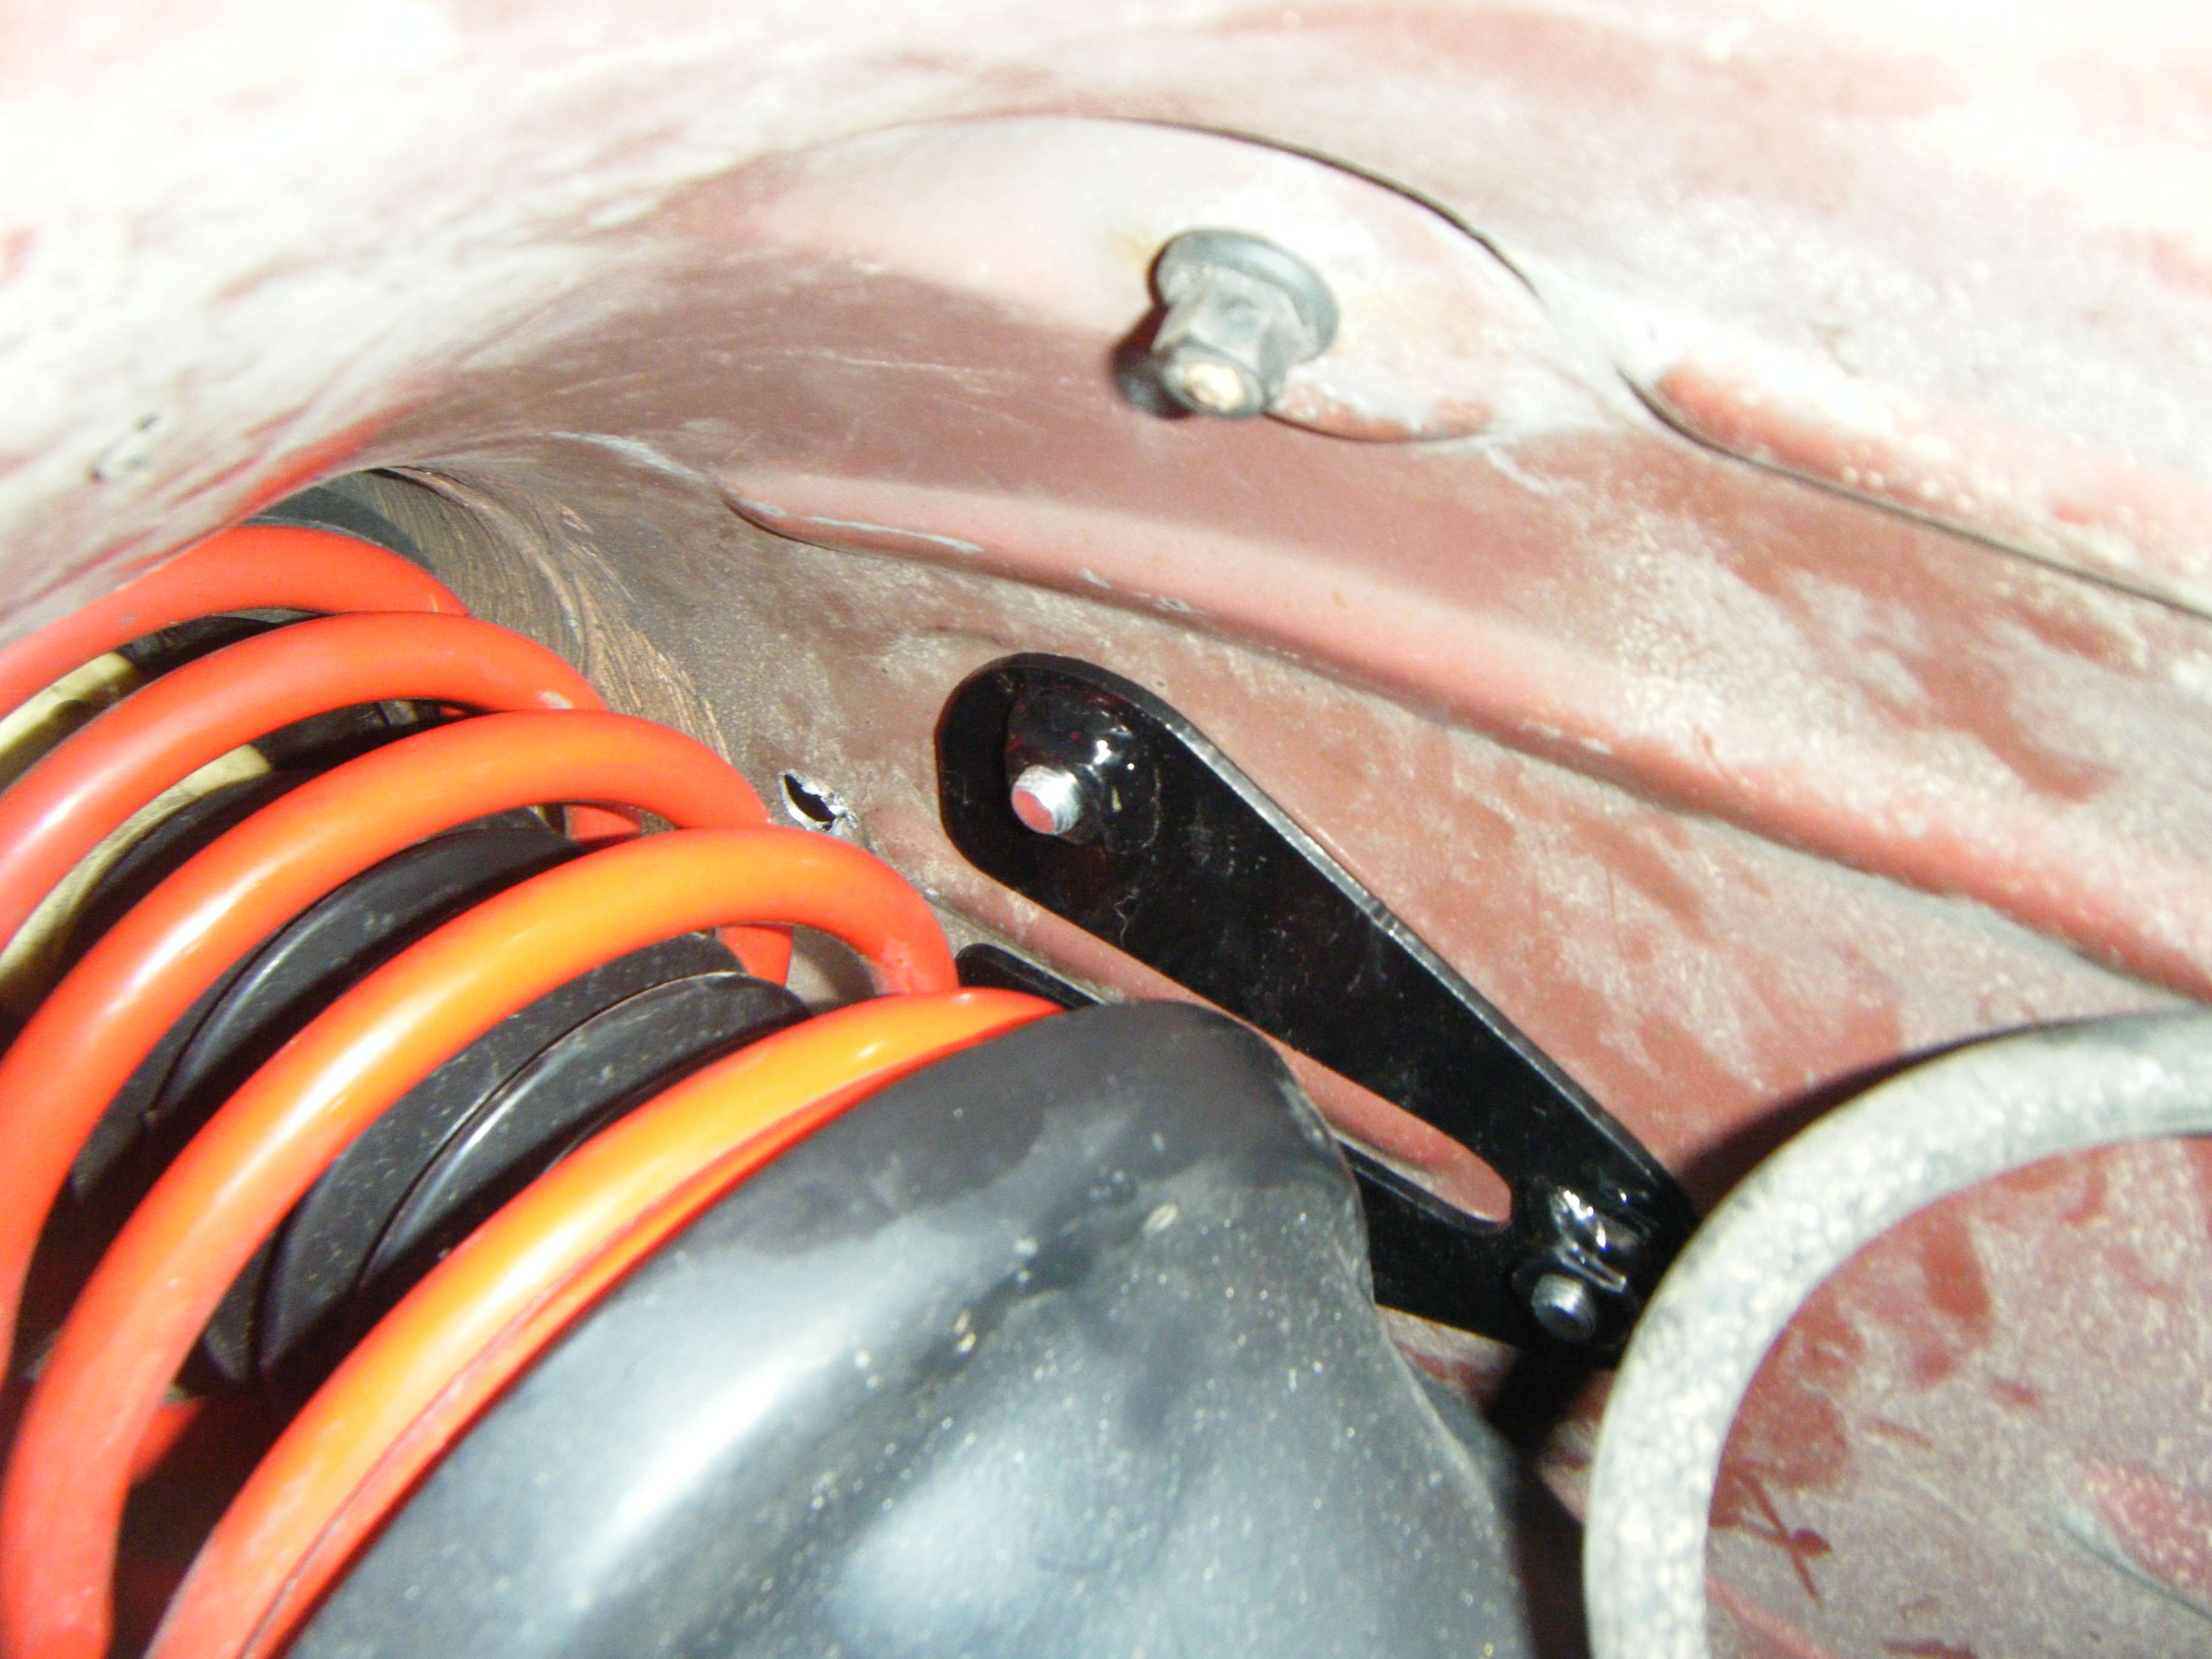
Alright here is the final install of the updated bracket design. Plenty of clearance in the wheel wells with the coil springs. I'm going to get final pricing on the brackets and then I'll start up an official GB.

clearance1.jpg

clearance2.jpg

bracketinstall.jpg

rstbcompleteinstall.jpg
 
Official GB thread started with better pricing then previously mentioned. I broke out some options for powder coating and paint matching the cross brace to get the price down. I'm still sending gomach1 the second prototype for a test run and review, but figured I'd get the GB out there and get the list going for the production build.

New thread is located here
 
Status
Not open for further replies.
Back
Top