• Welcome to the Contour Enthusiasts Group, the best resource for the Ford Contour and Mercury Mystique.

    You can register to join the community.

2.5L Track Death: The Chronicle of #2072's 3L Swap

Haha yeah, I have a friend who works for a local race fab shop with a JEGS account, so I was going to get it through him. When he got back to me saying the discount was nothing for that diff, I called customer service to order it retail and was informed they had recently depleted the remaining inventory. :blackeye:

I take it from your username you're a fan of Mid-Ohio? I've had the SVT there twice, love it!
 
I ordered the diff bearings and probably one of the last new MTX-75 Torsens in the country through Steve at Tousley today. He couldn't do any better than the discounted website pricing, but you need to take what you can find now. Anyone who's interested in doing this upgrade in the near future should probably act quickly, as he said he had five remaining before I claimed one.

With the money I saved versus the Quaife I also ordered the Fidanza flywheel through ultrarev. Expensive day...
 
No, just from central OH or Mid OH as alot of people call it haha. Never been to midohio myself but plan on it next year i hope.

What did you put down for the Fidanza ?
I havent checked prices lately but last i knew clutchflywheel.com was the cheapest at $296.76 with free shipping.

Edit: looks like you over paid by a few bucks lol.

Im only just over an hour from you so if you need a hand with anything or some company playin car drop me a PM.
 
It’s been a long time since my last update before the whole site outage debacle. Since the site has come back and been stable I haven’t been that motivated to post since I haven’t made a tremendous amount of visible progress. Just prior to the first outage, I took this video as promised showing the actual spun bearing, #1, but just now uploaded it:


On the mechanical side, I got the transmission “rebuild” done, consisting of a teardown to the bare case with a hot tank and media blast to the exterior and reassembly with the Torsen LSD, new throwout bearing, and new axle seals. The endplay measurements without the shim showed that the original shim could be reused, so I sealed up everything with anaerobic sealant and threw a plastic bag over it, where it remains today.

402642_10100360130178046_1526239_48967339_1439551865_n.jpg


2012-02-12_16-10-45_859.jpg


In the interior, I removed the dash and steering column to get the firewall sound deadening out (13 lb!) and have scraped up most of the melt sheet (another 8 lb so far, with two sheets left to do).

A couple weeks ago, I was browsing for a mate to the Sparco seat I picked up cheap from a friend a couple years ago and have been using in the driver’s position ever since. I’d been keeping an eye out for a matching one in the used market or closeout since buying the first, and finally OGRacing came through and had a brand new FIA 2008 to unload for cheap, in red! Since I hadn’t touched the SVT in a while, I had to sit the seats back inside for some inspiration…

412479_10100439703317836_3779046_o.jpg


This past weekend I degreased the engine bay. First, I had to temporarily throw the front suspension back on to roll it out of the garage, and while it was going to be outside, I also gave it a wash since it was still caked in mud from its final track day (including one “off” into a muddy ditch). Since I had suspicions that the sideskirts were collecting dirt inside, I pulled them off and sure enough, there had to be several pounds of accumulated dirt in each of them! I’ll be drilling a couple extra holes in their undersides for improved drainage before reinstallation… Anyway, as for the engine bay, it wasn’t all that terrible except for under the power steering reservoir and down the passenger side framerail. I started with some aerosol gel engine degreaser I had remaining in a can, which didn’t last long. I was underwhelmed with its performance. Before going out to pick up some more, I decided to try a 1:1 solution of Simple Green with a nylon bristle brush and it worked like magic. Here is the end result:

459634_10100478457658826_1526239_49497752_290694200_o.jpg
459634_10100478457658826_290694200_o.jpg


This weekend, hopefully I’ll make some progress cleaning up the remaining residue from the melt sheet and get the dash reinstalled so all the ignition wiring is ready to go when an engine goes in. Ironically the engine is the ultimate reason for this project but will be the last thing I’m worried about.
 
after about 4 minutes of starring at the pic of your transmission my fiance finally asked wth i was looking at...thats minty.

i hope to have my engine bay looking that clean after my swap this weekend.
 
I haven't been updating or visiting the site much due to all the outages, but I'm still crawling forward on the swap. I'll make a more complete update eventually, but in short I have a 2005 Mazda Tribute engine that I'm preparing to install.

Question regarding fuel rail: In my reading preparing for the swap it seemed like the NPG adapter made the return-to-returnless swap plug and play, so I didn't anticipate the Escape rail running through the 2.5L engine bracket. Now going back and searching some more, I see a couple references to shortening the end of the Escape rail and brazing the original cap back on. I'd just like to confirm that the device on the end of the Escape rail is the pressure regulator, it is ok to cut it off since I'm using the NPG adapter with the 2.5L regulator, and there is no other alternative if I want to use the 3L injectors. Thanks!
 
I Question regarding fuel rail: In my reading preparing for the swap it seemed like the NPG adapter made the return-to-returnless swap plug and play, so I didn't anticipate the Escape rail running through the 2.5L engine bracket. Now going back and searching some more, I see a couple references to shortening the end of the Escape rail and brazing the original cap back on. I'd just like to confirm that the device on the end of the Escape rail is the pressure regulator, it is ok to cut it off since I'm using the NPG adapter with the 2.5L regulator, and there is no other alternative if I want to use the 3L injectors. Thanks!

I have an 06 Escape rail and yes you must cut it to fit, the sensor on the end can be removed without issue, there is nowhere for it to plug into the Contour harness and your existing pressure regulator does the job with the NPG adapter.

Also in regards to the rail, be careful when cutting the end off, inside the rail I used there was a metal tube suspended in the center. It can slide out when the rail is cut open, but just be expecting something to be inside the rail.
 
Thanks, I actually saw your thread about that when I was searching. Regarding that piece, how far down the rail does it extend? Do I have to worry about where to cut off the rail before I risk actually cutting into that separator? Or is it short enough that I won't cut through it and just have to be careful about it not falling out. Appreciate the help.
 
Since you seem to do a lot of "tracking" in your Contour, are you planning to do anything special to ensure that you get good oil supply to the engine? Any extra oil pan baffling, certain oil pan you're looking for, certain oil pickup you're looking for, or any internal mods for oil supply?

In case you haven't seen my build thread, I'm also looking to build track-friendly 3L. I'm a little earlier in the process though.
 
Thanks, I actually saw your thread about that when I was searching. Regarding that piece, how far down the rail does it extend? Do I have to worry about where to cut off the rail before I risk actually cutting into that separator? Or is it short enough that I won't cut through it and just have to be careful about it not falling out. Appreciate the help.

I pretty much have all the pictures you need in the thread I created on brazing the fuel rail, HERE

I actually decided against putting the divider back in the rail when I brazed it shut. I kind of actually wish I put an AN port on the other end of the fuel rail to acutally run the Aeromotive fuel regulator the way it was meant to be too... but oh well. Those pics should help a lot though. Good luck.

Also FYI you will need to cut the fuel rail down more then I did by about 1/8". When I went to assembly it the rail interfered by just a hair.
 
Last edited:
Thanks, I actually saw your thread about that when I was searching. Regarding that piece, how far down the rail does it extend? Do I have to worry about where to cut off the rail before I risk actually cutting into that separator? Or is it short enough that I won't cut through it and just have to be careful about it not falling out. Appreciate the help.

If I was to do it again I would cut the end off in two pieces, first the very end to remove the piece inside and then another cut to make it clear the mount. Just like CSVT#49 my rail doesn't have that piece now.
 
...are you planning to do anything special to ensure that you get good oil supply to the engine? Any extra oil pan baffling, certain oil pan you're looking for, certain oil pickup you're looking for, or any internal mods for oil supply?

The main thing I'll be doing is checking the oil level and topping off after EVERY session, not just every few. I neglected to do this on the day the bearing spun. When I checked it afterwards, it was slightly low. Although my SVT already had the revised oil pan, I chose to go with the newest SUV motor (Escape/Mariner/Tribute) I could find, partially because of the general forum consensus that they have the "best" pan. I'm considering adding an Accusump as well, but that's on the back burner until I get it together, running, and troubleshot.

I pretty much have all the pictures you need in the thread I created on brazing the fuel rail, HERE

I actually decided against putting the divider back in the rail when I brazed it shut. I kind of actually wish I put an AN port on the other end of the fuel rail to acutally run the Aeromotive fuel regulator the way it was meant to be too... but oh well. Those pics should help a lot though. Good luck.

Also FYI you will need to cut the fuel rail down more then I did by about 1/8". When I went to assembly it the rail interfered by just a hair.

Thanks for your advice!
 
I searched for a while but haven't come across even a mention of using the Escape throttle body, which should maybe tell me the answer...has anyone rigged up the SVT cable to make the Escape throttle body work? I knew the cam was on the opposite side of the housing from the SVT, but I didn't pay attention to the fact it's designed to pull from the back side as well, which is the more difficult obstacle. Of course I already blasted, painted, and optimized it before realizing this, so I'm trying to figure out how I can still use it. Don't care about getting cruise to work, as I wasn't planning to put it back in anyway.
 
Yes you can use the stock svt throttle cable on a 3L throttle body. I may be able to show you a pic of how I got mine hooked up if it ever stops raining.
 
About time for a real update, going all the way back to last May...

When I was still doing interior work and weight reduction, I found a really good example of why I was completely tearing the car down and rebuilding...you just never know with multiple-owner cars. One of the previous owners (or a shop) had bypassed the factory amp, but instead of using a few inches of wiring to do so, they had a 16 foot spool wound up and shoved behind the glove box. So addressing that was good for over a pound.

303457_10100513456725416_1879998317_n.jpg


I rigged up a $10 axle tie-down strap for use as a cheap, simple, and lightweight front tow point:

538125_10100537282837696_430795731_n.jpg


I removed the power steering system, compression-fit the rack lines together, and plugged the valve body (I later completely removed the subframe and rack and cleaned everything):

206163_10100548591016016_1237980988_n.jpg


I had the headers blasted to remove the remains of their old coating, re-coated them, and heat-wrapped them:

479848_10100551466159206_1000792651_n.jpg


I test-fit the new lightweight Motegi wheels and installed the OE-style carbon fiber hood with black-anodized aluminum pins, and I hand-cut some vinyl livery for it:

194144_10100649836409436_1329959341_o.jpg


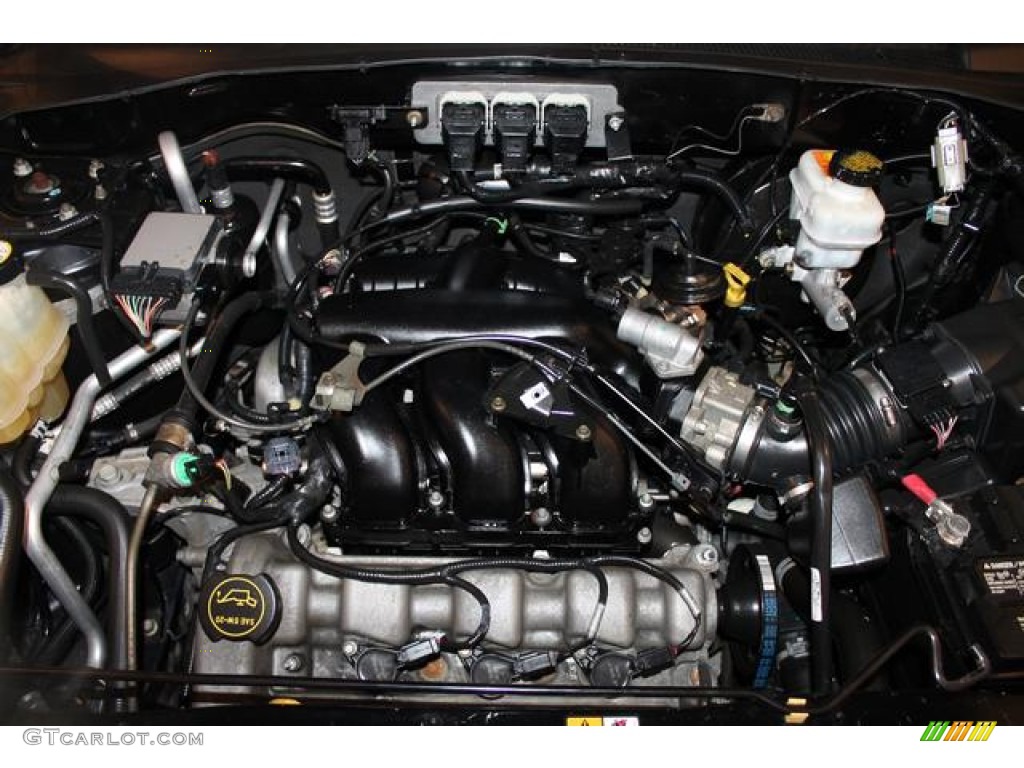
Finally, I actually bought an engine! As I mentioned, it's from a 2005 Mazda Tribute with 39K miles. It looked kind of rough as purchased:

421346_10100662721941726_1979151024_n.jpg


But throw a lot of money and time at something...

65298_10100698450087236_1609114358_n.jpg


...and it cleans up ok!

224174_10100708783259476_264988524_n.jpg


The aluminum flywheel, new clutch, and transmission then went on, along with some ancillaries like starter, water pump and passages, etc. For the install, I decided to try a different approach and instead of dropping it in from the top as I'd taken the old engine out, I dropped the subframe, put the drivetrain on it and put the whole thing on a rolling platform:

374555_10100722643483476_2094384094_n.jpg


This was definitely the way to go. All I had to do was lower the body down over it and roll the platform into alignment just as the engine and transmission mounting studs approached the brackets. It was much more safe and controlled than having it all hanging, and there were no tight clearances to worry about. Based on my experience both ways now, I'm an advocate of pulling the engine from below.

So that brings me to the present, where I am doing final rewiring, reconnection, and rerouting/fabrication of everything to make it actually work. I think I have a pretty good image for everything that's left to do, including how to use the reverse-pull Escape throttle body, but more on those issues after they're completed and working!
photo.php
 
i ran a 3L tb on my car for a while before i went to the 65mm. just had to modify the bracket a bit to get the proper spacing for the cable. if you want to use the svt, might as well go with a 65mm since youll have to do some of the same modifications
 
...just had to modify the bracket a bit to get the proper spacing for the cable.
It's more than just that, which is what I was trying to explain in my post a few posts up...I should have just Googled a picture to show it. The Escape throttle body pulls in the opposite direction, toward the passenger side. In other words, the cable needs to be routed and approach it from the manifold side rather than the filter side as it normally does in the Contour. This Escape pic illustrates:

64914692.jpg


At any rate, I fished the SVT cable around and over the manifold and it seems like I can make it work with a custom bracket, which I also have a good image of how I'll do it with a simple hand-formed aluminum piece and just the cable grommet area of the SVT bracket. I'll be sure to post pictures of it if it works out as well as it does in my brain.
 
Back
Top