• Welcome to the Contour Enthusiasts Group, the best resource for the Ford Contour and Mercury Mystique.

    You can register to join the community.

tips for removing dash assembly

I think I have the dash just about free. When I pull it away, do all the wires stay with the steel frame ? Furthermore, I also have to disconnect the vent hoses ?

thanks,

Mad Dog
 
No Title

38) On the drivers side, about in the middle of the lower frame, the weather stripping is cut. Carefully lift the part leading to the front and pull it up so that you expose a plastic trim panel.
fetch


39) Gently pry open the panel. This should not require a great amount of force.
fetch


40) Remove the 2 black bolts, which are Torx-30.
fetch


41) Repeat for the passengers side.


Mad Dog
 

Attachments

  • photo16164.JPG
    photo16164.JPG
    232.4 KB · Views: 5
  • photo16165.JPG
    photo16165.JPG
    178.2 KB · Views: 4
  • photo16166.JPG
    photo16166.JPG
    606.4 KB · Views: 4
No Title

42) Under the center console, on the drivers side there are 2 torx-30 bolts that need to be removed.
fetch


43) Under the center console, on the passengers side there are 2 torx-30 bolts that need to be removed. In the picture I show only the lower one, with the arrow pointing up towards the second bolt.
fetch


44) Time to remove the speedometer cluster. Remove 5 bolts. Take care not to drop an down into the dash.
fetch


Mad Dog
 

Attachments

  • photo16167.JPG
    photo16167.JPG
    321.7 KB · Views: 4
  • photo16168.JPG
    photo16168.JPG
    250.8 KB · Views: 4
  • photo16169.JPG
    photo16169.JPG
    148.5 KB · Views: 5
No Title

45) Disconnect the battery and wait 24 hours before proceeding. It is imperative that there is no chance that the airbags accidentally deploy while you are working in the area.

46) On the back of the speedometer cluster, carefully remove the 2 cable heads. Be careful not to damage any components on the back.
fetch


47) In the passengers footwell, look up into the airbag well. Remove the left side wide nut that anchors the dash to the frame.
fetch


48) Remove the right side wide nut that anchors the dash to the frame.
fetch


Mad Dog
 

Attachments

  • photo16170.JPG
    photo16170.JPG
    117.3 KB · Views: 2
  • photo16171.JPG
    photo16171.JPG
    94.2 KB · Views: 2
  • photo16172.JPG
    photo16172.JPG
    106.3 KB · Views: 2
No Title

49) On the underside of the steering column, you need to remove the plastic cover. Remove 3 small phillips screws.
fetch


50) Unplug the yellow and black connectors on the underside of the steering column.
fetch


51) Don't forget the free connector on the lock cylinder.
fetch


Mad Dog
 

Attachments

  • photo16173.JPG
    photo16173.JPG
    220.8 KB · Views: 2
  • photo16174.JPG
    photo16174.JPG
    244.8 KB · Views: 2
  • photo16175.JPG
    photo16175.JPG
    436.3 KB · Views: 2
No Title

52) In the drivers side footwell, there is the main junction box. Remove the 6 cable heads. As far as I can tell these are each unique so there is no question of putting them back in incorrectly.
fetch
photo16176.JPG

53) Open the fuse box in the drivers side footwell. Disconnect the 2 cable heads.
fetch
photo16177.JPG

54) On the passengers side footwell, on the center column, there is a cable to a ……not sure what this does. Disconnect the cable.
fetch
photo16178.JPG

Mad Dog
 
I hit a snag. I left the steering wheel on, but there is no way I can get the dash out - the steering wheel blocks removal, even if its set to its lowest position. Is it possible to drop the entire steering column by unbolting it, which would hopefully give me enough room ?

thanks,

Mad Dog
 
To refine what I said in the last post - I could unbolt the 4 bolts that secure the steering column to the support column. I can then drop the entire thing a few more inches which should give me clearance to get the dash out. However, I am concerned that the steering column has only a limited degree of freedom (similar to how you should not over-bend a CV joint) and letting it droop would damage the steering shaft joints.

Mad Dog
 
Anyone…. can I drop the steering column a few inches (rests on the seat) without damaging the couplings ?

thanks,

Mad Dog
 
Did you get this done ?
I followed along with you for most of my removal, there are quite a few harnesses to unplug that you did not cover.

As for the column, yes you can drop it down.
 
Sorry for the delays, I do have more pics. I got to the point of getting the dash out, into my workshop. I ended up getting the airbag and steering wheel off. Now that I have the tiger by the tail, I am struggling to figure out the best way to reseat the vinyl coating, which has somewhat peeled off the plastic frame.

I will try and post more pics this weekend.

thanks,

Mad Dog
 
No Title

Time to remove the airbag.

First, disconnect the battery and for good measure, remove it from the car. Let the car sit 24 hours. Yes, this is probably overkill, but why take chances. The last thing you need is an airbag deploying on your face. best also to wear safety glasses.

On the backside of the steering wheel, there are two rows of 3 holes (see pic). The middle hole on each side houses a retaining screw that holds the airbag in. Reports vary on the screw - some ay say Torx 20, 25 or 30. Mine was Torx-30. Undo both both bolts. Once both bolts are free, the airbag can come out.

The airbag will be connected by a cable. Carefully disconnect the cable. Store the airbag, face down, in a safe location.

Mad Dog
 

Attachments

  • photo16404.JPG
    photo16404.JPG
    216.6 KB · Views: 0
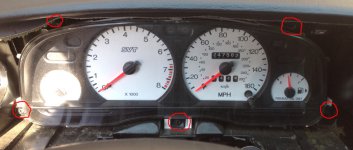
I should of posted something this summer when I finished, but I did, and it looks good. When you have the dash out, make sure to carefully inspect it for lifting off the plastic frame. This is an ideal time to glue down the vinyl onto the frame if its coming loose. I had to use a heat gun, lots of spray glue, and multiple clamps. It took a week of slow, careful work, but it was worth it. once finished, I got the dash back in but reversing my steps (it was a lot easier), and done !

Take your time, and you can do this.

Mad Dog
 
Back
Top