• Welcome to the Contour Enthusiasts Group, the best resource for the Ford Contour and Mercury Mystique.

    You can register to join the community.

tips for removing dash assembly

MadDog

Veteran CEG'er
Joined
Jul 27, 2012
Messages
618
Location
Augusta, GA
I plan on removing the entire dash assembly for a few fixes and upgrades. According to the haynes manual, you need to pull the trim under the wipers to release a speedometer cable. However, I thought the speedometer cables were only in the 95 model ? I have a 2000 SVT.
Any other tips on removing the dash ? I read that people think that removing the steering wheel is a good idea.

thanks,

Mad Dog
 
Disclaimer, it's been about 4 years since I swapped mine (2000 SVT), so I don't exactly remember it all. I didn't remove any trim on the outside of the car or the steering wheel. I took the seats and center console out though to give me more room to work.

I have this crappy photo that shows how much I removed to pull the dash out. I switched to a 98 dash, so I had to swap one vent tube out for a different one, I remember the project went pretty smoothly actually. I was glad to have help though (CrazyTalkSVT).

247413_659406374030_3693823_n.jpg
 
I was planning on taking out the center console. I thought the passenger airbag went with the dash, but you can snake the dash out from the airbag ?

The picture looks kind of scary - you didn't have many troubles getting it back together ?.

thanks,

Mad Dog
 
It looks a lot scarier than it is, though it can be time consuming.
The passenger airbag (black box) is mounted to the frame and does not get removed. The airbag aesthetic cover will come off with the dash.

I had help from an experienced CEGer: turbo_fox did a lot of the legwork in locating the bolts, dropping the steering column and more. IIRC - and this was 8 years ago so my memory is fuzzy - the biggest trouble we had was getting the plastic HVAC ducts to stay aligned during assembly.
https://picasaweb.google.com/115397470911686445120/Interiorswap
 
Using the ford pdf from the dash warp kit instructions, I first practiced at the junkyard by pulling the old one out of a 96 Contour. It went fairly smoothly, once I found the two nuts hoilding the dash in place at the passenger airbag. I left the seats in, but if I did it again I would pull them.
 
Hey MadDog, would you mind taking a few pics as you go or posting any tips you find during removal/reassembly? I've got to replace my passenger airbag in the future and haven't really messed with the interior besides swapping the steering wheel.
 
I plan on taking lots of pics. I just got the stereo removal tool so I am out of excuses not to do it. If I grow a pair I will start this weekend. : )

Mad Dog
 
No Title

I started taking the dash out today. There are a lot of layers to peel before the dash comes out, so this is just a start. I have the Haynes manual and the factory manual, both of which help, and 2 years ago, I took out some of the console parts to clean the car. I have a 2000 CSVT so if you have a different model, your experiences might be different.

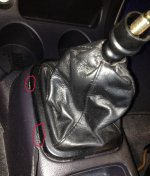
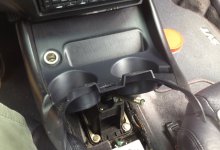
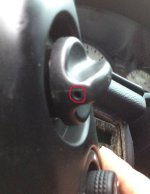
1) Unscrew the shift knob, counter-clockwise. When it comes off, there is a spring underneath it. Don't lose it. I put all of my parts in a bottle, and I suggest you do the same.

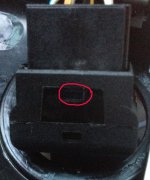
2) Carefully remove the leather shift boot. There are 4 small locking tabs, 2 on the drivers side, 2 on the passengers side. Pull the boot up gently.
fetch

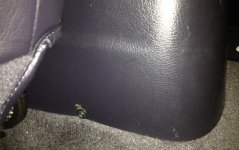
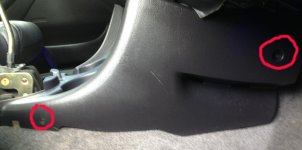
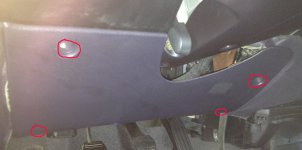
3) Move the front seats up so that the 2 screws that anchor the center armrest are exposed. Use a small phillips screwdriver. Just as an FYI, the last time I put them back on, I didn't like how the center rest was wobbly, so I put a small shim inside to help make it feel more solid.
fetch

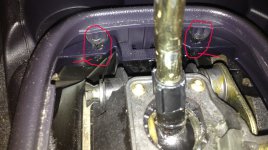
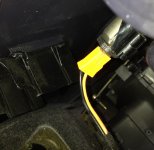
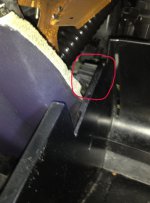
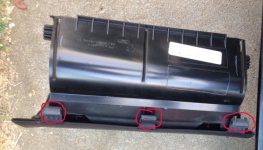
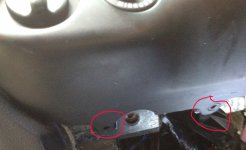
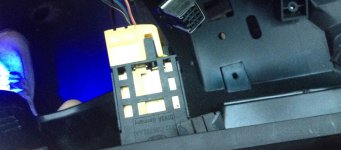
4) Look at the front of the center rest, near the shifter. THe center rest is help in place by two "pinch" clips. You need to get a set of pliers and gently pinch the clips under the horizontal plastic housing, and wiggle them up. Once both clips are disengaged, the center rest will be mostly free to move.
fetch

More later.

Mad Dog
 

Attachments

  • photo16102.JPG
    photo16102.JPG
    341.3 KB · Views: 3
  • photo16103.JPG
    photo16103.JPG
    210.2 KB · Views: 2
  • photo16104.JPG
    photo16104.JPG
    208 KB · Views: 2
No Title

5) Remove the cup holder which is velcro-ed in place.

fetch

6) Once the center rest is loose, put the car in first and start wiggling the entire unit towards the front. You need to slip the emergency brake boot over the emergency brake handle.
fetch

7) Once you get the center rest off notice the shiny brick under it. I have been lead to believe that this is some sort of impact sensor. Normally, if you were smart, you would of disconnected the battery by now, rendering this not a problem. I have to keep the battery connected for now as I have to roll the car in and out of the garage. In this case, make sure you do not drop anything on it, like nice heavy steel tools. Cover it with something.
fetch


More later.

Mad Dog
 

Attachments

  • photo16105.JPG
    photo16105.JPG
    283.3 KB · Views: 3
  • photo16106.JPG
    photo16106.JPG
    160.1 KB · Views: 2
  • photo16107.JPG
    photo16107.JPG
    131.3 KB · Views: 2
  • photo16108.JPG
    photo16108.JPG
    190.4 KB · Views: 2
No Title

8) Time to remove the center console that sits under the stereo facing. On each side, there are 2 phillips screws. Remove both. There might be a plastic snap near the firewall on the drivers side. Thats simple to disengage.
fetch

9) Put the car in reverse. Gently wiggle the console towards the rear and up. Do not yank it out as there is an electrical connection to the cigarette lighter.
fetch

10) On the underside, carefully remove the cable to the cigarette lighter.
fetch

More later.

Mad Dog
 

Attachments

  • photo16108.JPG
    photo16108.JPG
    190.4 KB · Views: 2
  • photo16119.JPG
    photo16119.JPG
    215 KB · Views: 2
  • photo16120.JPG
    photo16120.JPG
    169.7 KB · Views: 2
No Title

11) Time to remove the stereo. This will require a stereo removal tool (a pair of u-shaped metal pieces). Insert the tools into the holes on each side of the head unit, until they click.
fetch

12) Gently push the ends facing you gently towards the doors - this will help disengage the clips that lock the head unit into the console. Wiggle the tools until the head units comes out from the console. This will likely require a lot of swearing as it doesn't want to come out easily.

13) Once out, there are 3 cables to disconnect from the head unit. Gently work each one off, then set the head unit aside.
fetch

More this weekend.

Mad Dog
 

Attachments

  • photo16121.JPG
    photo16121.JPG
    140.7 KB · Views: 1
  • photo16122.JPG
    photo16122.JPG
    196 KB · Views: 1
No Title

14) Remove the glovebox. The glovebox is hanging on 3 snap-on connectors riding on a rod, and is prevented from falling open by 2 small arrestors. To remove the glovebox, on the eft side (near the center of the car), gently pull the left tab towards the right side of the car until the hanger is free.
fetch

15) There is a hanger on the right side of the glovebox that can be disengaged in the same way.

16) The glovebox can now be removed by gently pushing up on the underside where the 3 snap on connectors hang off the rod. Wiggle a bit to disengage all 3.
fetch

17) My 2000 CSVT did not have a glovebox light, but if your does, make sure to disengage the light from the glovebox.

Mad Dog
 

Attachments

  • photo16123.JPG
    photo16123.JPG
    208 KB · Views: 3
  • photo16124.JPG
    photo16124.JPG
    188.6 KB · Views: 3
No Title

18) Remove the dash clock (desk clock or holding piece if you have a 2000 Contour). Use a dental pick to spudger on the bottom right corner to lever out one side of the dash clock. Then wiggle out the other side. Go gentle to avoid breaking any tabs.
fetch

19) With the dash clock hanging free, disengage the cable head using a dental pick or small screwdriver.
fetch


Mad Dog
 

Attachments

  • photo16125.JPG
    photo16125.JPG
    88.5 KB · Views: 2
  • photo16126.JPG
    photo16126.JPG
    233.8 KB · Views: 3
No Title

20) remove the kick panel under the steering wheel. There are four, 7mm bolts to remove and the panel is easy to get out.
fetch

21) Don't let the panel drop free as it is attached to the footwell light. Disengage the light from the kick panel.
fetch

22) Remove the headlight switch; first step is removing the 2 small phillips screws on the underside of the switch housing.

fetch


Mad Dog
 

Attachments

  • photo16127.JPG
    photo16127.JPG
    139.3 KB · Views: 3
  • photo16128.JPG
    photo16128.JPG
    155.7 KB · Views: 3
  • photo16129.JPG
    photo16129.JPG
    190.7 KB · Views: 3
No Title

23) You need to remove the knob from the light switch. However, you can't just pull the knob off. On the underside of the knob is a small hole. Use a dental pick of very small screwdriver inserted into the hole to lever the release tab. Then pull the knob off.
fetch


24) There are 3 things to disconnect from the panel. The orange unit is for the lights and is easily removed by pressing the 2 side tabs. [Edit - just remove the green plug head !] The grey housing is for the light and unscrews with about a 1/4 rotation.
fetch


25) The last item is a pain in the ass. On the reverse side, you need to gently wedge a small flathead screwdriver to push the tab in, or push the blocking plastic piece away from the plug head just enough to wiggle it out. Cursing is mandatory.
fetch


More later.

Mad Dog
 

Attachments

  • photo16134.JPG
    photo16134.JPG
    253 KB · Views: 2
  • photo16135.JPG
    photo16135.JPG
    236 KB · Views: 2
  • photo16136.JPG
    photo16136.JPG
    260 KB · Views: 2
No Title

26) Use 2 finger to reach under and up to push against the defroster buttons. It should not require much force to pop the buttons out.
fetch


27) Use a small screwdriver or pick to remove the plug heads.
fetch


28) On top of the steering column, there is a cover secured by 2 phillips screws. Remove the screws.
fetch


Mad Dog
 

Attachments

  • photo16138.jpg
    photo16138.jpg
    488.3 KB · Views: 1
  • photo16139.JPG
    photo16139.JPG
    201.5 KB · Views: 1
  • photo16140.JPG
    photo16140.JPG
    161.1 KB · Views: 1
No Title

29) With the 2 screws out, gently wiggle the cover up and towards you. This should not require a great effort.

30) There are 5 phillips screws that have to be removed to get the panel covering the speedo cluster out.
photo16141.jpg

Mad Dog
 
No Title

31) Gently wiggle the panel towards you and slightly up. This should not require a great effort.
fetch


32) Under the stereo/HVAC control panel, there are 4 phillips screws to be removed (sorry for the crappy pic).
fetch


33) Once the screws are out, you need to pull out the panel. This took a lot of wiggling trying to get it out without a lot of force. I suspect a good strong pull will get it out, but I took about 15 minutes to get it out. Don't let it drop as the dimmer switch is still connected.

34) Disengage the dimmer switch plug.
fetch


Mad Dog
 

Attachments

  • photo16145.JPG
    photo16145.JPG
    135.1 KB · Views: 4
  • photo16146.JPG
    photo16146.JPG
    126.8 KB · Views: 2
  • photo16147.JPG
    photo16147.JPG
    155.8 KB · Views: 2
  • photo16148.JPG
    photo16148.JPG
    215.6 KB · Views: 3
No Title

35) This is what the panel looks like. Note the position of the retaining clips.
fetch


36) Remove the 2 phillips screws to loosen the HVAC control panel from the frame. Wiggle it loose.
fetch


37) There are 5 plug heads to remove. All are pretty simple except for the one on the right, which has a metal retaining clip. Lever one side of the clip out with a small screwdriver.
fetch


Mad Dog
 

Attachments

  • photo16148.JPG
    photo16148.JPG
    215.6 KB · Views: 2
  • photo16149.JPG
    photo16149.JPG
    155.4 KB · Views: 2
  • photo16150.JPG
    photo16150.JPG
    129.4 KB · Views: 2
Back
Top