SQuAlL-NT
CEG'er
I have been struggling to find a rear camber solution for the Contour, so I made my own and I want to share with the everyone.
Disclaimer: Although I did track test on this part, I hold no responsibility on how reliable it is.
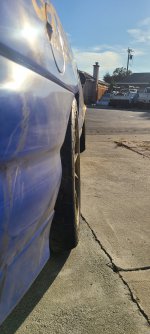
Here is how it looks like with -2 on the rear. (I have -2.5 now but picture some other time)
The idea behind it is our car is lack of rear camber adjustment and there aren't any aftermarket solution.
I could put a linkage collar to my Ksport struts, but it will change the factory designed rear sway bar mounting location. Also, I want this to beneficial for people that are running the car on stock style suspension.
Here is the parts list for a PAIR with the link of where I purchased (Part A,B,C.... will make sense in the How-to):
- (A) Swaged Steel Tubes 15", 1"OD $18.99 x 2
- (B) Rod End C6153 $13.97 x 2
- (C) Rod End Spacers 0.5" thickness $7.99 x 2
- (D) Rod End Spacers 0.75" thickness $7.99 x 2
- (E) Jam Nuts 3/4-16 LH SL3416 (pack of 6, need only 2) x 1
- (F) Jam Nuts 3/4-16 RH SR3416 (pack of 6, need only 2) x 1
- (G) Clevis End ALL57824 $31.99 x 2
- (H) 1/2” ID x 1 3/4” OD x 1/2" Thick Washer $16.80 x 4
- (I) Long bolt with jam nut, bought rom HomeDepot, forgot the size x 2
- (J) Ball Joint Rod End 60645K85, RH Oversized, 1/2"-20 Thread $8.37 x 2
- (K) Shock Extensions 1 ", 1/2-20 Thread $22.99 (Comes in a pair) x 1
- (L) Accessory Clamp, 1" Tube Size $16.99 x 2
Keep in mind, there are areas that can be improve and there might parts that are cheaper somewhere else.
Let put this together.
Here is what the control arm looks like next to the OEM one.
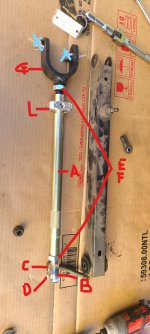
Sitting side by side with Massive toe arm
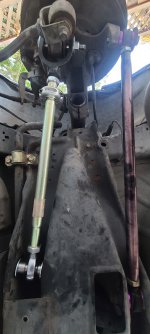
Jack up the rear end of the car, make sure it is stable, remove the rear wheels
I suggest to get the subframe side first as it is the hardest to get to. You do need to lower the subframe to get the OEM arm and bolt out and reuse the bolt and nut.
The thicker spacer can be either side, just make sure both left and right control arms are the same order. I forgot E or F jam nut for this side.
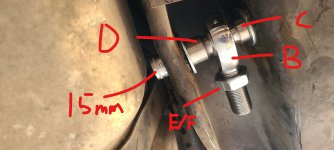
next, screw on the tube (A) and then (G) with the jam nut(E/F).
Now one hand hold onto the clevis (G), another hand rotate the tube (A). it should extend the both end in one direction, and retract when rotate the other direction.
Adjust it as the stock OEM arm length and align it with the hub.
Get the 2 thick washer (H) inside the clevis(G) and slide the long bolt (I) into it. Now, I have aftermarket bushing, with OEM, you might want to see if you need even thicker washer. (There is a R&D story on the washer later)
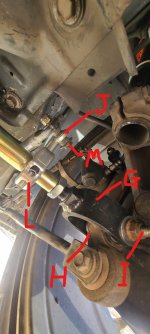
Now with the control arm connected without the endlink, you can adjust the camber, but the toe will make it harder. You can disconnect the toe bar and adjust.
After all the adjustment, make sure you jam the both end with the jam nut(E and F).
Connect from the top to bottom.
Use the aftermarket endlink bolt(M) to (J) that you have. If you dun have, you need bolt and some cone sharp spacer. I am using the same set from the OLD adjustable swaybar endlink.

Now you need to measure the gap. When I make this my car was a lot lower and i didn't need extension (K), but my new setup make the car sit higher, closes to stock height which requires 1" extension.
This picture shows you when the sway bar is on sea level, it needs an inch extension (K).
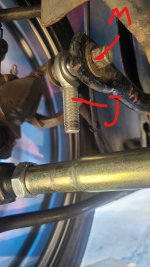
To install them. Push the sway bar up to make space, screw the extension (K) into the rod end (J). Then, screw the top part of the clamp (L) but do have screw all the way through into the clamp area.

Push the sway bar back to sea level, put the bottom part of the clamp(L) and tighten the 2 screw (5) to close the clamp

NOTE:
You can see the washers sunk into the bushing here
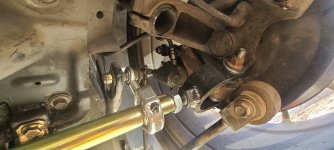
After a track day, the rear of the car swing like crazy when i go faster than 60mph on the way back home.
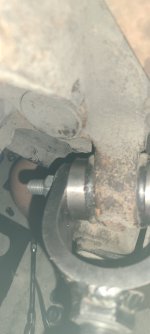
Found out the washer is not big enough.
Here is the thick washers that cover the whole bushing. Now i don't have that problem at all.
Hope this help you to find a solution for rear camber.
Feel free to drop some suggestions and if you tried it and improved.
Disclaimer: Although I did track test on this part, I hold no responsibility on how reliable it is.
Here is how it looks like with -2 on the rear. (I have -2.5 now but picture some other time)

The idea behind it is our car is lack of rear camber adjustment and there aren't any aftermarket solution.
I could put a linkage collar to my Ksport struts, but it will change the factory designed rear sway bar mounting location. Also, I want this to beneficial for people that are running the car on stock style suspension.
Here is the parts list for a PAIR with the link of where I purchased (Part A,B,C.... will make sense in the How-to):
- (A) Swaged Steel Tubes 15", 1"OD $18.99 x 2
- (B) Rod End C6153 $13.97 x 2
- (C) Rod End Spacers 0.5" thickness $7.99 x 2
- (D) Rod End Spacers 0.75" thickness $7.99 x 2
- (E) Jam Nuts 3/4-16 LH SL3416 (pack of 6, need only 2) x 1
- (F) Jam Nuts 3/4-16 RH SR3416 (pack of 6, need only 2) x 1
- (G) Clevis End ALL57824 $31.99 x 2
- (H) 1/2” ID x 1 3/4” OD x 1/2" Thick Washer $16.80 x 4
- (I) Long bolt with jam nut, bought rom HomeDepot, forgot the size x 2
- (J) Ball Joint Rod End 60645K85, RH Oversized, 1/2"-20 Thread $8.37 x 2
- (K) Shock Extensions 1 ", 1/2-20 Thread $22.99 (Comes in a pair) x 1
- (L) Accessory Clamp, 1" Tube Size $16.99 x 2
- (M) your existing Aftermarket mounting to the sway bar
- Some washers
Keep in mind, there are areas that can be improve and there might parts that are cheaper somewhere else.
Let put this together.
Here is what the control arm looks like next to the OEM one.

Sitting side by side with Massive toe arm

Jack up the rear end of the car, make sure it is stable, remove the rear wheels
I suggest to get the subframe side first as it is the hardest to get to. You do need to lower the subframe to get the OEM arm and bolt out and reuse the bolt and nut.
The thicker spacer can be either side, just make sure both left and right control arms are the same order. I forgot E or F jam nut for this side.

next, screw on the tube (A) and then (G) with the jam nut(E/F).
Now one hand hold onto the clevis (G), another hand rotate the tube (A). it should extend the both end in one direction, and retract when rotate the other direction.
Adjust it as the stock OEM arm length and align it with the hub.
Get the 2 thick washer (H) inside the clevis(G) and slide the long bolt (I) into it. Now, I have aftermarket bushing, with OEM, you might want to see if you need even thicker washer. (There is a R&D story on the washer later)

Now with the control arm connected without the endlink, you can adjust the camber, but the toe will make it harder. You can disconnect the toe bar and adjust.
After all the adjustment, make sure you jam the both end with the jam nut(E and F).
Connect from the top to bottom.
Use the aftermarket endlink bolt(M) to (J) that you have. If you dun have, you need bolt and some cone sharp spacer. I am using the same set from the OLD adjustable swaybar endlink.

Now you need to measure the gap. When I make this my car was a lot lower and i didn't need extension (K), but my new setup make the car sit higher, closes to stock height which requires 1" extension.
This picture shows you when the sway bar is on sea level, it needs an inch extension (K).

To install them. Push the sway bar up to make space, screw the extension (K) into the rod end (J). Then, screw the top part of the clamp (L) but do have screw all the way through into the clamp area.

Push the sway bar back to sea level, put the bottom part of the clamp(L) and tighten the 2 screw (5) to close the clamp

NOTE:
- The clamp should sit on the thinner side of the tube.
- Items (J), (K), (L) are all right hand tread. if you change the rod end (J) to Left hand tread, you just made yourself a adjustable endlink. I didn't because the extension(K) was a rush revision.
- Whenever you are going to do alignment, make sure the guy know they need to loosen the clamp (L) so they can rotate the tube (A).
- Make sure you put some grease in between the washers(H) and clevis(G).
- If you are going to use something else for the Thick washers(H), make sure the OD is larger than the bushing in the hub.
You can see the washers sunk into the bushing here

After a track day, the rear of the car swing like crazy when i go faster than 60mph on the way back home.
Found out the washer is not big enough.
Here is the thick washers that cover the whole bushing. Now i don't have that problem at all.

Hope this help you to find a solution for rear camber.
Feel free to drop some suggestions and if you tried it and improved.
