
31N007
New CEG'er
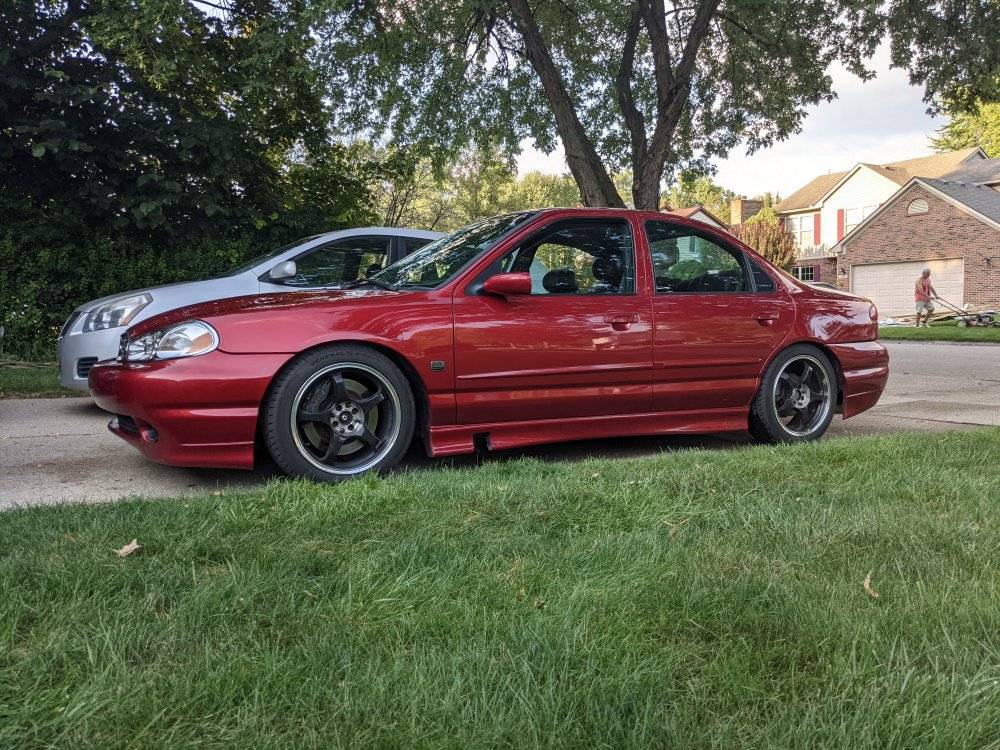
The vehicle as it sat the day I bought it:


It's an apparently very early build 1998 SVT Contour, in Toreador red. I found the original FS thread on here and it suggests that I'm the third owner, after picking it up off of a fella who was local to me that'd had it for a few months as the FS ad suggests. He didn't have the time or space to really give this thing the love it needed, and I was itching to get into another project, as my Pro5 is in need of a transmission and having something that's not my GTI to tinker with throughout the rest of the summer was a desire. This was almost a parts car, but the bloke who almost bought it to part out was kind enough to let me have first dibs at it. He's a mate of mine, and ended up coming into another parts car that had a 3L and LSD-equipped MTX-75 transmission, among other goodies, so I am happy he made out well there!
I got it back to a mate's place relatively trouble-free. The cooling fans were on all the time, and there was a switch panel in the radio spot with two switches, neither of which seemed to do much... That said, my Contour-owning friend who came with me was tailing me for a bit of the journey but overtook me after the smell of coolant was too overwhelming for him. Needless to say, I knew that I wanted to swap out the 2.5L for a 3.0L, and the second owner/seller also threw in a 3L engine and spare transmission as a part of the sale!
-Above left is an "E1" harness - the "E0" harnesses were poop and insulation tended to fail, leading to shorts, sensor issues, and all sorts of malarkey. No stranger to wiring danger, I wanted to tackle the conversion myself from E1 -> E0.
-Middle is some of the wiring mess that existed on the E0 harness that was in the motor. There's a glaringly obvious photo below that shows the worst of what can happen to these poor harnesses over time...
-Right is the PCV system - milky due probably to age, tuckered out headgaskets, and copious amounts of coolant that infringed on areas it had no business being in!
This is a good representation of old and shwonky versus new and less prone to electrical fires... Positive battery lead to engine fuse box... Great!
We called this fella (curious) George as he waltzed right in to see what we were up to and kindly distracted all of us for an hour or so the day I believe we pulled the engine out of the car!
1) BAT struts, nice!
b) old and tired lump, ready to be retired
3) rear bank, with signs of an unhappy headgasket between rear/leftmost cylinder and the outside of the gasket
iv) closeup of that cylinder and it's amount of "nope"
E) this was my mistake - I was overzealous taking off the main power feeds into the fusebox, so this was a rash pinout after consulting a mate's spares harness
More to digest, from right to left this time (making sure you're paying attention):
Wiring spaghetti, wrapped and accounted for. Sans knock sensor, because I'm ignorant and the engine doesn't neeeeeeeed it (it'll always see 93 octane)
E1 PCM connector, notice the extra pins on the bottom left row, those get rearranged, sort of
E0 PCM connector
Wiring spaghetti, this was tearing apart the E1 harness to inspect the pins and ensure that nothing was totally botched. I noticed a few pins that appeared to have had a bad time, so I tidied those up and found out what's actually required to convert a harness...
Perks, and downside of having friends owning the same cars you buy... Nice MSDS headers!
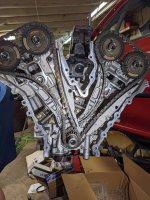
3L innards, pre- cam swap. Clean, suggested low mileage!
Maybe I shouldn't promote tools but this Milwaukee die grinder really cleaned up shop! I bought an aluminium burr from McMaster Carr and cleaned up both heads over 4 evenings, working maybe 4 hours each evening? Finished the ports off with a sandpaper drum on a Dremel. Much more involved than the port matching I did on the KL when I went from oval-port heads to "square port" to match the Millennia intake manifold that's on there. The swarf could have been dealt with better. Note the edge of what used to be a box which probably would have helped keep things contained... Nothing a shopvac couldn't sort out though! The keen-eyed among you may notice the doubled up/relocated injector holes. Ford kindly never made a split port 3L cylinder head, so a simple mix-and-match wasn't possible. There are threads explaining the difference, but the TL;DR is that the "easiest" way to complete the swap is to go this route, which allows use of stock fuel rails, lower intake, upper intake, throttle body, and PCV system. The only other option is to hybridise things, but that is its own can of worms, and this birdy wasn't keen to go for those this time around.
This was the biggest "err mmm hmm" moment of the entire build. I didn't catch this tearing the 3L down, and kinda kicked myself for it. I think that this was due to poor quality coolant being in the system previously. I took a leaf out of the Sloppy Mechanics book and liberally applied some copper gasket maker to the headgasket and am proceeding to send it. I cleaned up the face of the block as best as I could, and I'm anticipating this will withstand the test of time.
Double check things when they seem "prepped" This was double o-ringed - not a great setup for an engine that self destructs at the mention of low oil pressure!!!
This was various stages of reassembly. I'll be honest, I mostly cleaned things, as I preferred to let the two guys go ham who knew what the hell they were doing. 3L engine was prepped to go back in just two weeks after the 2.5 was torn out. Not bad I wouldn't say! My body hated me for a few days, I was genuinely sore all over for two days after the engine went in, and I couldn't fathom the thought of the wiring not working. Thankfully though, I keyed on and the engine fired right up! We fought a loosey goosey serpentine belt as we'd swapped to an Escape alternator. This swap greatly simplifies things with regards to servicing the alternator should it need removing. Think FSDE alternator location, on the KLDE engine... It's not a simple job to access, and so I say thank you Mazda for your alternator placement on the KLDE! LOL For those unfamiliar with the Mazda placement, it's above where the A/C compressor sits on the Duratec V6, but there's far more room in the bay for the alt to be removed... It's absolutely nuts seeing the difference between V6es from Mazda versus Ford.
Last photo for this post is a shot of the car cleaned up. I neglected to reinstall the jack point cover like a numpty. Forgive this hideous monstrosity.
Wiring conversion to be explained in the next post, as well as examining the cooling fan woes I'm fighting now.
It's an apparently very early build 1998 SVT Contour, in Toreador red. I found the original FS thread on here and it suggests that I'm the third owner, after picking it up off of a fella who was local to me that'd had it for a few months as the FS ad suggests. He didn't have the time or space to really give this thing the love it needed, and I was itching to get into another project, as my Pro5 is in need of a transmission and having something that's not my GTI to tinker with throughout the rest of the summer was a desire. This was almost a parts car, but the bloke who almost bought it to part out was kind enough to let me have first dibs at it. He's a mate of mine, and ended up coming into another parts car that had a 3L and LSD-equipped MTX-75 transmission, among other goodies, so I am happy he made out well there!
I got it back to a mate's place relatively trouble-free. The cooling fans were on all the time, and there was a switch panel in the radio spot with two switches, neither of which seemed to do much... That said, my Contour-owning friend who came with me was tailing me for a bit of the journey but overtook me after the smell of coolant was too overwhelming for him. Needless to say, I knew that I wanted to swap out the 2.5L for a 3.0L, and the second owner/seller also threw in a 3L engine and spare transmission as a part of the sale!
-Above left is an "E1" harness - the "E0" harnesses were poop and insulation tended to fail, leading to shorts, sensor issues, and all sorts of malarkey. No stranger to wiring danger, I wanted to tackle the conversion myself from E1 -> E0.
-Middle is some of the wiring mess that existed on the E0 harness that was in the motor. There's a glaringly obvious photo below that shows the worst of what can happen to these poor harnesses over time...
-Right is the PCV system - milky due probably to age, tuckered out headgaskets, and copious amounts of coolant that infringed on areas it had no business being in!
This is a good representation of old and shwonky versus new and less prone to electrical fires... Positive battery lead to engine fuse box... Great!
We called this fella (curious) George as he waltzed right in to see what we were up to and kindly distracted all of us for an hour or so the day I believe we pulled the engine out of the car!
1) BAT struts, nice!
b) old and tired lump, ready to be retired
3) rear bank, with signs of an unhappy headgasket between rear/leftmost cylinder and the outside of the gasket
iv) closeup of that cylinder and it's amount of "nope"
E) this was my mistake - I was overzealous taking off the main power feeds into the fusebox, so this was a rash pinout after consulting a mate's spares harness
More to digest, from right to left this time (making sure you're paying attention):
Wiring spaghetti, wrapped and accounted for. Sans knock sensor, because I'm ignorant and the engine doesn't neeeeeeeed it (it'll always see 93 octane)
E1 PCM connector, notice the extra pins on the bottom left row, those get rearranged, sort of
E0 PCM connector
Wiring spaghetti, this was tearing apart the E1 harness to inspect the pins and ensure that nothing was totally botched. I noticed a few pins that appeared to have had a bad time, so I tidied those up and found out what's actually required to convert a harness...
Perks, and downside of having friends owning the same cars you buy... Nice MSDS headers!
3L innards, pre- cam swap. Clean, suggested low mileage!
Maybe I shouldn't promote tools but this Milwaukee die grinder really cleaned up shop! I bought an aluminium burr from McMaster Carr and cleaned up both heads over 4 evenings, working maybe 4 hours each evening? Finished the ports off with a sandpaper drum on a Dremel. Much more involved than the port matching I did on the KL when I went from oval-port heads to "square port" to match the Millennia intake manifold that's on there. The swarf could have been dealt with better. Note the edge of what used to be a box which probably would have helped keep things contained... Nothing a shopvac couldn't sort out though! The keen-eyed among you may notice the doubled up/relocated injector holes. Ford kindly never made a split port 3L cylinder head, so a simple mix-and-match wasn't possible. There are threads explaining the difference, but the TL;DR is that the "easiest" way to complete the swap is to go this route, which allows use of stock fuel rails, lower intake, upper intake, throttle body, and PCV system. The only other option is to hybridise things, but that is its own can of worms, and this birdy wasn't keen to go for those this time around.
This was the biggest "err mmm hmm" moment of the entire build. I didn't catch this tearing the 3L down, and kinda kicked myself for it. I think that this was due to poor quality coolant being in the system previously. I took a leaf out of the Sloppy Mechanics book and liberally applied some copper gasket maker to the headgasket and am proceeding to send it. I cleaned up the face of the block as best as I could, and I'm anticipating this will withstand the test of time.
Double check things when they seem "prepped" This was double o-ringed - not a great setup for an engine that self destructs at the mention of low oil pressure!!!
This was various stages of reassembly. I'll be honest, I mostly cleaned things, as I preferred to let the two guys go ham who knew what the hell they were doing. 3L engine was prepped to go back in just two weeks after the 2.5 was torn out. Not bad I wouldn't say! My body hated me for a few days, I was genuinely sore all over for two days after the engine went in, and I couldn't fathom the thought of the wiring not working. Thankfully though, I keyed on and the engine fired right up! We fought a loosey goosey serpentine belt as we'd swapped to an Escape alternator. This swap greatly simplifies things with regards to servicing the alternator should it need removing. Think FSDE alternator location, on the KLDE engine... It's not a simple job to access, and so I say thank you Mazda for your alternator placement on the KLDE! LOL For those unfamiliar with the Mazda placement, it's above where the A/C compressor sits on the Duratec V6, but there's far more room in the bay for the alt to be removed... It's absolutely nuts seeing the difference between V6es from Mazda versus Ford.
Last photo for this post is a shot of the car cleaned up. I neglected to reinstall the jack point cover like a numpty. Forgive this hideous monstrosity.
Wiring conversion to be explained in the next post, as well as examining the cooling fan woes I'm fighting now.
Attachments
Last edited:


")