DDV
CEG'er
Tools required
10mm combination wrench
1/4" drive tools
-Ratchet
-6" extension
-3" extension
-8mm socket
Pick-up magnet (optional)
Small wire brush
1. Open the hood.
2. Use the 10mm wrench to disconnect the cable from the positive (red, +) terminal on the battery.
3. WAIT A MINIMUM OF 10 MINUTES (longer is better!) BEFORE PROCEEDING TO STEP 4!
Did you wait?
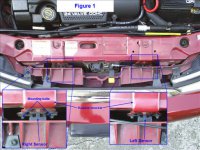
4. Use the 1/4" tools to remove the two bolts securing the airbag sensor; see Figure 1:
-The magnetic pickup tool can be used to hold the bolt and keep it from getting lost.
-Access the bolts through the front grille.
5. Move the sensor side-to-side and up-and-down to remove it from the radiator bracket. (It has a "T" that fits into the radiator bracket.)
6. Use the wire brush to clean the back of the airbag sensor and the radiator bracket.
7. Install the bolts to secure the airbag sensor:
-Use the magnetic pickup tool to hold the bolt in place while using the 1/4" tools to tighten the bolt.
8. Repeat these steps for the other sensor as required.
9. Connect the cable to the positive terminal on the battery.
Attachments
Last edited:

