Contour Enthusiasts Group Archives
Alright me and my friend started removing the head, not knowing what we were doing but removing anything that we thought was connected to the head...pretty easy right?

well I took some pics of all that we did for the day, about an hour to 2 hours work. And I have some questions...

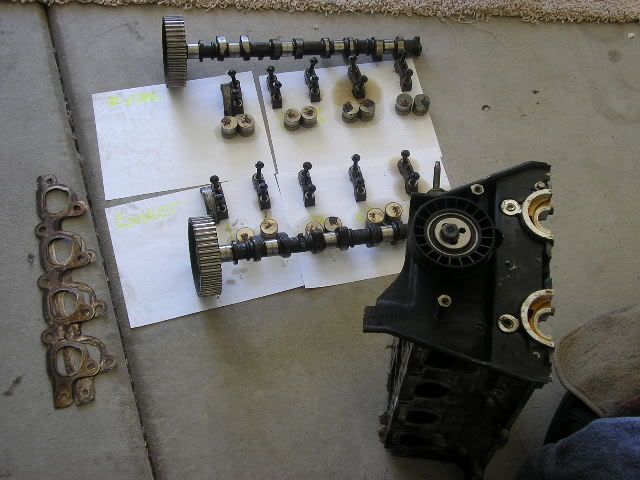
first one...what do I do about the timing belt and cam gears? does the belt just need to be removed and cam gears stay in place? I'm assuming thats the case but when putting it back on, I don't know if anything is gonna be screwed up or off or whatever.


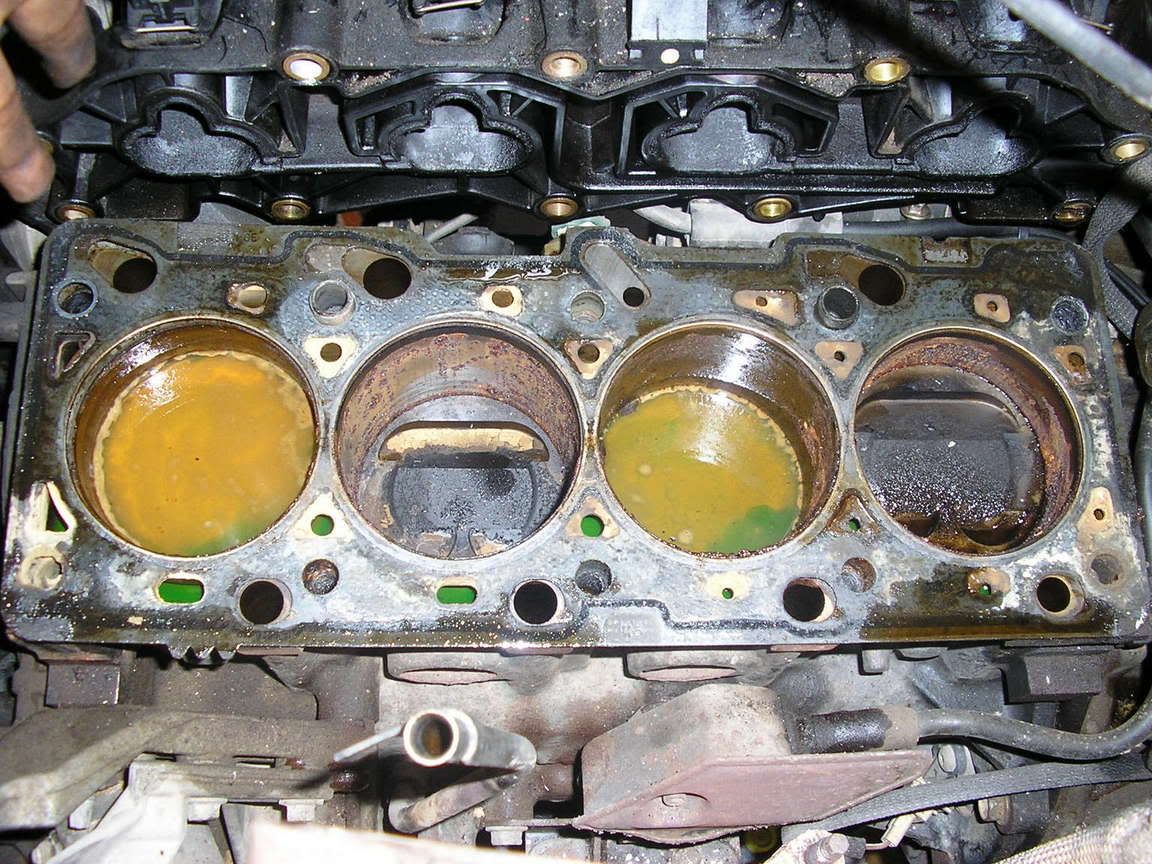
ok moving on, while taking off the exhaust manifold we encountered this problem. Some of the nuts would come off but the bolt would be stuck in place. Whats the deal here? A couple of the nuts & bolts would come out all the way but alot of them would not. Also if you can see the snake looking hose on the right side, its blocking one of the bolts holding in the exhaust manifold, that thing has little give in it and I can't get to the bolt with it in the way, what to do?


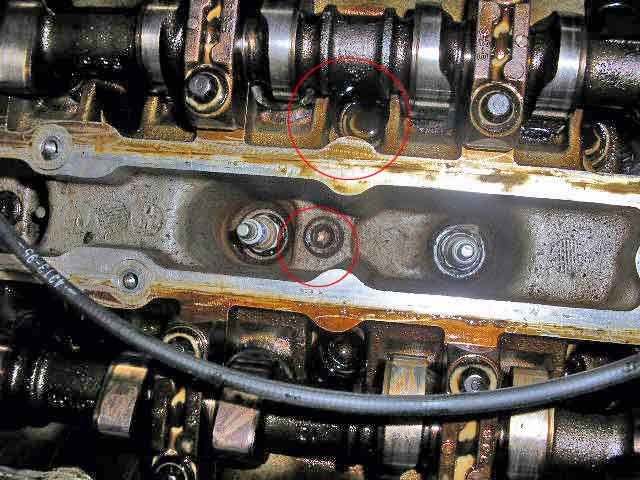
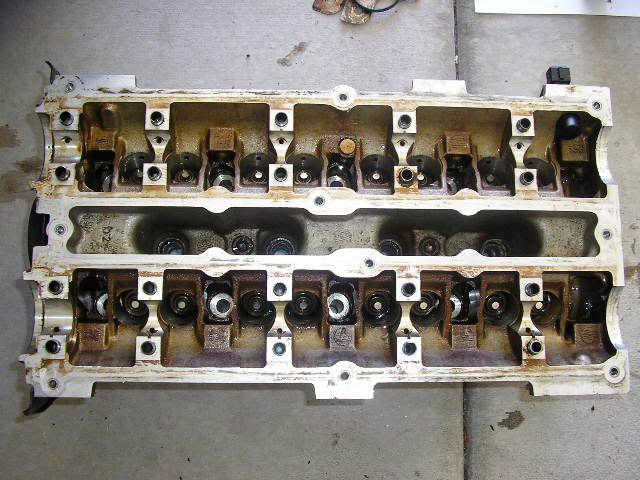
Ok now to the 3rd picture, it looks like I need some type of allen-wrench like tool to remove those two bolts in the middle...anybody know what size those are? I didn't have anything before to remove them. Also it appears that there are bolts underneath the cams, do those need to be removed? If so they look like a [censored] to reach.


Ok on this one when I removed the fuel rail and injectors...we had a problem with the bottom hose and plastic piece (not the yellow one) getting in the way so we tried to get it at an angle and some black plastic piece flew off (which is still MIA)...anyway now the plastic part is kinda wobbley. Should it be that way til the injectors and valve cover go back on or does it need to be glued in place?


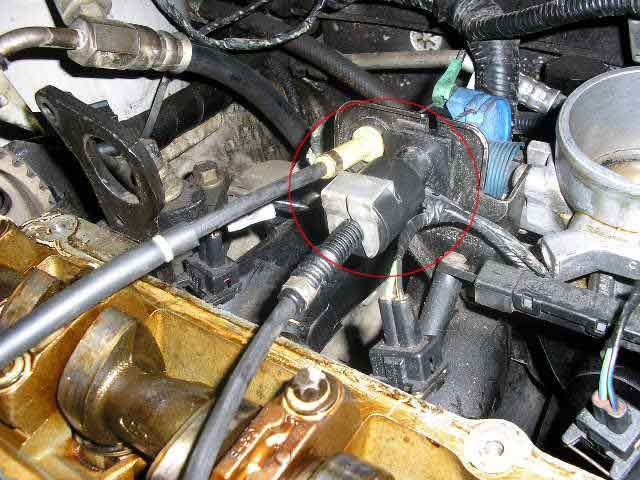
Alright here I believe we have everything taken off to separate the intake manifold from the head except like 3 allen wrench like bolts (I have no clue what they're called)...is there anything else holding it down? And I can leave the throttle body attached to the intake manifold correct?


Here is just a wider picture of the bolts in question.

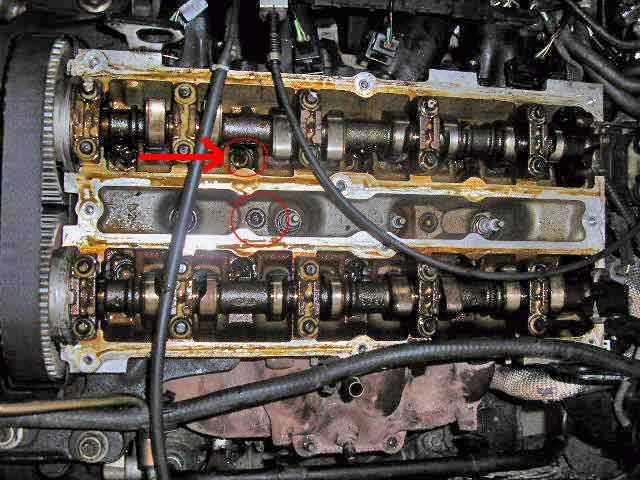
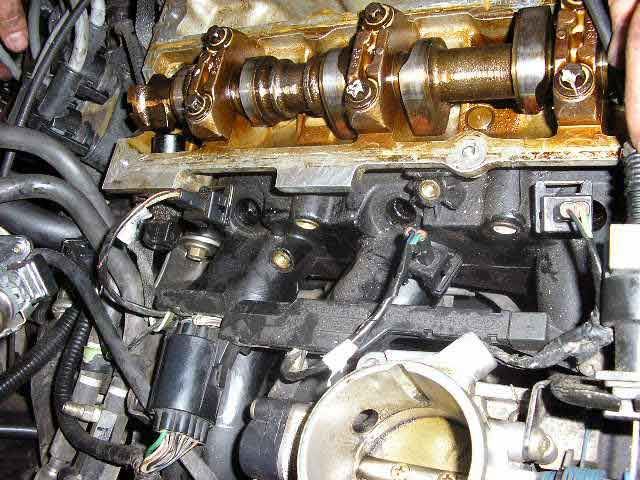
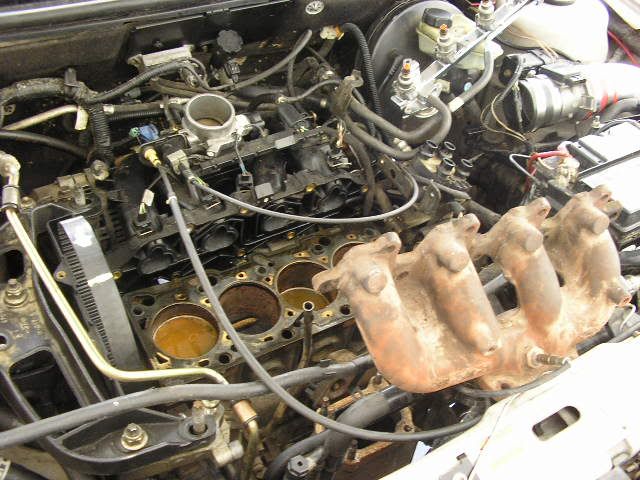
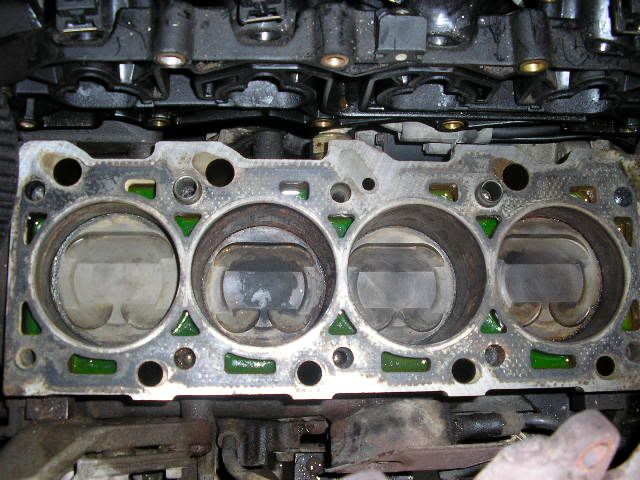
And here is an overall shot of our progress for the day, it should be minus the intake manifold and exhaust manifold but stupid bolts and tools we didn't have held us up.


And thats it I know this was a long post but just remember I'm a newb without a manual at the current moment and any help is good help. So please don't skip the post because of its length, I could really use the info.
yes you can leave the TB on the intake manifold im pretty sure, just disconnect everything. i cant tel form the pic, did you remove the fuel rail yet? i think you have to do that (again, i have never done a HG on a four cyilder car so i really am of very little use at this particular time).
as for those bolts under the cams...you have to remove them and you have to remove the cams to get to them. its the only way. but...oh dear god, what have you done to those cams??? they are so dirty!!


here see if this helps:


Fig. 1: Upper engine mount and accessory mounting brackets-2.0L engine


Fig. 2: Cylinder head bolt removal sequence-2.0L engine.

^ I certainly hope that you removed those bolts in that sequence or you may have problems putting them back in^


Fig. 3: Once the camshafts are removed, the cylinder head bolts are accessible.


Fig. 4: Loosen the head bolts in sequence, using the appropriate tools. The head bolts on the 2.0L engine require a T55 Torx bit to un-bolt.


Fig. 5: Lift the cylinder head off the engine block.

and theres the head gasket, or whast left of it.


Fig. 6: Remove the head bolts with a magnet once the head is placed on a suitable worksurface


you want pics of the rebuilding of the head (which you can probably dop while your in there, new t-stat and timingbelt tensioner!!!!!!) you want to do at least a partial rebuild (new TStat and TB tensioner) this is all providing that these things havent been replaced recently....


Fig. 7: The thermostat housing is held by three retaining bolts.


Fig. 9: Remove the timing belt tensioner pulley from the head


i cant stress enough that you replace the tensioner and the timing belt while your in there. do the Water pump to. its a while your in there thing. and the WP may have gotten fudged while trying to pump oil through the cooling system anyway.


Now is also a PREFECT time to remove that god awful Timing Belt cover. i would put the bottom one back on, but the middle one (shown here), and the top one can go away.

Fig. 10: The front cover is held by four retaining bolts, remove the bolts and...


... remove the cover from the cylinder head, the head will now lay flat.


using a suitable tool, remove the remains of the head gasket from both the block and head surfaces.


wipe the head and the block down with some cleaner (i woudl probably use TB cleaner, since it wont/shouldnt harm the metal, but consult a true professonal (i.e. terry haines) before doing so)


this will provide a good sealing surface for the new gasket.


Fig. 16: Place the new head gasket onto the engine block, aligning the holes in the gasket with ...


Fig. 17: ... the dowels in the block.


Fig. 19: The cylinder head bolts must be tighten in sequence, to the proper torque using a torque wrench

IMPORTANT!!!! The cylinder head bolts are a torque-to-yield design and cannot be reused. If the cylinder head bolts are reused, engine damage may occur.


here is the complete procedure...in steps:

1. Disconnect the negative battery cable.

2. Drain the engine coolant from the radiator and the cylinder block drain plugs.

3. Remove the intake manifold.

4. Remove the exhaust manifold.

5. Remove the camshafts and valve tappets.

6. Support the engine with a wood block between the crankshaft pulley and the front sub-frame.

7. Remove the engine support device (the big black funny looking bar that wraps around the rightside of the motor, its a brace/mount for the motor) for the timing belt cover removal.

8. Remove the right-hand engine lifting eye retaining bolt and the lifting eye.

9. Remove the support bracket from the power steering pump mounting bracket and cylinder head.

10. Remove the timing belt covers.

11. Remove the camshaft timing belt tensioner pulley.

12. Remove the thermostat housing from the rear of the cylinder head.

13. Remove the ignition coil and bracket from the cylinder head.

15. Remove the spark plugs if not already removed.

16. Remove the cylinder head retaining bolts in the reverse of the installation sequence.

17. Remove the cylinder head and gasket from the engine.

RE INSTALL INSTRUCTIONS:

1. Clean the cylinder head and cylinder block gasket surfaces and check for flatness. Refer to the Engine Reconditioning Section for procedures.

2. Install a new cylinder head gasket onto the cylinder block. Be sure the head gasket is properly positioned on the dowels.


WARNING Use care when positioning the cylinder head to prevent damage to the head gasket or dowels.


3. Place a light coating of engine oil onto the threads of the new cylinder head bolts and install.

4. Tighten the cylinder head bolts in sequence and in the following steps:

5. Tighten all bolts to 15-22 ft. lbs. (20-30 Nm)

6. Tighten all bolts to 30-37 ft. lbs. (40-50 Nm)

7. Rotate all bolts 90-120 degrees.

8. Reinstall the ignition coil bracket and the ignition coil.

9. Reinstall the water thermostat housing.

10. Reinstall the timing belt covers.

11. Reinstall the camshaft timing belt tensioner pulley and retaining bolt onto the front of the cylinder head.

12. Reinstall the support bracket to the power steering pump mounting bracket and the cylinder head.

13. Tighten the support bracket to 29-41 ft. lbs. (39-55 Nm).

14. Reinstall the right engine lifting eye to the cylinder head and the alternator mounting bracket. Tighten the retaining bolts to 30-41 ft. lbs. (41-55, Nm).

15. If removed, install the left-hand engine lifting eye to the cylinder head and tighten to 10-13 ft. lbs. (14-18 Nm).

16. Install the engine support device to the engine lifting eyes and support the engine.

17. Remove the wood block from between the sub-frame and the crankshaft pulley.

18. Reinstall the valve tappets and camshaft into their original locations.

19. Reinstall the exhaust manifold.

20. Reinstall the intake manifold.

21. Reinstall the spark plugs.


22. Drain the engine oil and remove the engine oil filter.

WARNING

Operating the engine without the proper amount and type of engine oil will result in severe engine damage.


DUHHH!

23. Reinstall the drain plug and tighten to 15-21 ft. lbs. (21-28 Nm).

24. Reinstall a new engine oil filter and fill the crankcase with the proper amount and grade of oil.

25. Fill the engine cooling system.

26. Reconnect the negative battery cable.

27. Run the engine and check for oil and coolant leaks. Check for proper engine operation.


there, i hope this helps, it took me like an hour to make!!! lol. i dont mind though, helping a fellow CEG'er makes it all worthwhile...

MAKE THIS A STICKY PLZ!!!


oh and dont forget what i said about cleaning the tops of your cylinders and the valves in the head...they need to be cleaned...gasoline is probably the safest thing to use, since they get gas on them anyway lol.

BTW, link is here: Headgasket How to!!
Well there ya go ninja!
That bolt size you circled is a t-45 (same as brakes) but it doesn't seem like you need to touch those
Anyways, Haynes manual recommends leaving the Intake and Exhaust manifold on for simplicity, but it makes head removal heavier and bulkier, so you'd need a lift a a helper.

TIP: Label EVERYTHING

Edit:How-to remove cruise


1)Disconnect actualtor cable from throttle linkage on the TB, by releasing the inner cable end attachment from the segment and unclipping the outer cable from the bracket
2)Unscrew the actuator mounting bolt, then slide the actuator mounting bolt, then slide the actuator out of the mounting pin holes
3)Disconnect the multi-plug and remove assembly.
4)Press actuacting cable cap locking arm, remove cap by turning counterclockwise(image)
5)Raise cable retaining lug no more than .5 mm, and push cable end out of the slot in the pulley
6)When Installed, make sure cable end, locks into the slot in the pulley
7)To locate cable cap onto actuator pulley, keep cable taut and in the pulley groove, and pull the throttle linkage end of the cable to draw the cable cap onto the pulley
8)To install cable cap, keep cable taut and the pulley still, then install the cable cap tabs into the actuator slots; then turn the cap clockwise till locking arm locates on the locking stop


holy crap stryker, nice! good read.
go ninja go!
Originally posted by Nate S:
go ninja go!


also, on a side note, i have put a light coating of used motor oil on every gasket i have ever replaced. if its old oil it will burn, dont use too much, but i find it helps to give it a good seal until the engineheats it up enough to seal it up good. just an afterthought.

wow, ok I think that pretty much answers all my questions. I think I just have 2 more...

is removing the cam gears and cams straight forward or do I need any special tools? I don't want my timing to be all screwed up. And the timing belt, can I just slide it off or what?

And my last one...how do I get those damn bolts off my exhaust manifold where only the nut came off? thats damn annoying...

ok I replaced my timing belt not too long ago because it had teeth missing...and as far as replacing bolts, I have like a $20 budget right now honestly so I can't really do anything recommended...only whats extremely necessary. No joke but I am dead broke.

edit: oh yea where are u findin this info? it might be able to answer some of my other questions as well.
all info is from autozone.com

youhave to replace those bolts. they are useless. borrow some money! how much ya need man? find out how much they are and i can probably help..at least some, but really im not in a much better postition than you are lol.
ok more progress today, no pics because it looks basically the same.

All thats needed to be done is...remove 2 bolts from intake manifold, remove cams, cam gears, and timing belt, then remove head bolts...we're almost done as far as taking it off goes.

I'm a little scared about removing the timing belt and cams/cam gears still...will I have to take it to a shop to have the timing corrected?

edit: actually nevermind, i think all the info i need is on that auto zone site.
I just got my new head bolts in the mail today.
$21.99 plus shipping, from
http://www.partsamerica.com
Ninja, you're taking on quite a project here. You absolutely must do everything the right way or you will be replacing the entire engine. You're timing is going to be gone but it is not hard to get back.

After you have everything back together there is a slot on the cam gears that mechanics use to correct the timing. Slide something in there that is going to be a tight fit and where they have absolutely no play. There is only one way to do this. Then you're going to have to position the number 1 cylinder at top dead center. One way to do this is to use a screwdriver in the spark plug hole and watch for when the screwdriver starts to fall back down and then put it back at the top most point.

On the crankshaft pulley there are two notches. ONE of those notches is the correct placement for your timing. Make sure to use the correct one. I believe when looking at it, it will be the one behind the first one. Going clockwise that is. There is also a notch on your block that you will use to time the crankshaft pulley with. Once your timing is good to go then slip on your timing belt and you should be good.

Suggestion..


Spend 15 bucks and get that haynes manual.... you will be extrememly happy you did.
Originally posted by Obsidian:


Suggestion..


Spend 15 bucks and get that haynes manual.... you will be extrememly happy you did.


I second that!

After changing my timing belt, I ended up taking it to the shop for them to set the timing straight. I probably could have done it my self but I didn't feel like taking the time .

Take your time and follow the book to the letter.
Awesome info!!! Make this a sticky!


BP
I went on that auto zone site and there was only one thing where it showed to keep the timing in place.

I was under the impression that the crank pulley needed to be set to that position and locked in place and then everything else can come off. I was assuming it wouldn't matter how the cam gears come off and go back on. Also do the cams need to be placed back on the head in a certain way or do I just use the straight edge tool to set them right?
th straight edge tool will work great. ar eyou putting them back on already???
noooo not yet, I've been takin a break...I just wanna build up the confidence that this part is actually doable as it seems like the hardest step.
Hey Ninja why don't you ask in the Phownix area, if other CEG'ers would/could give you a hand at this, there's a few guys that know alot about our Contiques in your area, IE: Darrel, Keyser and i think Rev. Jay

Just an idea
i'm sure the mighty duratec guys (excluding darrel) are much too busy for me.
Originally posted by ZetecNinja:
i'm sure the mighty duratec guys (excluding darrel) are much too busy for me.


NO Darrel has a zetec (non running ) but still a zetec.

Did you ask around, don't cost much just to ask for help, although i never asked for any, most of the time CEG'rs will gladly help others if they can, look around.

You should know this with 6500 + posts
Maybe I'm an idiot and you already explained this, but...
Why are you removing the head?

Blown head gasket.
Originally posted by Oeneus:
Originally posted by Obsidian:


Suggestion..


Spend 15 bucks and get that haynes manual.... you will be extrememly happy you did.


I second that!

After changing my timing belt, I ended up taking it to the shop for them to set the timing straight. I probably could have done it my self but I didn't feel like taking the time .

Take your time and follow the book to the letter.


I dispute your second on that! Spend $8 and get a factory Ford manual from Todras. Much better than a Chiltons/Haynes/etc. Plus the Ford manual will have part numbers for you to reference.
Originally posted by Bull-Mtl:
Originally posted by ZetecNinja:
i'm sure the mighty duratec guys (excluding darrel) are much too busy for me.


NO Darrel has a zetec (non running ) but still a zetec.

Did you ask around, don't cost much just to ask for help, although i never asked for any, most of the time CEG'rs will gladly help others if they can, look around.

You should know this with 6500 + posts


yes I know that Darrel has a zetec but I know hes busy because he rarely checks the boards anymore and I wanted the Ford DVD from him but haven't heard back yet...so my guess is that hes too busy for any of this right now. Which is quite alright because truthfully I wanna be able to get through this myself just for experience points. Although if they have something to add via this post then go for it.
Seriously, get the ford cd from todras.
alright I think I'll PM him about that right now...

I do have a question for you guys in the meantime though

does this piece need to be removed to get to the crank pulley so that I can set the timing? Or do I need to go underneath to get to it or what? I thought I could get it by removing my wheel but the fender is in the way.
With wheel off, there should be a cover you remove to access the crank pulley. If you are trying to keep the car's timing, I guess you would align it with the marks on the block/oil pan and put the car in fifth gear and rig something up to hold the brakes hard (per haynes manual).
Posted By: IonNinja Re: somebody help me please... - 08/13/04 03:16 PM
I'm getting unmotivated...I can't get to the crank pulley and tensioner pulley! I've removed the wheel, removed the wheel well liner and ther is more f*ckin metal in the way! There is nothing else to remove to get to it!

I can't remove the black piece on top because I've got nothing to support the engine...

I don't know what to do...
Posted By: Cris'pus Re: somebody help me please... - 08/13/04 03:35 PM
But that makes no sense Ninja. How could there be metal in front of the crank pulley? Also the tensioner...isn't it just below your intake sprocket???

As for the Black piece aka right hand engine mount, it shouldn't be a problem to just leave it unsupported. Some may recommend against it, but it didn't bother my engine when I replaced my mounts like that and when I did my Timing Belt. You could always, albeit temporarily, put the emergency jack with a block of wood to support it.
Posted By: IonNinja Re: somebody help me please... - 08/13/04 04:11 PM
well I don't have any wood
and yes I know where its at but I can't get to it because the engine mount is in the way...which I can't take off because I have no other way to support the engine.

But anyways I got one problem solved, there was a small piece covering the crank pulley but that is removed kinda...but now my question is how do I line this b!tch up? I'm not seeing any marks...

I also just thought about something right after I posted this message, is the middle timing belt cover gonna make it difficult for me to remove the timing belt?
Posted By: Cris'pus Re: somebody help me please... - 08/13/04 04:53 PM
How does impossible sound. At least for my Post98.
Now as for the marks, I was too looking for some lines or something, but what I found is kinda disappointing. There are 2 VERY small Dents in the edge of the crank pulley, yes dents. No lines or numbers, it looks like someone took a chunk of metal and banged away at the pulley. So when you find them, Mark the 2nd one, with gold or whiteout, which is about 2 inches to the right of the 1st one.

2econdly, there is a raised bit at about "5 o'clock" on the oil pan that looks like an airplane wing pointing down. Now don't line the pulley mark with the right or side going straight down, but with the angled side of the raised metal.
(Have you gotten that Haynes manual yet?


Posted By: Stryker Re: somebody help me please... - 08/13/04 08:27 PM
you have to remove the bracket and the serpentine belt to get to the center cover. put a jack under the oil pan to support the weight of the motor, but dont lift the motor up, just keep it there for a just in case thype of thing. then remove the brakcet. then the top tensiuoner pully just above and forward fo the alternator.if you need pix, PM me, i can snap a few while my bro is here to help.
Posted By: IonNinja Re: somebody help me please... - 08/14/04 12:35 AM
I do actually have a ford cd that I just got in today, but it shows me all this sh!t. Its just that when I actually go out there and look for marks myself I don't see a damn thing. I got pissed off and fell asleep and now I've got to register for school so I think I'm done til Sunday/Monday. I found the little plane wing flipped down now I just need to find the dent marks, it was too dark for me to see anything though.

But basically what I do is loosen the bolt on the crank pulley and move the crank to the right spot and tighten it back up. Then on the belt tensioner i loosen the bolt and move it to the farthest right and then tighten it back up? Then take the belt off? This is how it goes to my understanding...let me know if thats not right.

Also do the cams need be lined up before the belt comes off? I'm assuming the same procedure is needed to move the cams for alignment.

Man I gotta admit this is the scariest part of the whole damn job, I wish I had someone actually here to help me on this part. If I really didn't care I could just rip everything apart and worry about my timing once I have the head back on.
Posted By: caltour Re: somebody help me please... - 08/14/04 02:22 AM

When you start a project like this, there is always a point where you get frustrated. But you can do it.

You have to take your time, and read the manual over and over again until you get a feel for the whole job. Then follow the manual, step by step, no improvising. It all falls together if you study the manual and follow it step by step.

You are trying to figure out too many things at once (timing belt removal, manifold stud removal, engine mount removal, timing belt cover emoval, cam removal, etc.). That's what happens when you are not following the manual's steps. It gets overwhelming.

I recommend that you read the manual again (the whole head removal process, from start to finish) before you do any more work on the car. Then, when you are ready, start at Step One in the manual. Just like you are starting the whole job from the beginning. Don't move on to Step Two until Step One is sucessfully completed.


Posted By: emartinez13 Re: somebody help me please... - 08/14/04 04:31 PM
Zetecninja, I know what you're going through, I just went through the same ordeal about 2 weeks ago. I had a blown head gasket, and I did all the work myself. Thanks to the help of my trusty Haynes manual, I must have read it like 3 times to make sure I got everything right. One thing I would highly recommend if you don't already have the head on is to take it to a machine shop and have it pressure checked to make sure it's not warped. I had mine pressure checked for 25 bucks, had it resurfaced for about 33. I also had them do a valve job which set me back 138. I think it was worth it, they left the head looking like brand new, there was no carbon build up in the ports and the valves looked like new, they also installed new valve stem seals which came with the head gasket set. If you need any additional help you can ask me whatever since everything is still fresh in my head. Good luck.
Posted By: IonNinja Re: somebody help me please... - 08/14/04 07:51 PM
Originally posted by emartinez13:
Zetecninja, I know what you're going through, I just went through the same ordeal about 2 weeks ago. I had a blown head gasket, and I did all the work myself. Thanks to the help of my trusty Haynes manual, I must have read it like 3 times to make sure I got everything right. One thing I would highly recommend if you don't already have the head on is to take it to a machine shop and have it pressure checked to make sure it's not warped. I had mine pressure checked for 25 bucks, had it resurfaced for about 33. I also had them do a valve job which set me back 138. I think it was worth it, they left the head looking like brand new, there was no carbon build up in the ports and the valves looked like new, they also installed new valve stem seals which came with the head gasket set. If you need any additional help you can ask me whatever since everything is still fresh in my head. Good luck.


damn why can't people like you be in AZ? I know I didn't want help before but now I do, BADLY!

Might be a couple days before I go out there again, I'll be sure to update you guys.
Posted By: IonNinja Re: ok I'm ready to tackle the timing belt - 08/17/04 02:44 PM
Ok I think I'm going for it now today.

I've been looking over the instructions on auto zone as they are the easiest to follow (to me).

I am still kind of confused about one part of the instructions though...how exactly do I turn the crankshaft? Obviously it doesn't turn just from me using my hand.

I was reading through the instructions and from my impression, I need to remove the crankshaft pulley and then insert a special tool (crankshaft bolt or something to that effect, which I don't have btw) to turn the crankshaft, then once it is in the correct place I reinstall the crankshaft. This will get it into correct alignment and then I continue to follow the rest of the directions, is this correct everyone?
Can you not turn the pulley?
Posted By: FlaXXMaN Re: ok I'm ready to tackle the timing belt - 08/17/04 09:18 PM
All i do is use the bolt that holds the main crank pully on. Use the approprate socket and a breaker bar to turn the engine clockwise to the approprate position.
Posted By: IonNinja Re: ok I'm ready to tackle the timing belt - 08/18/04 12:36 AM
Originally posted by FlaXXMaN:
All i do is use the bolt that holds the main crank pully on. Use the approprate socket and a breaker bar to turn the engine clockwise to the approprate position.


ok, this is all I needed to know.

and no I can't turn anything...
I guess I should have further explained, I meant turn the crank pulley using a socket and breaker bar. Have you tried that?
Posted By: IonNinja Re: ok I'm ready to tackle the timing belt - 08/18/04 03:23 AM
Originally posted by Kremithefrog:
I guess I should have further explained, I meant turn the crank pulley using a socket and breaker bar. Have you tried that?


yea I tried today, the bastard wouldn't budge...its on there tight as sh!t. I'm just gonna have my uncle come over sometime this week and make him do it. I'm too weak
Posted By: Cris'pus Re: ok I'm ready to tackle the timing belt - 08/18/04 06:51 AM
OK....
By "turn" do you mean turning the Bolt off, as in loosening it? or do you mean turning the crank so as to get it to TDC?

If you're not trying to loosen the Bolt, you should be able to turn the bolt which should, in turn, rotate the crank (clockwise) and if you can't, yes, you are weak.
Posted By: IonNinja Re: finally an update? yes sir - 08/25/04 11:51 PM
well I didn't read the last few posts a while back...but I'm not sure how u would turn a bolt clockwise without loosening it. Anyway my uncle who is a mechanic gave me a shortcut to take. Just marked the exact spots on the cam pulleys and timing belt so that they can be aligned when everything is put back together. So the timing belt didn't even come off, just slipped the cams from underneath the belt and I was ready to get rollin again finally. This is taking extremely long due to me waiting for my uncle to help and all this crap but anyway...I got the head off today. Which means I'm just about there, just gotta clean, seal and torque to spec.

Few pictures for you high speeders...

My head when it was first removed...no wonder the car wouldn't stay on unless I gave it gas.


the weird part is that I was expecting my head gasket to be all burned and in little pieces but the entire thing is intact...I found that kinda weird but I guess I'm lucky. Now I'm wondering how a perfectly intact head gasket let all that coolant in there?


head disassembled


puddles gone after a little cleaning from me, although I'm not sure how I'm supposed to get the coolant in the little cracks


bottom of head


there you go...I'm praying to have this finished up in the next couple of days...we'll see what happens.
Posted By: caltour Re: finally an update? yes sir - 08/26/04 12:23 AM
Originally posted by ZetecNinja:
I'm not sure how u would turn a bolt clockwise without loosening it.


Clockwise = tighten
Counterclockwise = loosen

Originally posted by ZetecNinja:
Which means I'm just about there, just gotta clean, seal and torque to spec.


Did you have the head checked to make sure it's not cracked or warped? The usual advice is to have the head checked at a machine shop to make sure the gasket surface is perfectly flat, and inspect for fine cracks. They can machine it flat if necessary. Sometimes they can weld up cracks.


Originally posted by ZetecNinja:
My head when it was first removed...no wonder the car wouldn't stay on unless I gave it gas. Now I'm wondering how a perfectly intact head gasket let all that coolant in there?


Your car would not have run with that coolant in the cylinders. It looks like you didn't drain the coolant before you took off the head, so the coolant that was in the head must have poured into the cylinders.


Originally posted by ZetecNinja:
puddles gone after a little cleaning from me, although I'm not sure how I'm supposed to get the coolant in the little cracks


You mean the coolant in the coolant passages? The way to get it out is to drain the coolant from the bottom of the radiator.

Posted By: IonNinja Re: finally an update? yes sir - 08/26/04 12:32 AM
the car didn't run with the coolant in there...but with me keeping my foot on the gas I could keep it going a few extra feet (trying to rush it home)...but yea it would eventually just die out no matter what. I'm just saying, now I know why...

And no I didn't drain the radiator because of the advice my uncle had given me...he said that I may not have to because 9 times out of 10...something something...I can't even think right now but he gave me a reason why I wouldn't have to when I suggested it to him.

I don't believe the head will have to be checked out though, it doesn't even look like there is damage period...I didn't even have to scrape the gasket off. It popped right off like it was nothing. There has to be someway that is was moved or something...but I'll let my uncle look at it, he should be able to tell if it needs to be done or not but I really doubt it.
Posted By: Seawulf_dup1 Re: finally an update? yes sir - 08/26/04 12:48 AM
If the head is aluminum, you need to get the head resurfaced before you put it back on. Aluminum warps and it's something we've always done when pulling off a head. If it's steel, they you probably won't need to resurface it, but Aluminum needs it.

Yeah, you should of drained the coolant before taking off the head. Look into a metal head gasket. Turbo Tom sells them and can withstand turbo applications with ease, nevermind regular driving. There's no way you could of ran with that much coolant in the compression chambers, that's like hydrolock levels of fluid there.

We used an impact wrench to remove the pulley, it's a piece of cake with one of those. Cam timing is easy if you know what you're doing. If you're in AZ maybe call up StreetFlight and get some pointers from them. Good luck.
Posted By: IonNinja Re: finally an update? yes sir - 08/26/04 06:43 AM
just a simple question

it doesn't matter if radiator fluid is drained to the ground right? I've only got one can and its filled with the remaining oil from my car.

Also I am supposed to run water through the radiator after all the coolant is let out to pretty much flush the radiator right?
Posted By: Cris'pus Re: finally an update? yes sir - 08/26/04 07:03 AM
No, you shouldn't. Unless the stuff you put in last says it's biodegradable or something.

While you're there, do This . You'll get it all out.
Posted By: IonNinja Re: finally an update? yes sir - 08/26/04 08:17 AM
alright, thats a good pic at the end too...looks like it would take all of 5 min. to install.

so does the coolant just drains out of there?
Posted By: SleeperZ Re: finally an update? yes sir - 08/26/04 05:11 PM
The pics for this post are wonderful.
Will definately be helpful in the future.

Go for a thinner copper head gasket to increase compression, its a cheap few extra ponnies.
(Of course, if FI is in your future don't).
Posted By: Kremithefrog Re: finally an update? yes sir - 08/26/04 07:55 PM
Originally posted by SleeperZ:
The pics for this post are wonderful.


Ditto, though I never hope I have to use them.
Posted By: Stryker Re: finally an update? yes sir - 08/27/04 03:25 AM
i believe the heads on the Zetec are cast iron, like the block. you should be ok if you didnt drive it further than 2 miles at speeds above 30 MPH.

when something like this happens, (for future reference) immediately pull over wherever you are. and have the car towed to whereveryou want to be.
Posted By: Loco4G63 Re: finally an update? yes sir - 08/27/04 03:26 AM
Originally posted by Stryker:
i believe the heads on the Zetec are cast iron, like the block.


Wrong.....aluminum head, cast iron block.
Posted By: Stryker Re: finally an update? yes sir - 08/27/04 03:35 AM
ah, ok i was wrong, thanks for correcting me.

so yes, do have it looked at, at the very least, if you dont, you will most likely be going through all of this again...
Posted By: Cris'pus Re: finally an update? yes sir - 08/27/04 04:37 AM
Originally posted by ZetecNinja:
alright, thats a good pic at the end too...looks like it would take all of 5 min. to install.

so does the coolant just drains out of there?


No. Well, you could but No.

1)Drain the fluid by the 'invisible' drain plug on the rad
2)Slap a hose (I needed a female/female adapter) to the Tee
3)Turn on hose and the remaining coolant will flow out the overflow
Posted By: IonNinja Re: finally an update? yes sir - 08/29/04 08:39 PM
ok well I had the head shaved...only cost me $35 at NAPA too. Soooo I'm in the process of reinstalling the head...right now I've got to reinstall intake manifold, exhaust manifold, coil pack, remove oil filter, drain radiator, reinstall valve cover and thats it! Not much huh?

Wish me luck!

oh yes the guy was telling me how he measured the head...

if its below 2000 something then it doesn't need to be machined...anything over does and mine was only 6000 so it was barely touched but needed to be done so I wasn't going through the same thing again.

oh and you say draining the radiator gets rid of the coolant in here correct?


and and ONE MORE question
how the hell do I get that 02 sensor out of the exhaust manifold? Do I just use a regular wrench or what? I need a socket to fit on that damn thing because its too tight for a regular wrench. And this fake PB Blaster Autozone crap hasn't worked one time yet!
Posted By: caltour Re: finally an update? yes sir - 08/29/04 09:20 PM
Yes, draining the radiator will drain the coolant out of the block (most of it, anyway). It's a good idea to drain and refill your coolant before you restart the motor, because there are probably bits of gasket material in there from when you scraped the gasket surface clean. A good flushing is recommended.

It's also a good idea to change your oil and filter before restarting, because some of the coolant that was in your cylinders may have drained down into the crankcase.

About removing the sensor: I use Liquid Wrench and WD-40. Doesn't work every time, but usually does. Maybe someone here can advise as to whether applying some heat to the area where the threads are would ruin the sensor?
Posted By: IonNinja Re: finally an update? yes sir - 08/29/04 11:35 PM
yea I drained the radiator...damn that crap came gushing down my arm fast Wasn't expecting that...the coolant that came out was green though! Like fresh coolant...I even put water in the overflow tank afterwards and it came out clean so maybe it didn't need the flush but oh well...can't hurt anyway.

I do have new plugs, new oil filter, new oil, new intake manifold gasket, new exhaust manifold gasket waiting to go in...

My uncle also says that when I have everything put back together I just put it new oil and run it for a day then drain it out again and add new oil. I guess its supposed to get rid of any old bad oil still in there. I don't wanna put the recommended amount if I'm just gonna drain it out the next day so should about 2 bottles be good?
Posted By: Kremithefrog Re: finally an update? yes sir - 08/30/04 12:21 AM
Put the right amount, just use cheap oil.
Posted By: caltour Re: finally an update? yes sir - 08/30/04 01:09 AM
Originally posted by Kremithefrog:
Put the right amount, just use cheap oil.


When Kremit says "use cheap oil" he doesn't mean use some off-brand mystery oil from the 99 cent store. He also doesn't mean you should use recycled oil, or cheapo single-viscosity 30-weight oil or anything else like that. What he really means is that you don't need to buy Mobil 1 synthetic oil or any other "premium" oil if you plan on changing it again soon. I'm sure that's what he meant to say, but he ended up posting his typical dangerous half-baked offhand remark instead of posting thorough, useful information.

Here is what you do: buy whatever name brand (Valvoline, Quaker State, etc.) is on sale at Autozone or K-Mart. Buy at least five quarts of 10-30 weight multiviscosity oil, and a new Purolator filter too. Put exactly 4.5 quarts in the motor, and put the new filter on. NEVER put in less than 4.5 quarts, or you could ruin your motor.
Posted By: Kremithefrog Re: finally an update? yes sir - 08/30/04 01:41 AM
BS dude. Screw you and your half hearted attempted to put me down. He said he is gonna keep it in there for a day. ANY dino oil will be fine for a day (if it's certified and the right viscosity, and what oil isn't certified). There isn't even a huge difference between cheapo dino oil and non cheapo dino oil. You're a retard and you really need to think before you post.
Just looked at your registered date. Stupid newbies. We'll learn you something one day.
And I just realized I probably seem too overworked over it. I don't care if you talk smack about me. But when you post incorrect info (some was correct like use 4.5qts.) AND try to talk smack. Yeah that's not cool.
Posted By: caltour Re: finally an update? yes sir - 08/30/04 03:02 AM
Originally posted by Kremithefrog:
ANY dino oil will be fine for a day (if it's certified and the right viscosity, and what oil isn't certified). There isn't even a huge difference between cheapo dino oil and non cheapo dino oil.


There are lots of cheap oils out there that do not belong in our engines, not even for a minute. As you know, there are cheap oils at discount stores (and many other retail outlets) that are not API certified. One brand for sale around here is called "Chalet" and it is definitely not API certified. I wouldn't put it in my lawnmower. And, as I mentioned in my previous post, there are other types of cheap sub-standard oil for sale (recycled, single-vis, etc.). It's stupid to use any oil that does not meet the manufacturer's specs for quality, just to save a few pennies.

Zetecninja is working his ass off to fix his motor. If you are going to advise him, you have an obligation to do it right. It's wrong to tell him to use "cheap oil" without explaining (and limiting) what you mean. It's also wrong to tell him that "ANY" dino oil is OK, even for a short time.


Originally posted by Kremithefrog:


But when you post incorrect info (some was correct like use 4.5qts.) AND try to talk smack. Yeah that's not cool.


I posted incorrect info? What are you talking about? Trust me on this, Kremit: you don't want to start a discussion about posting incorrect info.
Posted By: ChattavegasSE_dup1 Re: finally an update? yes sir - 08/30/04 03:04 AM
As long as you don't use olive oil, you oughtta be in good shape. Just be sure to buy your oil from the automotive side of Wal Mart, not the grocery side.
Posted By: Russell-3L Re: finally an update? yes sir - 08/30/04 03:05 AM
i use andvance auto brand 5W-30 as my "cheap oil" i used it when breaking in teh 3L, i use it in the bronco, especially after the head gasket replacement. costs 99 cents a bottle and works fine. accually its in the 3L now (was broke, couldnt afford mobil1, but will use that from now on)
Posted By: Kremithefrog Re: finally an update? yes sir - 08/30/04 04:03 AM
Originally posted by caltour:
Originally posted by Kremithefrog:
ANY dino oil will be fine for a day (if it's certified and the right viscosity, and what oil isn't certified). There isn't even a huge difference between cheapo dino oil and non cheapo dino oil.


There are lots of cheap oils out there that do not belong in our engines, not even for a minute. As you know, there are cheap oils at discount stores (and many other retail outlets) that are not API certified. One brand for sale around here is called "Chalet" and it is definitely not API certified. I wouldn't put it in my lawnmower. And, as I mentioned in my previous post, there are other types of cheap sub-standard oil for sale (recycled, single-vis, etc.). It's stupid to use any oil that does not meet the manufacturer's specs for quality, just to save a few pennies.

Zetecninja is working his ass off to fix his motor. If you are going to advise him, you have an obligation to do it right. It's wrong to tell him to use "cheap oil" without explaining (and limiting) what you mean. It's also wrong to tell him that "ANY" dino oil is OK, even for a short time.


Originally posted by Kremithefrog:


But when you post incorrect info (some was correct like use 4.5qts.) AND try to talk smack. Yeah that's not cool.


I posted incorrect info? What are you talking about? Trust me on this, Kremit: you don't want to start a discussion about posting incorrect info.


Like I said, any certified oil is fine for a day.

Trust me I do want to start a discussion on this. I KNOW I have posted incorrect info at times AND I own up to it. You on the other hand post incorrect info AND try to talk smack.

Keep talking smack, it doesn't matter. Zetecninja can decide what oil he wants to use. But since you are soooo right about this, post some links up or something that say any correct viscosity, certified oil can't be used for a day in a car. Yeah, that's right you can't. You don't know anything, so keep your mouth shut.
Posted By: Stryker Re: finally an update? yes sir - 08/30/04 04:36 AM
i would take her up to highway speed once or twice using a citgo or similar oil brand (very cheap yet still certified).

then do a motor flush (you can buy afush kit at autozone for ~20 dollars) then use mobile one and drive on!.

good to see she will live again, i know people that just replace the motor when the head gasket blows. head gaskets are so much easier than replacing the whole motor, some people just dont realize what it takes to remove a motor, then when they have it halfway out/apart and realize they have to remove the drive axles and stick a boomstick in the diff so the gears dont fall into the bottom of the case, they wonder why they didnt just change the headgasket...
Posted By: Kremithefrog Re: finally an update? yes sir - 08/30/04 04:52 AM
Originally posted by Stryker:
i would take her up to highway speed once or twice using a citgo or similar oil brand (very cheap yet still certified).


Naw dude, you gotta use castrol valvoline mobil tri-syntetic blend with double certification.
Posted By: Stryker Re: finally an update? yes sir - 08/30/04 04:58 AM
heh kremit.


seriously, any dino oil will be fine for a day. if its not certified i woudl be wary, but it cant hurt much and is definately better than no oil. especially if you are only gonna put 20 miles on it. i would definately run 5w30 instead of 10 though.

pennziol, citgo (found @ dollar tree for...yeah, you guessed it, $1.00 per quart). and a 1.99 oil filter and go for 20 miles, do a motor flush and replace the oil with mobil 1 or equvalent (valvoline SynPower is cheaper in some cases). and a good oil filter.
Posted By: ChattavegasSE_dup1 Re: finally an update? yes sir - 08/30/04 10:56 PM
See!?! Anything but olive oil. Trust me.
Posted By: Stryker Re: finally an update? yes sir - 08/30/04 11:00 PM
oh yeah...olive oil sucks in engines, but again, better than no oil...ok not really cause either way, your motor is toast!


Posted By: Kremithefrog Re: finally an update? yes sir - 08/30/04 11:04 PM
Originally posted by ChattavegasSE:
See!?! Anything but olive oil. Trust me.


Certified olive oil will be ok.

Stryker, valvoline synpower is not an equivalent to mobil1. It's not a true synthetic. Amsoil, redline, royal purple are some other true synthetics. Not that it would really matter if you use a real synthetic or not. I pretend it does though and I use mobil1 and enjoy long drain intervals and a quieter engine.
Posted By: Stryker Re: finally an update? yes sir - 08/30/04 11:20 PM
ok, my bad. thank you for correcting me (AGAIN!! )


EDIT: HEY WAIT JUST A COTTON PICKIN MINUTE!!


Originally posted by valvoline.com:
SynPower is an advanced, fully synthetic motor oil formulated for extreme protection and superior performance.


are you sure?? do you knwo something i dont??? not being sarcastic, i wanan know, cause if im falling for a marketing ploy, i want to know
Posted By: caltour Re: finally an update? yes sir - 08/31/04 04:05 AM
[Everyone waits patiently for Kremit to answer Stryker's question]

Posted By: Kremithefrog Re: finally an update? yes sir - 08/31/04 04:13 AM
Originally posted by Stryker:

are you sure?? do you knwo something i dont??? not being sarcastic, i wanan know, cause if im falling for a marketing ploy, i want to know


From what I understand, they still use a base dino oil. There is no regulation on how a company uses the word synthetic for their products.
But make sure it cost atleast $2 a quart, has certification from the EPA,FDA,FCC, and CIA, even if it'll be in the car for just a day.
Posted By: Stryker Re: finally an update? yes sir - 08/31/04 11:21 PM
hmmmm...weird...who knew???

whats this do for mobil 1???

are we sure thats fully synthetic???
is there really a TRULY synthetic motor oil???
Posted By: Kremithefrog Re: finally an update? yes sir - 08/31/04 11:41 PM
Like I said, mobil1, amsoil, redline, royal purple,,, all true synthetics.
Posted By: Stryker Re: finally an update? yes sir - 09/01/04 01:02 AM
how do you know though?? im sorry i am getting off topic, ill pm you.

im very curious as to this outcome.

ZetecNinja, any progress???
Posted By: Kremithefrog Re: finally an update? yes sir - 09/01/04 03:39 AM
It is what is. How do we know the earth is round?
Posted By: Stryker Re: finally an update? yes sir - 09/01/04 04:10 AM
i understand now...my original question should have been

"how do you knwo that?" lol. sorry...forgive my ingorance, as its really hard to express things on the net. it was not my intention in any way to sound liek an [censored] to you...

anyway, i hope you get er back on the road zetec ninja.

Posted By: Kremithefrog Re: finally an update? yes sir - 09/01/04 04:23 AM
Naw it's cool. I really wish I could explain it you know, but I can't. It's like how do you know that the block is iron? Well I've never tested it but from what info I've gleamed it's iron. That kinda thing.
Posted By: Stazi Re: finally an update? yes sir - 09/01/04 07:55 PM
God, reading this has made me cringe as it's more than apparent that the "Ninja" went about this without the use of a shop manual. I hope he damn well uses one to rebuild the thing or I can see a trashed engine in the works!
Posted By: IonNinja Re: finally an update? yes sir - 09/01/04 10:38 PM
actually I bout a Ford cd about midway through

and I've always looked up instructions before taking apart or putting anything back together...so no rebuild necessary but thanks for your encouraging words.

btw I've got 4 bottles of Valvoline 10W30 and 2 bottles of Castrol GTX High Mileage (75K+)...guess I'm gonna need one more bottle at the very least...
Posted By: Kremithefrog Re: finally an update? yes sir - 09/01/04 10:56 PM
You know you should use 5w-30 with our engines, right?
Posted By: IonNinja Re: finally an update? yes sir - 09/02/04 01:55 AM
Yea I know that is recommended but I have ran 10w30 since I have owned the car and it hasn't caused me any problems.
Posted By: Stryker Re: finally an update? yes sir - 09/02/04 03:48 AM
5w30...mobil1.

i hate castrol.
Posted By: caltour Re: finally an update? yes sir - 09/02/04 04:07 AM
Originally posted by ZetecNinja:
Yea I know that is recommended but I have ran 10w30 since I have owned the car and it hasn't caused me any problems.


10W30 is fine. The Haynes manual recommends 10W30 or 5W30.
Posted By: Kremithefrog Re: finally an update? yes sir - 09/02/04 05:24 AM
10w-30 is OK. 5w-30 is the CORRECT weight though. On pre98s I think it matters less, but for some reason I think it may clog VCT solenoids on 98+ with repeated use. My car runs slightly better with 5w-30.
As long as it's supa dupa certified it'll be tizight tho.
Posted By: Russell-3L Re: finally an update? yes sir - 09/02/04 06:34 AM
he lives in arizona, im sure the 10W-30 will be fine for him!
Posted By: Kremithefrog Re: finally an update? yes sir - 09/02/04 06:50 AM
Yeah, but synthetic 5w-30 is better.
Posted By: 2.3Turbochicken Re: finally an update? yes sir - 09/04/04 01:13 AM
I dont check the zetec board much more, but I must say make sure you get the head checked and the block if you can afford it. Mine warped the head and block, i had the head resurfaced assuming the block was ok. months went on as I leaked oil and topped her off, till one night I fell behind and this was my fate. Make sure you keep 4.5 qts in there.. now time for the old ugly pics. btw when you starve you engine of oil and it spins a bearing, our motors become interference motors very quickly, heres what my exhaust valves and my spark plug did to a piston. and it destory my head I had $500 in from replacing the headgasket only 3 months before

Posted By: caltour Re: finally an update? yes sir - 09/04/04 02:03 AM
Whoa! Thanks for those pics, 2.3turbochicken.

It looks like that one pic shows indentations where the valves hit the pistons. It's good to finally have an answer to the long-standing question about whether zetecs are interference engines.

Posted By: 2.3Turbochicken Re: finally an update? yes sir - 09/04/04 02:24 AM
Originally posted by caltour:
Whoa! Thanks for those pics, 2.3turbochicken.

It looks like that one pic shows indentations where the valves hit the pistons. It's good to finally have an answer to the long-standing question about whether zetecs are interference engines.


please read my post with more detail I stated that when I spun a bearing it made my motor interfere. my piston would move ~1/3-1/2" after spiinning the bearing this reducing the stock clearances
Posted By: caltour Re: finally an update? yes sir - 09/04/04 04:51 PM
OK, thanks, I didn't pick up on that. What exactly is "spinning a bearing" anyway? How is it different from a regular old worn out bearing (i.e. the bearing surface is worn beyond specs due to lots of use), or a bearing that is fractured and busted into pieces? I've seen both of those.

BTW, we haven't heard from zetecninja for awhile.
Posted By: Stryker Re: finally an update? yes sir - 09/04/04 08:19 PM
spinning a baring is exactly that, the bearing "spins" i am really bad at describing things...maybe somone else is beter...
Posted By: IonNinja Re: almost done - 09/05/04 08:43 AM
I've got everything back together...just needs to be tightened.

However, I did have an issue when I tried to start the car. At first it seems it didn't want to crank over but after a couple tries I got it to start...but it felt like my timing was off. Either that or my timing belt is really loose, which it did feel like when I was checkin it out. How do I get it tighter? the belt tensioner seems to be doing its job however on the other side of the belt its really loose and feels like it can just slide off so easy on that side. I think its not turning the cam pulleys good and thats my problem.

Any advice? I always could just not deal with it and get my timing set but wouldn't that cost a good amount of $$$?
Posted By: caltour Re: almost done - 09/05/04 04:07 PM
How loose is your timing belt? Haynes doesn't give any specs re: how much slack there is supposed to be. It just says the tensioner spring is supposed to maintain the proper tension. In my car, the timing belt has almost no slack on the tensioner side, and about 3/16" of slack on the other side.

What procedure did you go through to set the timing? Did you follow the procedure in the manual? If you slid the belt off the cam gears when you removed the head, and then just slid the timing belt back on the cam gears when you reinstalled the head, you could easily have messed up the timing. If a cam gear is even one tooth off its proper position, the car will barely run. Did you at least mark the belt and cam gears with chalk or paint to help you put the belt back in the same place (in relation to the cam gears)?

How did it run when you started it? Did it idle, but fail to accelerate? That might help us figure out what's wrong.

A shop would charge probably $200 or more to set the timing, because they have to take off the valve cover, top timing belt cover, and a bunch of other stuff.
Posted By: IonNinja Re: almost done - 09/05/04 09:40 PM
Originally posted by caltour:
Did you at least mark the belt and cam gears with chalk or paint to help you put the belt back in the same place (in relation to the cam gears)?


this is exactly what I did taking advice from my uncle (the mechanic). Everything looked lined up to me but maybe not.

The timing belt feels plenty tight on the tensioner side but really loose on the other side.

I think I will probably go back and just set the crank pulley at TDC and use a straight tool to alighn the cams...I would've did this in the very beginning if I could turn the stupid crank pulley.
Posted By: Cris'pus Re: almost done - 09/05/04 11:43 PM
Originally posted by ZetecNinja:


I think I will probably go back and just set the crank pulley at TDC and use a straight tool to alighn the cams...I would've did this in the very beginning if I could turn the stupid crank pulley.


That'll save you a lot of time. I tried to leave the v.cover on and just slip the belt off and turn the 2 sprockets a tooth or two; and did that for a couple days.

So I took it to a shop and for liability reasons they wouldn't do it. Fed up I took the V.Cover off and aligned my gears and Presto, 20 minutes it took.
Posted By: IonNinja Re: almost done - 09/06/04 03:33 AM
I went out there today...it appears as though my cam gears are aligned and moving together. However the belt is not in the same spot as it was before I started the car...I'm not sure what would make the belt jump like that but as I said before its really loose on one side and you could almost slip it off. I think my belt seems to be the issue...and nothing more I hope.
Posted By: Stryker Re: almost done - 09/06/04 03:39 AM
sounds like your tensioner moved a little??/


100th post in this thread...yay
Posted By: IonNinja Re: almost done - 09/06/04 03:52 AM
I don't know, I can't slide the tensioner bolt all the way to the left side...its sittin about middle right now maybe more slightly to the right...belt the belt on that side is tight...its the other side thats loose as hell. Would the tensioner have an effect? I've tried sliding the bolt all the way to the left with no luck
Posted By: Kremithefrog Re: almost done - 09/06/04 06:59 AM
Do you have the spring and tiny bolt to set the tensioner properly? Something had to get misaligned if it got lose on one side... not sure what you need to do other than just set the timing and set the tensioner properly THOUGH it would seem you wouldn't need to set the tensioner, you did have to remove pulleys and gears and whatnot, so something couldda changed.
Posted By: Stryker Re: almost done - 09/06/04 05:44 PM
i wonder...if the spring is even in there??? it sounds like its not...i did that on a DOHC neon, i put the belt on but forget the tenssioner spring, and then i wondered for 2 hours why the car wouldnt start...duh! lol.

seriously, i dont think your that lax, but maybe you had a brain fart? happens to all of us.
Posted By: IonNinja Re: almost done - 09/06/04 06:44 PM
well I would love to tell you that I put the spring back in there, or that I even know what you're talking about but I can't...ahha

I called my uncle and he is gonna help me out...
Posted By: Stryker Re: almost done - 09/06/04 07:27 PM
Originally posted by ZetecNinja:
well I would love to tell you that I put the spring back in there, or that I even know what you're talking about but I can't...ahha

I called my uncle and he is gonna help me out...


well...


do you have any springs laying around your work area??? if you do, chances are it isnt in the car LOL.
Posted By: Kremithefrog Re: almost done - 09/06/04 07:51 PM
The spring and post are something you buy from the dealer to set the tensioner, you can leave them installed or remove them after setting the tensioner.
Posted By: IonNinja Re: almost done - 09/06/04 08:51 PM
oh ok well then that explains it because I never had that in the first place...I'm pretty sure no spring fell out and i never saw one or used one when installing the tensionser...I just put it back where it was supposed to go...slid the bolt the farthest to the left I could and tightened the bolt.
Posted By: Kremithefrog Re: almost done - 09/06/04 09:14 PM
Yeah, not good.
Posted By: tiv_dup1 Re: almost done - 09/06/04 09:23 PM
actually, having the spring is not THAT important (just makes it easier), if you install the belt in the proper sequence (it's in the book somewhere) going around and keeping the belt tight at each step so that you put it onto the tensioner in the last step, so all remaining "looseness" comes over the tensioner.

I'd guess the proper sequence is to start at the next sprocket (clockwise) from the tensioner and progressing clockwise around.

I hope I made sense

T.
Posted By: Cris'pus Re: almost done - 09/07/04 12:26 AM
I don't use the post spring for my post98 but I do know that I had to pull the intake gear to get some slack after the tensioner was loose and push it back when the belt was tightened.

Crank the belt a few times by hand to see what the belt does when it turns the gears.

I took my belt off over a dozen times and found that putting it on the intake gear first was the easiest way.

Also don't put it fully on one gear and try to get the other side on. It won't work. Slip on about 1/4 inch then try the otherside.
Posted By: Stazi Re: almost done - 09/07/04 08:37 PM
I saw this coming from 10 miles away.
Posted By: IonNinja Re: almost done - 09/07/04 09:16 PM
Originally posted by Stazi:
I saw this coming from 10 miles away.


thanks for the warning jackass

its okay though because it will all be solved in the next day or so, no biggie.
Posted By: Stazi Re: almost done - 09/08/04 01:40 PM
Originally posted by ZetecNinja:
Originally posted by Stazi:
I saw this coming from 10 miles away.


thanks for the warning jackass

its okay though because it will all be solved in the next day or so, no biggie.


The only jackass here is someone who is doing a head job using his "uncle" as a referrence rather than the damn manual.

I'll bet that if you forked out $8 to by the god-damned CD Manual MADE BY FORD FOR IT'S FIELD MECHANICS, you wouldn't end up in the crap-pot you find yourself in now.

I tried to warn you to get a shop manual and to FOLLOW IT TO THE LETTER when at least REBUILDING the engine, but obviously you didn't.

don't get pissy because your being an ignorant buffoon!
Posted By: IonNinja Re: almost done - 09/09/04 12:09 AM
Originally posted by Stazi:
Originally posted by ZetecNinja:
Originally posted by Stazi:
I saw this coming from 10 miles away.


thanks for the warning jackass

its okay though because it will all be solved in the next day or so, no biggie.


The only jackass here is someone who is doing a head job using his "uncle" as a referrence rather than the damn manual.

I'll bet that if you forked out $8 to by the god-damned CD Manual MADE BY FORD FOR IT'S FIELD MECHANICS, you wouldn't end up in the crap-pot you find yourself in now.

I tried to warn you to get a shop manual and to FOLLOW IT TO THE LETTER when at least REBUILDING the engine, but obviously you didn't.

don't get pissy because your being an ignorant buffoon!


you must be bored if you feel the need to come in my thread and show your a$$

for one I do have a ford cd manual, infact the one todras is selling. And my uncle has been a mechanic for 20+ years so he obviously has experience in the field. I can read the stupid cd 20,000 times, it doesn't change the fact that I am not a mechanic. Its obvious to see, and if it bothers you so much get your dumba$$ out here and fix it yourself. I'm doing what I can, I'm gonna f*ck up many times, its all apart of learning and I doubt the first job you ever did on your car was changing a headgasket so don't expect me to do something perfect that I have never done before. With or without the Ford cd it is not going to change anything...

I'm am not pissy at all, I am glad I worked on my car because it has given me plenty of experience and I have learned alot...f*cking up is just apart of the game...and well if that bothers you then you can kiss my a$$ really cuz I could care less. But thanks for your interest in my project...
© CEG Archives