|
|
Joined: Jun 2004
Posts: 35
New CEG\'er
|

New CEG\'er
Joined: Jun 2004
Posts: 35 |
I did the gutter guard grill mod on my car. Doesn't look too bad. My website has som pics of it (in bio)
95 Contour GL V6 ATX
full of little experimental mods that make me happy
|
|
|
|
|
Joined: Oct 2003
Posts: 5,143
Addicted CEG\'er
|
|
Addicted CEG\'er
Joined: Oct 2003
Posts: 5,143 |
YES! thats EXACTLY what I am looking for, You are brilliant. THANKYOU for solving my question on if you reuse the old grille or custom fabricate a new one. im going to do just that.
98 Corolla LE 1.8L DOHC 1ZZFE
TEIN H.Tech Springs
Tokico HP series Struts
Short ram air intake
Tsudo Axel Back Exhaust
... if a jelly fish stung me.. would you pee on the wound?
|
|
|
|
|
Joined: Oct 2003
Posts: 5,143
Addicted CEG\'er
|
|
Addicted CEG\'er
Joined: Oct 2003
Posts: 5,143 |
Well, I did mine... heres how I did it and how it turned out Parts: $1.50 Sheet of gutter Gaurd at lowe's Tools: my hands, a pair of needle nose plyers time: about 15-20 minutes     Final Result 
98 Corolla LE 1.8L DOHC 1ZZFE
TEIN H.Tech Springs
Tokico HP series Struts
Short ram air intake
Tsudo Axel Back Exhaust
... if a jelly fish stung me.. would you pee on the wound?
|
|
|
|
|
Joined: Oct 2003
Posts: 301
CEG\'er
|
|
CEG\'er
Joined: Oct 2003
Posts: 301 |
I finally got around to doing the Mesh grill so I though I could add to this post.
TOOLS:
1 gutter guard from Lowes for $1.40
1 Wire cutter(or anything that will cut through the gutter guard)
1 Power Drill
10 1 1/4 inch screws.(although you probably won't use them all)
Sanding paper I used rough 60 grit
Dremel or anything you can use to saw.
TIME
30 Minutes-1 Hour Max
First...
Take off the grill. There are 2 screws to take out...then the grill just pulls out.
Second...
Cut out the current grill. You want to cut out the grill thats already there...cut as close as you think you can get. Then sand the rest down. It doesn't have to be perfect because its hard to see through the mesh anyway.(keep your ford logo if necessary)
Third....
You'll notice on the back the oval that there are a bunch of melted looking screws...you need to take those out. I used a power drill for this. Its not gonna take out the screw its gonna drill straight threw it. Use a 3/16 bit There should be 10 slots if IIRC. You have to drill all the way through the thing or else it won't come apart.
Fourth....
Take the chrome oval apart from the back piece. You'll notice in all 10 spots that you drilled through there will be small structures...Cut those off, you won't need it because you'll be replacing it with screws.
Fifth
Take out your mesh and measure. You want your mesh to lay securely inside of the black piece so that when you put it together with the Oval there will just come together. If you over cut then you'll have to trim(the oval and black piece wont fit together) if you undercut your grill won't be properly secure...but you do have a alot of room for error so don't fret. Once measure your mesh to the black piece cut it out and lay it inside the black piece.
Sixth
Place the Chrome oval on top of the black piece and admire your grill. If like the look of it proceed to putting the the piece back together. You want to make sure that the structure closes all the way. Once you have the oval and the black piece properly together all you need to do is whip out the handy power drill again and drill back into the holes that you've already made using 1 1/4 screws. I didn't need to use all 10 holes though. I only used 5-6. Once its done admire and put back onto the car to be admired some more.
Alot of people are saying that they used silicon for step 6 and didn't full remove the bolts holding the oval to the black piece. I though of doing it that way, but eventually I want my grill to be interchangable and it'll be 1 billion times easier to just unscrew, insert, and screw back in. Any questions let me know
~darp~
The next project is on the lower grill(on my SE) once I finish that I'll do a write up on it also...
Originally posted by P�?�?�WD�?�?��?®C�?�?�?�?TM�?�?�N:
I can do anything if i can find that powder .
|
|
|
|
|
Joined: Jun 2004
Posts: 3,065
Hard-core CEG\'er
|
|
Hard-core CEG\'er
Joined: Jun 2004
Posts: 3,065 |
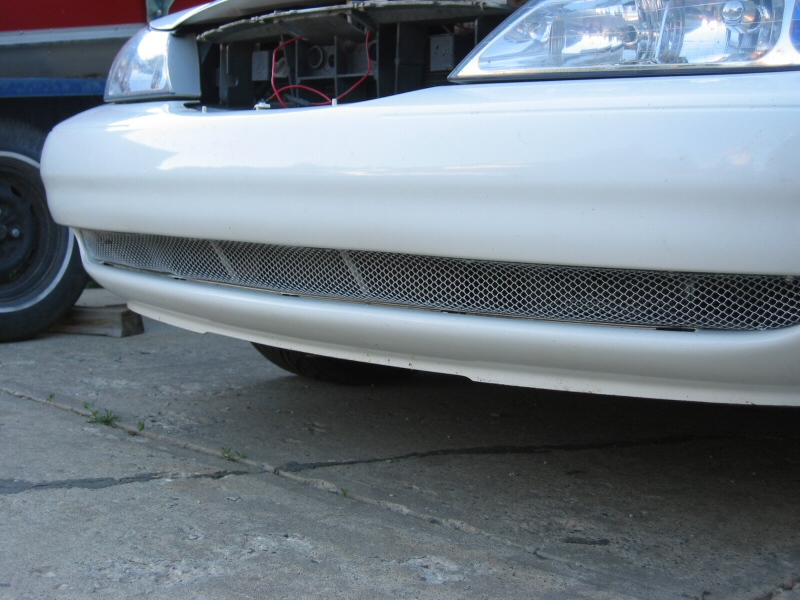
I did the gutter guard one- $1.58 at Lowes. And a set of screws, which was $2.50 (I needed extras anyways). I traced the shape using the chrome ring with a sharpie, and the cut with tin snips about 1" out from the line. I then cut notches in the mesh to fit around the plastic holders. I took out the old honeycomb grill with a screwdriver and a hammer. Then I bent the mesh into place, and put about 6 screws in to hold it in place, along with some washers. I pushed all of the extra mesh in with a screwdriver to make it conform to the plastic, and it secures it better. Looks great. I also put the ford tag back in, because it feels like you are defacing the car w/o it. Very happy with the results, and it only took about 20 min. A great mod for newbies!
|
|
|
|
|
Joined: May 2002
Posts: 2,007
Hard-core CEG\'er
|
|
Hard-core CEG\'er
Joined: May 2002
Posts: 2,007 |
Originally posted by amarv12:
Originally posted by amarv12:
Price: Like $2-3 for a roll of gutter guard at Home Depot
Fastened with: Clear hot glue
Sidenotes: I did it on my post 98 mystique (on my old 99), and the procedure is a little different than contours. First theres 4 screws at the top of the grille when you open the hood--take those out, then to access the 3 allen screws below the grille, you need to carefully and gently bend the grille forward, and use one of those 90 degree bent allen keys (can't remember what size). It takes quite some time as you have very limited space to work with, but eventually you'll get them out. Then slide the grille back; once you get the grille off (for the way i did it) you need to cut out the vertical bars in the grille. Make sure the stubs are cut flush to the frame of the grille, so it looks good. Then all i did was slap some mesh in there slightly biggeer than the opening, and glued it on the grille in the back where you cant see.
*I am on the hunt for some better mesh however, because the gutter guard is kind of flimsy, and wears its shine quickly. Also when i find some new mesh, i'll probably use gel base super glue to make sure its extra tight, or figure something else out.
Also if you do use gutter guard, i would recommend putting a clear coat on it, so it keeps its shine. And if the spots where the stubs were cut flush bother you, then have your grille painted body color--to me, it doesn't stick out too much.
I have some finished pics here
Happy modding 
So; this thread got me motivated to actually go look for mesh, so i hit up home depot to look around again. Most of you know already, but i just found out that most home depots dont even sell the rolls of gutter guard anymore--instead they sell these 3' sheets. These sheets are much better than the old stuff i had from the roll, much thicker--higher guage, and just generally sturdier.
So, i re-meshed my grille, and this time i used screws to fasten it, along with hot glue. Also i cleaned the mesh and get a chance to put on some clearcoat early this morning, it looks great.
This picture is a little big, so i'll post a link. In the pic, where i have the red circles you can see that i have put screws, driven from the outer edge to inner; and where the blue circles are is where i later put hot glue. There's more pics in that album too. Sorry about the quality, photobucket resizes pics when they're too big.
So to recap:
Mesh: Higher guage gutter guard 3' sheet
From: Home depot
Price: $1.25
I know this is all pretty simple, but i think its nice to outline it for the newcomers that may be scared to just tear stuff apart on their own. 
I ended up re-doing my grille once more.
Here's the page.
1998 Mystique LS:
-2.5 Duratec ATX
-Vibrant White
--------------------
=Pics=
=Info=
|
|
|
|
|
Joined: May 2003
Posts: 154
CEG\'er
|
|
CEG\'er
Joined: May 2003
Posts: 154 |
Mystique grille note: Just a note on the instructions listed for the Mystique grille removal. Above it was mentioned that an allen key was needed to remove the screws that attach the grille to the bumper cover. I couldn't get mine off, so I ended up taking the entire bumper cover off and....the screws are actually Phillips, NOT allen key. Now that I have the bumper off, I'm going to do mesh on both the grille and the lower portion of the cover and I will detail my progress for all the 'stique owners this weekend.
-Electric Frost
1998 Mercury Mystique GS
SVT side skirts, rear SVT bumper, SVT exhaust, K&N Cone Air intake, 17in ST200 rims
2005 Ford Mustang GT
|
|
|
|
|
Joined: May 2002
Posts: 2,007
Hard-core CEG\'er
|
|
Hard-core CEG\'er
Joined: May 2002
Posts: 2,007 |
Ya, sorry, i meant to add that a long time ago. On my old 99 it was a hex head, on my 98 it was phillips. An easy way to tell is to just slide a mirror down there to look at the head.
Once again, sorry about that.
1998 Mystique LS:
-2.5 Duratec ATX
-Vibrant White
--------------------
=Pics=
=Info=
|
|
|
|
|
Joined: Jun 2004
Posts: 79
CEG\'er
|
|
CEG\'er
Joined: Jun 2004
Posts: 79 |
Originally posted by darpinian:
The next project is on the lower grill(on my SE) once I finish that I'll do a write up on it also...
Cool, I'm interested in doing that too. Let me know how it turns out.
|
|
|
|
|
Joined: May 2003
Posts: 154
CEG\'er
|
|
CEG\'er
Joined: May 2003
Posts: 154 |
-Electric Frost
1998 Mercury Mystique GS
SVT side skirts, rear SVT bumper, SVT exhaust, K&N Cone Air intake, 17in ST200 rims
2005 Ford Mustang GT
|
|
|
|
|