I got a Photobucket account, here is the Schematic of the blower motor circuit and other pics relevant to the procedures below:
I figured out how to put the text and photos back together, it's a dull evening

I always wanted to post images!
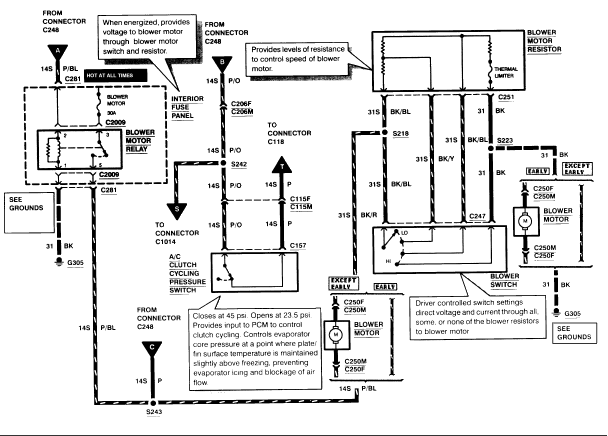
Blower Motor schematic
Written procedure to remove blower resistor

REMOVAL
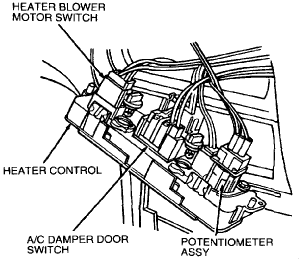
Working from inside the vehicle, disengage clips and remove upper footwell trim panel from the passenger side.
Disconnect wire harness from heater blower motor switch resistor.
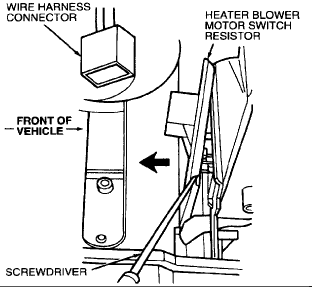
Insert screwdriver approximately 5 mm (0.2 inch) under edge of heater blower motor switch resistor to disengage retainer and remove heater blower motor switch resistor.
INSTALLATION
Position heater blower motor switch resistor on A/C evaporator housing and snap into place.
Connect wiring harness.
Install upper footwell trim panel.
Check blower motor for proper operation at all speeds.
Copyright �?© 2005 ALLDATA LLC
Terms of Use
Written procedure to remove climate panel:
1995 Mercury Mystique V6-153 2.5L DOHC
Top - Vehicle
Heating and Air Conditioning
. Control Assembly
. . Service and Repair
. . . Climate Control Assembly
.
Notes
Climate Control Assembly
[image]
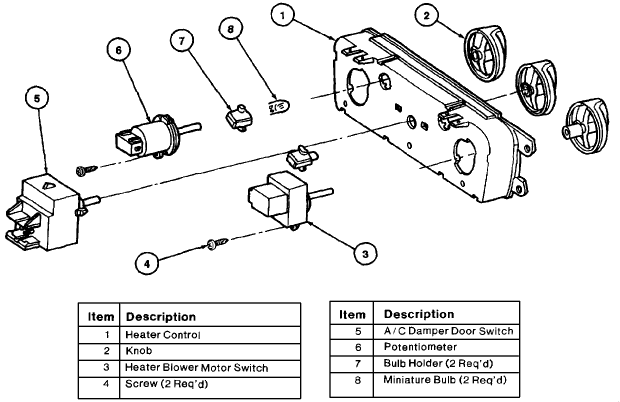
[/image]
REMOVAL
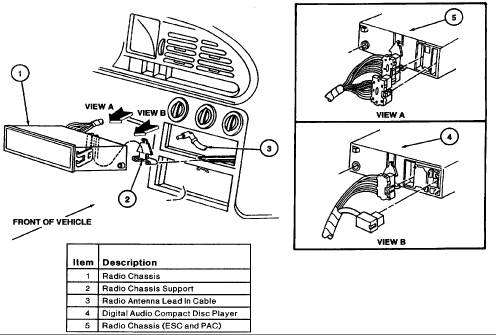
Disconnect battery ground cable. CAUTION: Do not use excessive force when installing removing tool. This will damage retaining clips, making radio chassis or digital audio compact disc player removal difficult.
Install Radio Removing Tool T87P-19061-A into radio face plate or digital audio compact disc player face plate. Push tool in approximately 25.4 mm (1 inch) to release retaining clips.
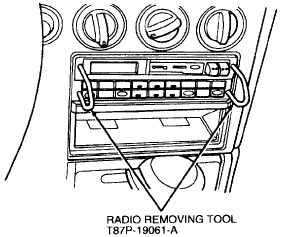
Apply a slight spreading force on tool and pull radio chassis or digital audio compact disc player from instrument panel.
Disconnect the connectors and remove the radio chassis and digital audio compact disc player.
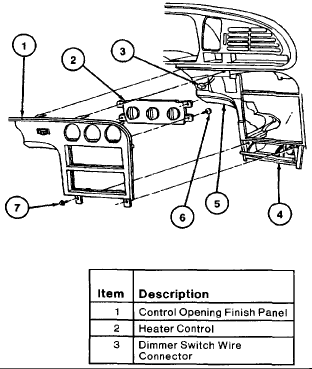
Open ash receptacle and remove two screws retaining control opening finish panel to instrument panel. Snap finish panel away from instrument panel.
Disconnect light switch rheostat resistor wiring connector.
Disconnect wire connectors from the heater control.
Disconnect vacuum hose harness from heater control.
Remove four screws and heater control from finish panel.
INSTALLATION
Position heater control in control opening finish panel and install retaining screws.
Connect wire connector(s) and vacuum hose harness to heater control.
Connect dash dimmer switch wiring connector.
Install control opening finish panel by snapping it into place. Secure finish panel with two screws.
Connect wiring connectors and antenna cable to radio chassis.
Slide radio chassis into instrument panel, making sure that radio chassis or rear radio chassis support of the digital audio compact disc player is engaged on the upper support rail.
Push radio chassis or digital audio compact disc player inward until retaining clips are fully engaged.
Connect battery ground cable.
Test radio chassis and digital audio compact disc player for operation.
Copyright �?© 2005 ALLDATA LLC
Terms of Use
[image]
[/image]
