• Welcome to the Contour Enthusiasts Group, the best resource for the Ford Contour and Mercury Mystique.

    You can register to join the community.

headlamp assembly questions

MadDog

Veteran CEG'er
Joined
Jul 27, 2012
Messages
618
Location
Augusta, GA
I found a pretty good looking headlamp assembly at a local yard. I would like to replace my passenger's side unit due to a broken tab. I have a few questions about the headlamp.

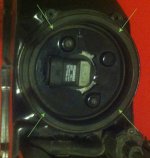
1) Is the rubber ring in the first picture removable ? I would like to tear down the assembly as far as I can and clean and re-assemble but I am not sure if the rubber ring is supposed to come out.
light ring2..jpg

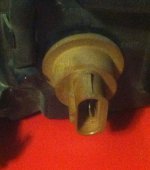
2) The male socket on the lamp in the second picture has 2 tabs that lock the female end in. However, every time I try and pull the socket apart while inspecting a headlamp assembly at the junkyard the locking tabs on the female end snap off. Is there any way to prevent this damage ? Warming the tabs up with a heat gun ? If they do break off, is there some sort of replacement I can add to keep the sockets locked ?
light socket..jpg

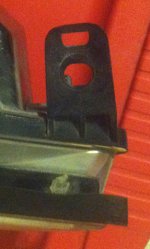
3) The tab. This is always the tab that breaks (third picture). 90% of the headlamp assemblies at the junkyard have this tab broken. Is there a good way to reinforce this tab ? I heard of someone putting a layer of JB weld on it.
light tab..jpg

thanks,

Mad Dog

Note to admin: I can never upload files that are more than 100K or so. Is there a way to increase the file size limit ?
 
Search for hightower mod how to, it shoes you how to take apart and clean

Rubber ring is removable just unscrew the three screws take out the plastic piece in the middle and then you can pull the rubber ring

I also heard some people rebuilt tabs with pieces of metal glued to the reaming plastic, and could use the same method to reinforce

Also use photobucket if you want bigger pics
 
Thanks for the info. I really didnt want to force the rubber ring out if it wasnt supposed to go.

I had some ideas for replacement tab fabrication, but first things first...gotta get this cleaned up.

thanks,

Mad DOg
 
The tabs and other retention methods break because the plastic is crap and gets much worse with temperature and time. Gluing it is a waste of time unless enough used to look like crap. They pretty much stay plugged in anyway, mine have been broken for years and no trouble at all. Most of the engine sensor plugs do the same thing, they are designed to have to pry them up enough to guarantee breakage once they have gotten old. Ford's way of frustrating owners enough to buy a new car. One of MANY ways I might add.....................

Just wait until the major headlight mounting tabs start cracking off to let entire headlight fall out and hang by the harness. You'll love it.
 
I was hoping someone had a metal retaining clip fabbed up for the headlamp plugs. I cringe when I look at those cheezy little plastic retaining clips

So far, my retaining tabs are in good shape except for one of the problem tabs is broken.

thanks,

Mad Dog
 
Dorman makes a replacement front turn/parking lamp connector pigtail, search Dorman 84814 at Rockauto. I've had to replace both of mine. In a pinch, you can wrap a large wire tie around the body of the harness connector and it will keep it in place until you can replace the connector.

The underhood plastic wiring bits in my Contour are some of the most fragile I've ever encountered. The wiring, connectors and harness sleeve in my 85 SVO Mustang are far more pliable, despite their advanced age.

For the headlight tabs, I use a 1/4" fender washer under the fixing bolts, they're quite large, which helps spread the load over the whole tab and makes it less likely to fail.
 
Yes, it is indeed curious how the plastic quality so varies. Some of it is bulletproof and never breaks, some parts break by simply being in their installed state, you come back later and they are broken and crumble in your fingers. I've noted how earlier model headlights that had a really good plastic that was resistant to UV and really clear-coated well to last forever have changed into plastics that get opaque twice as quickly and craze inside the plastic itself, meaning no amount of restoration is going to bring it back to transparent. They could easily do better but like everything else in American life now, why bother?
 
I was considering seeing if I could restore some mechanical durability by reflowing the plastic surface using an aggressive solvent. I dont know what dissolves PMMA, but I am guessing some dichoromethane might do it.

In the end thats still a hack, a new fastener is needed on the problem tab.

Mad Dog
 
Acrylic cement is amazing stuff and I have spliced 2 completely broken bumper mesh's back together, made new headlight mounting tabs, and made new grill mounting tabs.

I also use this stuff to fix broken vintage audio equipment with plastic cases. Works wonders, it's on ebay and comes in a little metal can and syringe. It physically melts plastic, evaporates, and the plastic dries hard and most times stronger than the original.
 
I also use this stuff to fix broken vintage audio equipment with plastic cases.

Do you remember the product name ? That sounds exactly what I am looking for.

Edit: or do you mean the acrylic cement ?

thanks,

Mad Dog
 
Last edited:
"We are unable to ship this material into Los Angeles, Orange, Riverside or San Bernandino Counties."

Dang glue sniffers around here! :nonono:
Karl
 
I tried this material, but it does not appreciably reflow the bulk of the ABS. ABS is tough. Instead, I applied a thin layer of JB Weld over the top of the tab as a reinforcement.

Mad Dog
 
If the black plastic parts are indeed ABS, you could reflow it with ABS (black drain pipe) plumbing cement. ABS cement is usually MEK and Acetone with some dissolved ABS resin, you can apply multiple layers and the dissolved resin will build up and reinforce broken parts. The Methylene Chloride in that linked solvent cement is not the best solvent weld for ABS, Acetone and MEK work much better.
 
J-B weld has no strength in thin layers unless you add like sheetmetal to it to add some strength. Take the epoxy and put it on a thin piece of cardboard like any card with vac sealed part on it and then flex the card after the epoxy dries, it easily cracks in two and no force used to do it. I've used epoxy on 500 different things, some will last forever and some five minutes or less, it's all about the way it is used not the quality of the product. Waste of time gluing on tabs with it, they WILL break off again. Not enough cross section to hold, or the tab breaks right next to the epoxy next time. The headlight plastic is durable in thick cross sections but weak in thin, and why they make tabs like that. The part is engineered to fail to make you buy more product.
 
Well that just sucks. What we need is a small molded part that bolts onto the stub of the tab. Just shear off the old tab, screw down the new one which could be fitted to the old tab frame.

thanks,

Mad Dog
 
I drill very small hole in broken tab remains and then using very bendable small gauge wire then wrap around the screw and clip extra off. Done correctly it does not look bad at all and as strong as the original tab was if not more.
 
Back
Top