
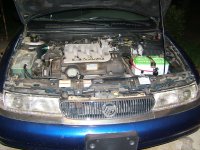
First Generation Contour & Mystique HID Upgrade
There’s lots of room to install HID headlights in the second generation of Contours and Mystiques. Unfortunately for owners of the first generation of the vehicle, the options for upgrading our terrible headlights are very limited. So limited, in fact, that I had to figure everything out from scratch.
The first problem to be overcome is to find the smallest HID projectors available. I found mine at theretrofitsource.com. They had fantastic customer service and support. The smallest projectors they had in 2010 were the Morimoto H1 Bi-Xenon Projectors, which they still sell. The “Bi” means they do both high and low beam in one lamp. There are plenty of tutorials on how to install them, so I will focus on our specific application.
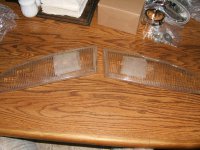
First I restored the headlights with fine sandpapers. I wet-sanded in alternating directions with finer and finer sandpaper. Then I carefully separated the clear polycarbonate cover from the reflector. Our cars are so old, the sealant is brittle anyway, but a little time in a warm oven will help in some spots. Dig out and dispose of the old sealant and clean it off the lens’ edges. Next, I placed a projector lamp in the standard headlamp socket on the outside, and found there was not even room for one of the provided shrouds inside. I carefully marked off the area of the headlamp where the light would go through with tape on the inside.

I ground out the ridges inside the lens with a Dremel tool and the coarse and finer sanding drum until it was relatively smooth.

I then repeated the restoration process on the inside of the lens starting with even coarser grit. Since it wasn’t going to be perfectly smooth, I masked and sprayed a coat of Future acrylic floor wax, and the fine scratches were filled in.

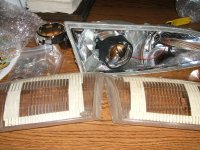
The whole purpose of this was that some retrofitters have you replace the lens with thin acrylic sheet vacuum formed over the old lens. This will not hold up very well over time, especially considering how much these good HID systems cost. The original polycarbonate lenses are literally what safety glasses are made of these days. Now it’s just a matter of reassembling the headlights, because they are just big enough to accommodate these projectors without any modifications to the old reflector housing. This next image shows the order in which the seals and rings go in to hold the projectors in place and sealed inside. I used the opening for the old high beams to run wires to the solenoid that raises a shade to simply cut off the top of the headlight’s beam, which the lens has flipped upside down. I literally (and carefully) broke the glass off the high beam lamps and soldered the leads on the filament posts.

Seal the lens to the reflector housing with a stretched strip of butyl window sealant from a local glass company. Just three feet of the material were enough for four headlights. Stretch it so that it is as thin as that original sealant and seat it in the groove of the reflector housing. If you use too much, it will not seal up tight and you’ll have to dig some out or start over. The material is like vinyl mastic, so lay some newspaper underneath the headlight and wear work clothes.

Just wire things up per the instructions and mount everything securely. This is a good time to repair the mounting brackets and get them ready to adjust the new lamps. I could cover this process in another message. The process also works the same for the first generation Mystique as you can see below:

I have not had any trouble from either vehicle in the three years since. I’ll probably buy another kit for fog lights and for my other Mystique because the light is so much better. Before the upgrade, I could see my car’s shadow stretched in front of me from the low beams of the car behind me when I had my high beams on! Now I can see much better at night and the projectors are so well focused that oncoming cars don’t even flash me if I accidentally left the high beams on.
There’s lots of room to install HID headlights in the second generation of Contours and Mystiques. Unfortunately for owners of the first generation of the vehicle, the options for upgrading our terrible headlights are very limited. So limited, in fact, that I had to figure everything out from scratch.
The first problem to be overcome is to find the smallest HID projectors available. I found mine at theretrofitsource.com. They had fantastic customer service and support. The smallest projectors they had in 2010 were the Morimoto H1 Bi-Xenon Projectors, which they still sell. The “Bi” means they do both high and low beam in one lamp. There are plenty of tutorials on how to install them, so I will focus on our specific application.
First I restored the headlights with fine sandpapers. I wet-sanded in alternating directions with finer and finer sandpaper. Then I carefully separated the clear polycarbonate cover from the reflector. Our cars are so old, the sealant is brittle anyway, but a little time in a warm oven will help in some spots. Dig out and dispose of the old sealant and clean it off the lens’ edges. Next, I placed a projector lamp in the standard headlamp socket on the outside, and found there was not even room for one of the provided shrouds inside. I carefully marked off the area of the headlamp where the light would go through with tape on the inside.
I ground out the ridges inside the lens with a Dremel tool and the coarse and finer sanding drum until it was relatively smooth.
I then repeated the restoration process on the inside of the lens starting with even coarser grit. Since it wasn’t going to be perfectly smooth, I masked and sprayed a coat of Future acrylic floor wax, and the fine scratches were filled in.
The whole purpose of this was that some retrofitters have you replace the lens with thin acrylic sheet vacuum formed over the old lens. This will not hold up very well over time, especially considering how much these good HID systems cost. The original polycarbonate lenses are literally what safety glasses are made of these days. Now it’s just a matter of reassembling the headlights, because they are just big enough to accommodate these projectors without any modifications to the old reflector housing. This next image shows the order in which the seals and rings go in to hold the projectors in place and sealed inside. I used the opening for the old high beams to run wires to the solenoid that raises a shade to simply cut off the top of the headlight’s beam, which the lens has flipped upside down. I literally (and carefully) broke the glass off the high beam lamps and soldered the leads on the filament posts.
Seal the lens to the reflector housing with a stretched strip of butyl window sealant from a local glass company. Just three feet of the material were enough for four headlights. Stretch it so that it is as thin as that original sealant and seat it in the groove of the reflector housing. If you use too much, it will not seal up tight and you’ll have to dig some out or start over. The material is like vinyl mastic, so lay some newspaper underneath the headlight and wear work clothes.
Just wire things up per the instructions and mount everything securely. This is a good time to repair the mounting brackets and get them ready to adjust the new lamps. I could cover this process in another message. The process also works the same for the first generation Mystique as you can see below:
I have not had any trouble from either vehicle in the three years since. I’ll probably buy another kit for fog lights and for my other Mystique because the light is so much better. Before the upgrade, I could see my car’s shadow stretched in front of me from the low beams of the car behind me when I had my high beams on! Now I can see much better at night and the projectors are so well focused that oncoming cars don’t even flash me if I accidentally left the high beams on.
Attachments

Last edited: