• Welcome to the Contour Enthusiasts Group, the best resource for the Ford Contour and Mercury Mystique.

    You can register to join the community.

Warmonger Upgrade

Heywood

Hard-core CEG'er
Joined
Jan 24, 2006
Messages
1,422
Location
Montreal
In about 2 weeks time I'm planning to do a complete brake job on my car. I think I have everything ordered and am just waiting for the various bits to show up.
I have so far:
FSVT rotors - received
Warmonger Brackets - received
Bendix pads - received
Speed bleeders - received
ATE amber fluid - received
Braided SS Lines - received
Calliper paint - received

My plan is to start at the front and as soon as I get the front rotors off, take them to a shop and have them turned to min spec to go on the rear.

I need to get this completely finished in 1 weekend so I'm posting up for any hints or tips. I've spent the last week or so searching through the forums and reading up. I'll be sure and update as I get the rest of the bits and maybe even post up a tool list to make sure I have everything. Once I start its going to be a major PITA to make a shop run. :cool:
 
Last edited:
do u have the right torx bit for the caliper slide pin? i think some cars have a hex, some have torx. brake caliper grease for the slide pins? brake pad spreader to push the piston back in. rear pistons u dont need the special tool. needle nose pliers work fine. make sure the pistons are lined up correctly with the pads. theres a notch to line up. you'll see it.

why the amber fluid? do u have the blue in now so u can see the fluid change.
 
First, you have the right idea. Learn all you can and be as prepared as possible.

Second, allow for the possibility that you won't be able to finish it in one day. Be prepared to finish the fronts and start on the rears. There is a lot of work to do. You may want to paint the calipers on still a different day, after you finish the brake upgrade.

Some highlights. Don't attempt the job without good grinders. A small 4" or 4 1/2" one to trim the spindles. A large one, seems like I borrowed a 9" one to open the throat of the rear brackets.

Another way to open up the throats would be with a milling machine if you have access to one. My guess is that about .065" off each inner face would give you room that you would not even need to machine the rotors. Once you get started with grinding the throats you will see the wisdom of this suggestion.

You also need a drum sander to open up the hat area of the rear rotors or (my preference) slightly reduce the outer diameter of the rear hubs.

So, my suggestion is to start with the fronts. Do one side at a time. Pull off the caliper, the caliper bracket (bridge), and the rotor. Trial fit the new brackets and you will see where the spindle needs trimming. Trim it enough
that there is good clearance for the fasteners without cocking them off to the side. It has been a while so I may not be clear on the whole process, but I had an early kit and had to enlarge a mounting hole in the spindle. The later kits may have studs that better matched the holes. Check your instructions and be prepared to drill the hole oversize if needed.

When you push the caliper piston into place, open the bleed port so you don't force fluid backward. You could damage the ABS hydraulic control unit or master cylinder if you push dirty fluid backward into them.

You will need to remove the rear calipers, caliper brackets, and rotors for access to modify things for the rears.

On the rears, the rotors won't fit onto the hubs unless you either open up the inner hat area of the rotor or reduce the outer diameter of the hub. I prefer the hub. To reduce the size of the hub, spin the hub by holding one of the studs and rotating the hub while holding the spinning drum sander against the edge of the hub. This will evenly remove metal. Stop as needed to test fit the rotor. You need to remove enough that the rotor fits with some clearance. Enough to rock the rotor. Too tight and it will cause fit problems when the rotor heats up, probably similar to warped rotors.

Once you get rotor fitment. move on to trimming the spindle. Test fit things to see what needs to be trimmed. The rears require more trimming than the fronts. You need some trimming to make a test fit. You will not be able to do the final test fit until the factory caliper brackets are opened up. You won't be able to determine you have trimmed the spindles enough until you have opened up the brackets. You may need to go back and forth to dial it in.

This may be the point you reach when you fold things up for the day. Put the stock rear parts back on and wait for the next weekend.

Like I said before, if you have access to a machine shop, you will do much better milling out the throats of the rear brackets to clear the thicker rotors. You might consider finding a pair of rear brackets and getting them machined before starting the job.

If you grind out the throats of the rear brackets. find a 9" grinder and remove the guard. Mount it in a vice. Don't do this by yourself. Have a friend help. Use heavy leather gloves. Remove metal evenly from both sides, one side at a time. If you do it evenly, you can test fit the rotor so that the bracket can be fit over the rotor. You will not be able to final test fit until the rotor is mounted and the bracket is test fitted in place.

When it comes to final fitting of the pads, some have posted that the have needed to remove the shims from the pad backing plates for clearance, or remove a little from the pads. I re-used the lightly used front and pads and had no trouble.

Its getting late. Those are some of the highlights. Read the instructions carefully. Don't rush. When all is said and done, IT IS WORTH IT!
 
Thanks a bunch Jim, plenty of stuff for me to digest there. I am thinking of doing a few hours friday night to get a jump on things, work hard over the weekend and worst comes to worst, I could get a ride to work and finish Monday night.
I want to get it all done in one hit to avoid having to bleed the brakes again, but I will see how it goes and may stop with just the fronts done depending on how its going.
hmouta, you are right, I have superblue in the lines right now, so the amber is to make sure everything is flushed properly.
And that is a great suggestion about getting some rear caliper brackets and having them machined before hand, I will see if I can get hold of some. I don't have a whole bunch of tools and definitely not a work area equipped to grind like you are suggesting. I was actually thinking of using a hand file to widen them out.
Is it possible to have a shop widen out the inside of the rotor hat? That would keep the grinding to the bits on the car. If I could find a good machine shop I could have them do turn the rotors, widen the hat and the calliper brackets at the same time.
 
I'm sure a machine shop could open up the hats on the rotors on a lathe. It would be similar to machining a break drum, but on a much smaller scale. I don't think an ordinary drum lathe could do it. You would need a very accurate measurement of the hub diameter and let the machinist know you need a very loose fit.
 
I was just checking out what I needed for the slide pin bolt and found that I have torx on the back and hex on the front. Very glad I checked both.
 
Print out the install directions and have them handy for the first corner. The second corner obviously went much faster for me. The only thing I'd add to the above posts is red loctite for the bracket to hub bolts. I plan to drill and safety wire mine but the thread locker will do for now.

I did my FSVT front upgrade last night and I echo Jim's comments on the grinders. I was able to pull it off with my 4.5" small unit and some other special cutting tools I happened to have in my garage.

After day 1 it's been fantastic. I went with some awesome track pads (Carbotech XP10's) and will give them a workout at an open track event this weekend.

Start to finish the fronts took me just under 8 hours. If I had a 9" grinder and vice it would have saved time but I made it with what I had.
 
Last edited:
One thing I would suggest is to to one side of the car at a time so you can use the other as a template for putting them back together correctly!

-Andy
 
i did this upgrade a while back. its a little more time consuming than it looks. i dont think its a one one weekender. the fronts are easy. just use a die grinder (thats what i used) or something in that family to trim down the spindles. and you need to drill the mounting holes in the spindle to 1-2 inch. thats it. easy.. for the rears i just had the rotor hats and the caliper brackets machined (if you do this i found that the easiest way is to measure the inside of the hats on the stock rear rotors with a caliper of some sort, not to try and measure the hub) to the right sizes. thats the easiest way..
 
Awesome comments guys. I really appreciate the input. I will call around a few machine shops next week and find somewhere to machine the bits. I'd rather them do it with the right tools than me hack away at this stuff for hours.
And I will add some loctite to the list.
 
Putting together my tool list for this weekend.
Tools:
1/4", 3/8" ratchets
T47, T50 torx sockets, 7 mm Allen socket
Torque wrench
4 1/2" grinder
drill with 1/2" bit
flare wrench for brake lines (10 mm?)
File
Sand Paper?
Wire brush
Gloves
Camera (taking photos before/during dismantling since I'm doing all 4 corners at once)

Caliper grease (I got a little tube with my bendix pads, will that be enough?)
WD40 & PBBlaster
Red loctite
Beer

I need to confirm speed bleeder sizes. I have 4 SB1010s at the moment, but it seems like sb8125L is what is needed on the fronts. Can anyone confirm? I'd also like to put one on the clutch bleeder if anyone knows what size that is. And are these available in stores? I ordered mine from their website but its too late to get any more before this weekend.

Also, I plan on just wiring my lines back with tie wire to close the them off until everything is ready to go back together. I'm not planning to reuse the hoses but I will be able to get them to kink right?

My plan is for Friday night to get all 4 rotors off so that I can take the rear brackets and front rotors to a machine shop 1st thing in on Saturday morning. Depending how that goes I may also prep the calipers for paint.
Saturday I will work the fronts and hopefully get them finished and possibly start on the rears. Must remember to go to the machine shop and pick up my bits before they close.
Sunday will hopefully be finishing up the rears and flushing the system.
Wish me luck and hopefully I'll be able to get this done as planned, its the biggest job I have attempted to tackle to date. I am prepared to stop half way if things aren't going well thanks to your comments.
 
Last edited:
Have you lined up a machine shop that can do the brackets? The average automotive machine shop may not have what you need. You will also need something to measure the hub diameter, as the old rear rotor will not help. The diameter of the "hat" of the old rear rotor would take you into the meat of the rotor on the front (new rear) rotors. Perhaps the machine shop could loan you a pair of calipers. Tell them you need the rotors to have a loose fit over the hub.
 
Damn Big Jim its like you read my mind. I was planning to take the old rear rotors in and tell them to open them up to the same diameter. Maybe I will try and work out how much play they have. My old idea was to wrap a piece of wire around the hub and then measure its length to back calculate the diameter. Maybe I'll revert to that.
I think I found a place today after much calling. It was too late in the day but I will call them in the morning to make sure they can do it. One thing that might be helpful for me is what sort of machine would be used to open up the caliper bracket? Is it a milling machine?
 
Yes, you need a milling machine to open up the brackets. The wire length will not give you an accurate enough measurement. See if the machine shop will loan you a caliper (and teach you haw to use it if necessary).
 
the proper measurement tool to use would be an electronic caliper. and i know most people dont have one of these just laying around, so. they should have one to use at the machine shop.. i had them take 1/8 inch off the total diameter on my rotors and they fit fine. i guess it probably matters what rotors you are using though. the hat thickness varies in different brands. just make sure you wont be making the hat too thin and jeopardize the structural integrity of the rotor (which you shouldnt be), but you might want to check just in case.. hope all goes well with the upgrade. keep us updated, and ask if you need advice or anything.
 
Started this afternoon and everything is going well so far. Got all the calipers off and have the bits to take to the machine shop in the morning in my friends car.
I checked my front rotors with the rear caliper brackets and they fit in there easily. I am guessing that this is because the rotors are worn down a lot. Should I try and get new ones machined down instead of reusing my old ones?
Check out the attached pics.
My work area:
IMG_4742.jpg

Front rotors in rear brackets:
IMG_4745.jpg


IMG_4744.jpg


IMG_4748.jpg


Would I have any trouble getting the svt rotors from a regular parts store?

Oh, and is there a trick to getting the parking brake off of the rear calipers? I wasn't sure about that one way collar thing thats on there, do I need to preserve it? Am I correct in thinking that when I am done I don't route the parking brake back through the hole on the caliper?
 
Last edited:
check your other post, i replied on that one too. i would use new rotors, and yes they fit because they are worn down. you SHOULD be able to get the rotors from a parts store, they would probably have to order them though. i recommend upgrading the type of rotor while you have them all off and are going all new. i bought EBC slotted and zinc plated rotors.. you dont have to take off the parking brake cable, it just can make it easier. i did it with mine on. just cut the plastic ties that hold the cable to the tow link and you should have all the freedom to move them around that you need.. to get the alignment brackets off: theres a long (like 3 inch) pin on the top that hold them on the calipers, just pull the safety pin (its really tiny) that fits into the larger pin and slide it out.
 
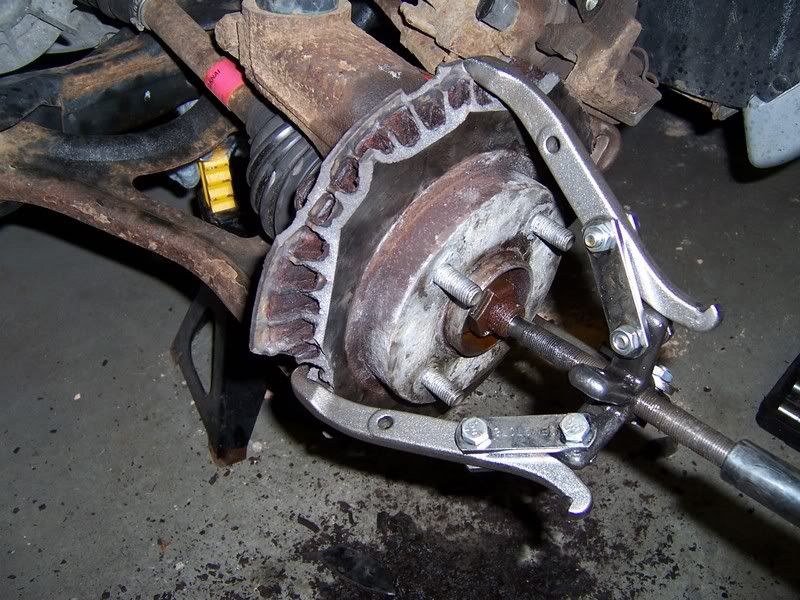
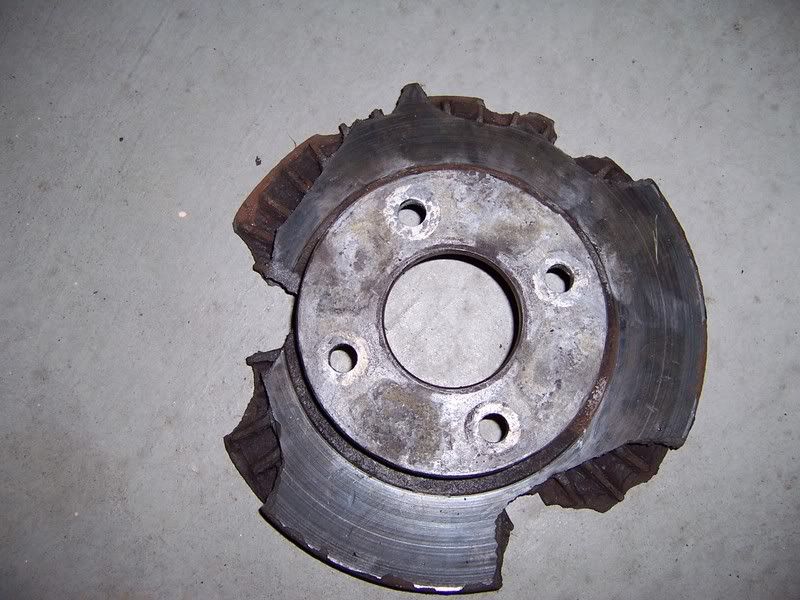
Got the front rotors w/o having to do this......

9-26-07ContourFrontBrakes010.jpg


9-26-07ContourFrontBrakes020.jpg


Just another reason to hate CA guys! :p

Kidding! keep up the good work!

Pat
 
I decided to reuse the old ones, but I had the brackets opened up a little anyway so that when I get new rotors I don't have to do it then. Just about done now. Painted the calipers this morning and will start putting them back on in an hour or so.
All the brackets and rotors are on and look good.
Everything has gone smoothly so far.
And f5r cobra, all my rotors just fell off as soon as I undid the caliper bracket. Looks like you didn't have any fun getting that one off.

Oh and for the record, I had the diameter of the hat machined out 1/8" and that was plenty and had 5/64" machined off the brackets.

And golf tees work great for blocking the brake lines.
 
Back
Top