• Welcome to the Contour Enthusiasts Group, the best resource for the Ford Contour and Mercury Mystique.

    You can register to join the community.

Ported 3L Guidance

mosh

CEG'er
Joined
Jul 17, 2006
Messages
136
Location
Camas, WA
After much deliberation, I made the choice to go the ported 3L route to maintain and enhance the sweet high revving nature of my car rather than go with the simpler but fundamentally different nature of the full 3L.

I love the revs, hitting 7400 on a daily basis, so I'm looking for the same high end flexibility and power in my 3L as I have in my 2.5L. I'm running about the 185whp range with the 2.5, lots of mods and a generic tune, my goal is to be at or above 220whp with the 3L, SVT cams/intake and a good tune.

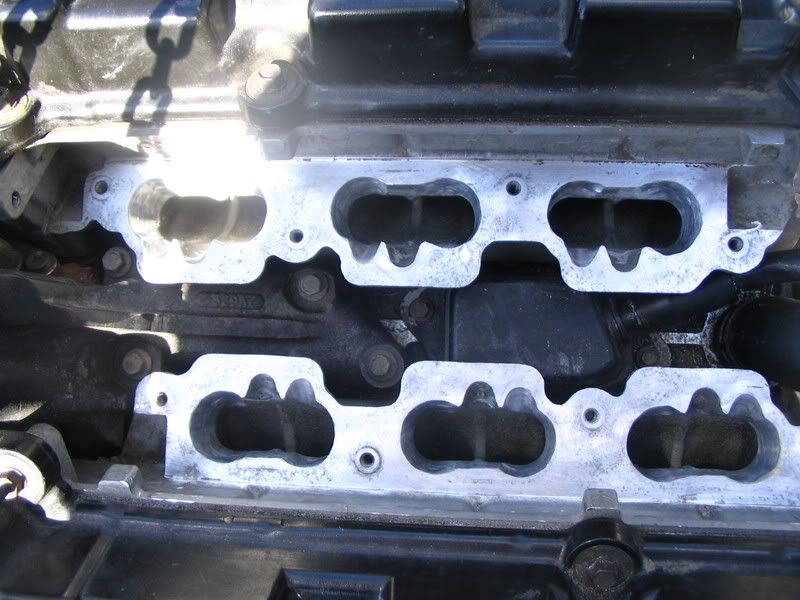
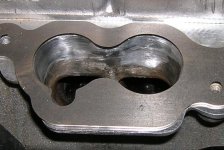
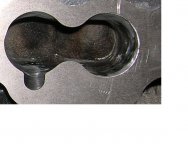
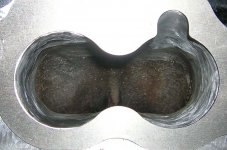
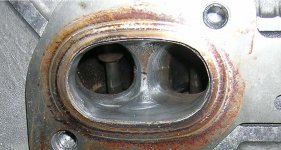
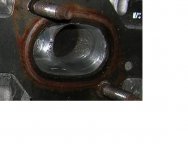
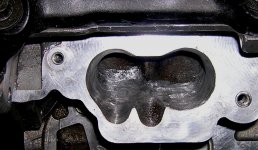
I have completed the initial porting of the intakes using Bugzuki plates and I've gasket matched the exhaust. I am looking for guidance from those who have successfully built high whp 3Ls as to how much more porting is need if any. Do I need to work on the inside corners or do any further enlarging?

I've attached a set of photos for commentary. Let me know! I've got some time before my clutch is fully burnt out and the motor is pulled.
 

Attachments

  • Intake Port 1.JPG
    Intake Port 1.JPG
    77.2 KB · Views: 0
  • Intake Port 2.JPG
    Intake Port 2.JPG
    39.7 KB · Views: 0
  • Intake Port 3.JPG
    Intake Port 3.JPG
    85.3 KB · Views: 0
  • Exhaust 1.JPG
    Exhaust 1.JPG
    86.6 KB · Views: 0
  • Exhaust 2.JPG
    Exhaust 2.JPG
    26.6 KB · Views: 0
go further down where the injector will be spraying, if you can. it will work fine the way you have it, but you will have the fuel hitting the side of the port and that will cause it to puddle a little bit easier on the low end. fuel atomization has a lot to do with throttle response, so if you can just keep the trend of what i call the "injector ditch" (lol) going a little further down into the port, you can make sure that fuel gets to travel a little ways before it just washes onto the side of the port. so far so good though!
 
are you using secondaries or are they tuned out? my eventual plan is to eliminate the secondaries and port the heads similar to how demonsvt did. I think with the 3L displacement, if you can tune without the secondaries it will make a bit more low end power. did you take the valves out? If you constantly run up in the RPM you may want to consider the st220 valve springs
 
Thanks for the input on the injector valleys...I was a bit concerned about the remaining thickness and was perhaps too cautious. I'll dig in a bit more.

I plan to initially run the car with operational secondaries and see how this goes. I have a spare Taurus 34/35 LIM that I may pull the secondaries from and install later after I live with the new motor for a bit.
 
You can open those ports up a bit more all the way around. I gasket matched the heads and the intake plates.

So, I took the LIM gasket and traced the inside of it onto the head, ported out the head. Laid the bugzuki plate in place on the head and installed a couple of bolts to hold it down, then I ported the plate to match the heads.

There is a lot more material that can be removed if you want to really hog it out.
 
so, i feel stupid asking this question but did you port it yourself? because i'm getting ready to start my 3.0L build and i'm pretty sure porting only consist of a steady hand and a good dremel?
 
Yes, did it myself. Most of the metal was rmoved with a dremel and a high speed steel cutter. Before these photos I used a sanding roll to smooth them out some.

Since that time and based upon input above, I've enlarged and smoothed them significantly using my air powered die grinder and sanding spirals from Standard Abrasive. The spirals are more forgiving and allow a deeper reach, but for the basic shape I'd still use the dremel and steel cutter (and lots of WD40).

I couldn't say for sure how long it takes, but I think more than 8 hours.

I'll post finished pics soon.
 
Lets see some pictures of what the porting looks like now. I would offer suggestions but do not know what you have changed.

Openning up the ports more then stock might not have much effect. If the ports are too large the amount of turbulance might be less causing less mixture of the fuel/air.

And since the valves are a set size you will only get a given amount of air through them.

These are the reasons I left the plates at the same size as the lower intake manifold. I think that I could probably open up the injector port a little more. It looks pretty tight in those pictures, and the gasket is openned more.

If you guys have any comments on the plates or suggestions let me know. I have to order a new batch soon and would be willing to make a revision or two.

Sorry I don't mean to highjack this thread. Paul
 
Here's a photo of the finished product, minus just minute or two of smoothing. I widened the injector valley to match the gasket. I also made it deeper and longer than the stock 3.0 valley by a good amount and broadened the transition into the port. This may or may not be easy to see...I increase the contrast to bring it out.

Otherwise I focused on "unshrouding" the corners leading into the valve bowl and bringing the area below the edge as perpindicular as reasonable.
 

Attachments

  • Port1.JPG
    Port1.JPG
    96.4 KB · Views: 0
i was taught to remove all the stock surface of the port for better flow. so on the injector port there is just a little bit left of the stock finish. just take it off all down the port.
 
Here's a photo of the finished product, minus just minute or two of smoothing. I widened the injector valley to match the gasket. I also made it deeper and longer than the stock 3.0 valley by a good amount and broadened the transition into the port. This may or may not be easy to see...I increase the contrast to bring it out.

Otherwise I focused on "unshrouding" the corners leading into the valve bowl and bringing the area below the edge as perpindicular as reasonable.

That looks much better than the before pics... much better job :)
 
You did an awesome job! The final on my 3L looked like your before. :laugh:

VegasTripSmudgeandcars158.jpg
 
That looks really good. Nice work.

I cannot believe you used a dremel for any of that. I used the Standard Abrasives kit and all air tools.

If I were to ever do it again I would make my first cuts with a stone even more aggressive than the most coarse one available in the SA kit. It took me a little over an hour for each port. Their is A LOT of time involved in this.

For that reason alone the LIM that Nautilus makes become cost effective depending on what 6-8 hours of your time is worth. And thats assuming you have the tools to do it.
 
Dremel

Dremel

Strangley I found that the 1/3 in diameter dremel steel cutter took off material faster than anything....it just left a lot of clean up with abrasive rolls.

Thanks all for the input. Just waiting for a good excuse to pull the current motor.
 
Did you have problems with aluminum getting stuck to the bit? Seems I always have to scrap it off, which is not very fun.
 
I used a 300 series. It has variable speed so for wire brush polishing or sanding rolls you can slow it down. I ran the high speed cutter at full speed and used 3 cans of wd40, keeping it lubricated and cool. I never had an issue with aluminum clogging the teeth.

In the end I did switch to a standard abrasives roll with my air grinder as it was the only way to get deep inside or to get consistent smooth radiuses. The dremel would very easily gouge out extra chunks....not condusive to good flow.
 
Did you have problems with aluminum getting stuck to the bit? Seems I always have to scrap it off, which is not very fun.

I did that for the first couple hours, but started spraying pb blaster on the bit soon after. I was grinding for 5-10 minutes straight without it clogging once after that. I probably spent ~8 hours total porting.
 
Back
Top