
-
Welcome to the Contour Enthusiasts Group, the best resource for the Ford Contour and Mercury Mystique.
You can register to join the community.
You are using an out of date browser. It may not display this or other websites correctly.
You should upgrade or use an alternative browser.
You should upgrade or use an alternative browser.
Red Leads to Power Center
- Thread starter rrichard7
- Start date
CSVT#49
Addicted CEG'er
The 4 red wires from the positive battery post to the power center have lost their coating/insulation. How do you get into the power center to replace these wires?
Thanks,
Ray
97 Mystique 2.5L
I actually just did this.
-Remove the battery from the car.
-Unbolt the power distribution box
-Remove the lid
-Remove all of the relays and fuses making sure you note their locations. I drew a simply diagram indicating sizes and colors.
-Now there are two separate sections to the box. Using a flat head screw driver you can pop out the locking tabs on each side of the section. This will allow you to pull the section out the top of the box pulling the wires up with it.
-Some of the wires lead up to a distribution "tee" unbolt the tabs that the fuses slide onto and then unbolt the tee. The tee will then drop down and the two 10awg wires are crimped to it. I decided to pry open the crimps and replace the entire wire. You could also just cut the wire and use a butt-end splice connector to attach a new wire to the existing one at the crimp.
-The second set of wires runs into a connector for a fuse block. Using a small flat head screw driver again you can pop the tabs retaining the wire terminals into the plug. Once you pull the terminals out again you will see the wires are crimped out. Again here I opened up the crimp and replaced the wire completely. As I mentioned before you could also use a butt-end splice here as well.
-Now that you have disconnected the wires from the power distribution box you have remove the wires from the battery distribution terminal (section that bolts up to the positive battery terminal. To replace these wires again I opened up the crimps and replaced the entire wire. You could also again use the butt-end splices here as well.
A few notes:
It is harder then hell to open up the crimped sections. I more or less cut open the crimp with a dremel cut off tool. I then used what was left to recrimp a new wire in its place. I then used a generous amount of solder on all the connections and shrink-wrapped the finished connection. I would highly recommend doing it this way as if you use a butt-end splice you are still leaving some of the wire in the circuit and this wire will eventually end up like the rest of the wire where the insulation is cracking off exposing bare wire. If you do feel you must use the butt-end splices atleast invest in a lot of shrink-wrap and put this over the wire you are reusing. Doing this will hold the wire insulation together and prevent it from exposing bare wire in the future.
This job took me roughly 3 hours to complete. This of course includes time for drinking a few beers too. If you have any questions just let me know. I might be able to disassembly some stuff for you and take some pictures of the final result if that would help.
Good luck.
LocoLobo
CEG'er
i'm glad someone asked that question because i was wondering it myself, i've got even more work to do now...
CSVT1214
Addicted CEG'er
I need replace mine also. All 4 of my positive cables are missing some insulation. I have a good set on my parts car but I wasn't sure if there was a trick to replacing it.
LocoLobo
CEG'er
yeah, all four of mine are missing like 3.5 inches or so and are nasty looking
projectSHO89
Hard-core CEG'er
How timely that I found this. Mine look like crap also. I know what I'll be doing tomorrow....
Steve
Steve
...or you could just put Liquid Electrical Tape ($8 from Home Depot). I have that on the positive cable for the past 20 months and it is still working "fine".How timely that I found this. Mine look like crap also. I know what I'll be doing tomorrow....
Steve
projectSHO89
Hard-core CEG'er
Damage is too extensive. I'll post a pic tomorrow.
projectSHO89
Hard-core CEG'er
Well, here's the old one:
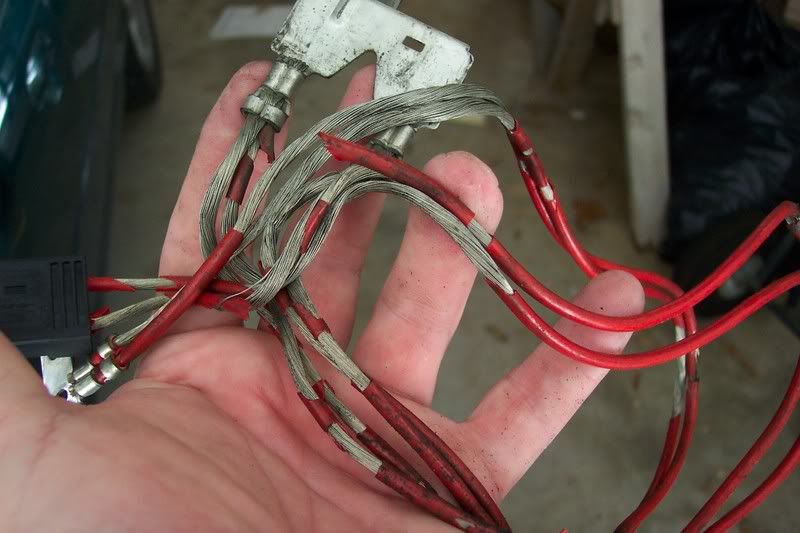
Not visible in the photo are several spots where there is visible evidence of arcing. Maybe that has something to do with my wife's report of recent intermittent stalling.....
Here's the repaired harness, ready to re-install:
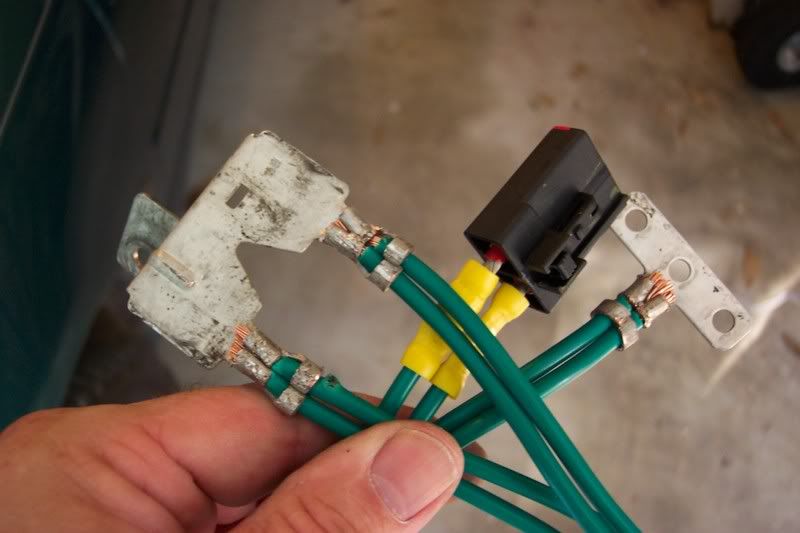
My local NAPA was out of red #10 primary wire, so I ended up with green.
A couple of points in above writeup that I can complement based on my 98:
1. There is no need to remove any of the relays or fuses from the box.
2. There is no need to remove both internal sections of the panel from the enclosure.
3. Remove only the bottom cover (it just snaps off/on)
4. The small section of the fuse panel that has the three large fuses just unclips and then pulls up to gain access to the screw connectors so the tee-connector can be removed from the fuses.
5. I also removed the battery tray to give myself some extra room. You may find this to be optional.
6. To open the crimps, I locked the tab in my 5" bench vice, then used my center-punch to drive into the crimp to open it. Re-crimping was done with vice-grips.
Took me about 3 hours excluding the trip to NAPA.
Steve
Not visible in the photo are several spots where there is visible evidence of arcing. Maybe that has something to do with my wife's report of recent intermittent stalling.....
Here's the repaired harness, ready to re-install:
My local NAPA was out of red #10 primary wire, so I ended up with green.
A couple of points in above writeup that I can complement based on my 98:
1. There is no need to remove any of the relays or fuses from the box.
2. There is no need to remove both internal sections of the panel from the enclosure.
3. Remove only the bottom cover (it just snaps off/on)
4. The small section of the fuse panel that has the three large fuses just unclips and then pulls up to gain access to the screw connectors so the tee-connector can be removed from the fuses.
5. I also removed the battery tray to give myself some extra room. You may find this to be optional.
6. To open the crimps, I locked the tab in my 5" bench vice, then used my center-punch to drive into the crimp to open it. Re-crimping was done with vice-grips.
Took me about 3 hours excluding the trip to NAPA.
Steve
GeoPappas
New CEG'er
I am having the same issue.
Does anyone know the Ford part # for this cable?
Does anyone know the Ford part # for this cable?
Aussie Ford
Hard-core CEG'er
That's a good looking replacement job you did, BUT have you checked the rest of the wiring? Start with the fan harness connector right in front of the engine. Looks to me like you may have the wiring harness deterioration as described in the TSB. Read it first then check your car.The info says if there are cracks in it you have the problem and need to replace ALL harnesses as outlined for you particular car/engine/options. Been there done that, not fun, some cars not cheap.
Regards,
AF
Regards,
AF
projectSHO89
Hard-core CEG'er
That's a good looking replacement ob you did, BUT have you checked the rest of the wiring? Start with the fan harness connector right in front of the engine. Looks to me like you may have the wiring harness deterioration as described in the TSB. Read it first then check your car.The info says if there are cracks in it you have the problem and need to replace ALL harnesses as outlined for you particular car/engine/options. Been there done that, not fun, some cars not cheap.
Regards,
AF
The problems covered by 99M03 haven't been prevalent in 98-on models.
The rest of mine show no degradation.
Steve
Aussie Ford
Hard-core CEG'er
The problems covered by 99M03 haven't been prevalent in 98-on models.
The rest of mine show no degradation.
Steve
That's a good thing Steve. However rrichard7, and others making posts here have earlier cars and may not even know that information exists. They need to read it and check out their cars.
When I did mine there were several people that had 98's with the problem b/c they were built in 97 and must have gotten in on the tail end of the bad batch. Ford did not acknowledge any 98's had it, but I heard they did change out the harnesses if brought to them.
Did you have any other pics of actually getting into your BJB? After getting that loose one can break the tabs on the bottom cover when taking it off. Then there are those two sections inside, and all those wires have connectors that can be removed. I should have taken pics when I took mine all apart. When you first get into it and don't know what's there it is a bit intimidating (at least to me) not wanting to break a tab and make more problems for yourself....(I know how to do that well) :laugh:
I actually cut one out of a car at the jy, and took it home to figure out how to take it apart before starting on my car when fixing the wiring harnesses.
AF
Some 1998 models were made at the end of 1996. :shrug:...When I did mine there were several people that had 98's with the problem b/c they were built in 97 and must have gotten in on the tail end of the bad batch. Ford did not acknowledge any 98's had it, but I heard they did change out the harnesses if brought to them.
....AF
Aussie Ford
Hard-core CEG'er
Some 1998 models were made at the end of 1996. :shrug:
96????? How could 98's be built in 96? If your referring to my post I think you missed a year my friend..... LOL
The bad harnesses went from 95 through 97 and some 98's had them too. Most all were corrected by the E1's in mid 98.
AF
96????? How could 98's be built in 96? ....
The early CSVTs were built in November 1996 and were 1998 models. You can call a vehicle a 1998 model if it is released for sale after January 1, 1997. When it is built does not have a bearing on what model year it is stamped.
Aussie Ford
Hard-core CEG'er
It is good to learn something every day thanks...... I'll take the rest of the day off now.....LOL
great history.
AF
great history.
AF
I just finished this project yesterday, took me about four hours and change with a run to the Home Depot for some supplies but it cannot be stressed enough that if you use the crimps from the original setup to make sure you don't damage them enough to re-crimp all the new wiring and that you DO solder the whole setup once all else is done.
As obvious notes can say: i forgot to solder the ends at the positive crimps and the wires came loose leaving me to tear all my setup one more time to do this job right but once done, oh man it feels good it was done the good way, EXCELLENT write-up.
Thanks!!!
As obvious notes can say: i forgot to solder the ends at the positive crimps and the wires came loose leaving me to tear all my setup one more time to do this job right but once done, oh man it feels good it was done the good way, EXCELLENT write-up.
Thanks!!!