BoneStock99
CEG'er
INTRODUCTION
Whether you are fixing a problem, improving performance or simply doing regular maintenance, there is nothing like the pride one feels after having worked on his own car with his own hands. If you are not mechanically inclined or simply lack experience but want to get started on doing your own work, fixing the throttle hang on the contour V6 is a great project to get your feet wet and build confidence.
The throttle hang experienced by V6 contours is annoying but fortunately, the fix is extremely simple, inexpensive and takes very little time.
So...
In recognition that not everyone is comfortable under the hood of a car and that many of those who are not would like to be, The Contour Throttle Hang Fix is presented here for your edification.
BACKGROUND
You may want to read the article at http://www.contour.org/FAQ/FAQ.php?s=probs&displayid=3 and that may be enough for you to have a go at it. If you are still shy, fear not and read on.
THINGS YOU WILL NEED
You will need a V6 Contour of course. An SVT is preferred but a non-SVT will work just fine too.
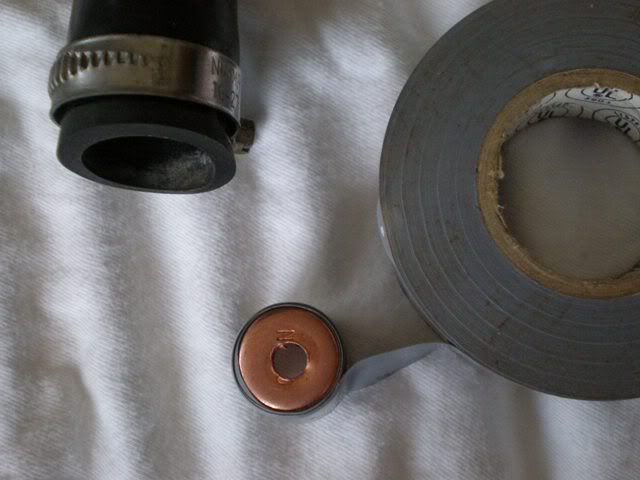
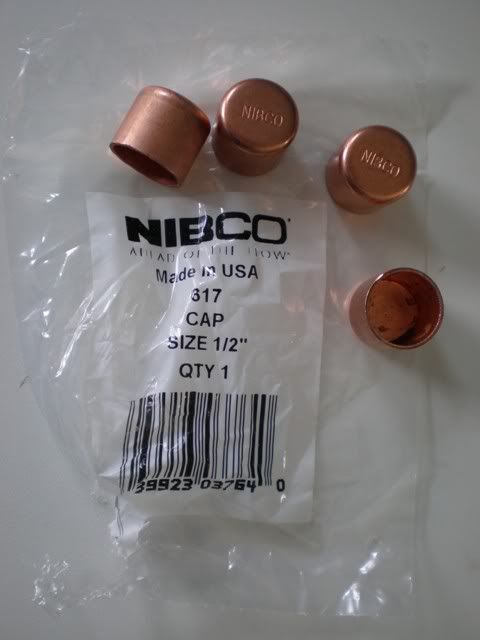
You will also need some 1/2 inch diameter pipe caps, available for about fifty cents each at the home improvement store.
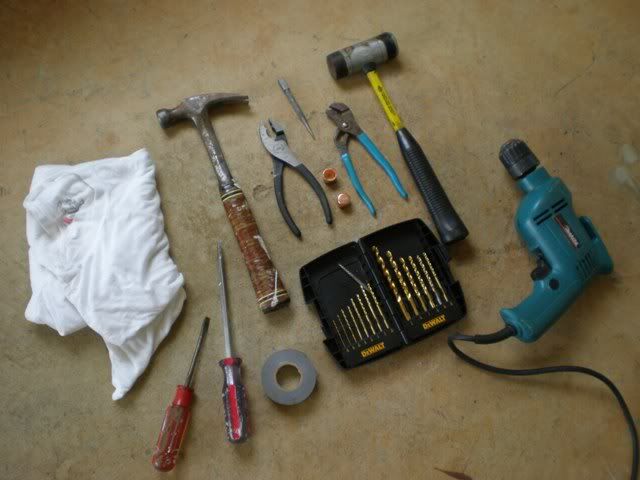
You will also need a selection of tools. The picure shows just about every tool you could possibly need. At a minimum, plan on having:
- A drill
- 3/16" and 7/32" drill bits if you have an SVT
- A 15/64" drill bit if you have a non-SVT
- A pair of pliers or a bench vise, extremely important so you don't injure yourself!
- Flat blade screw driver
- Electrical tape
WHERE UNDER THE HOOD WILL WE BE WORKING? IS THE SPOT EASY TO GET TO?
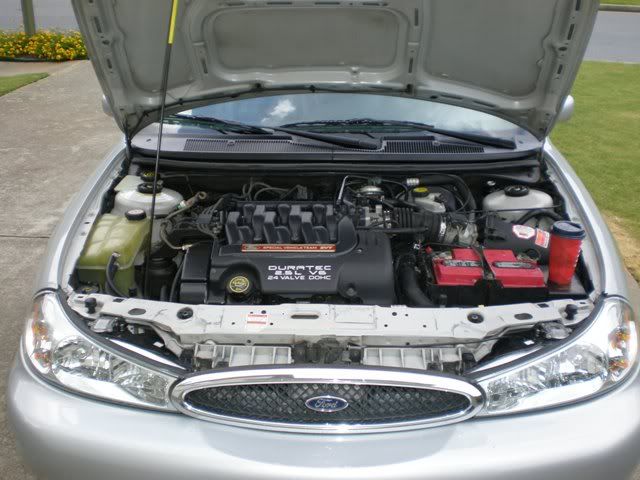
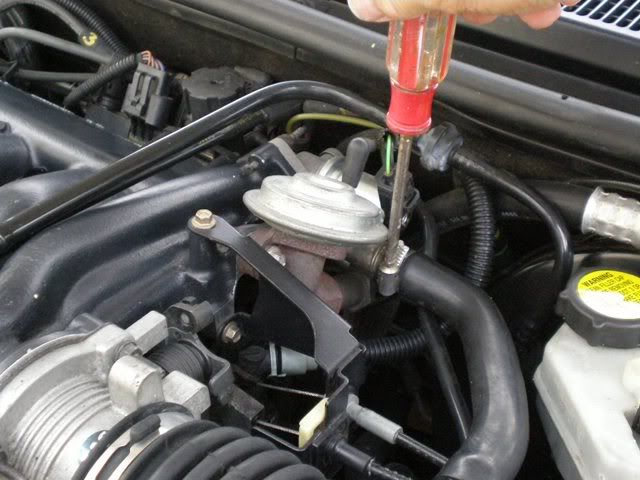
We will be working under the hood in the location shown below, at the rear of the engine compartment, slightly to the driver's side of center.
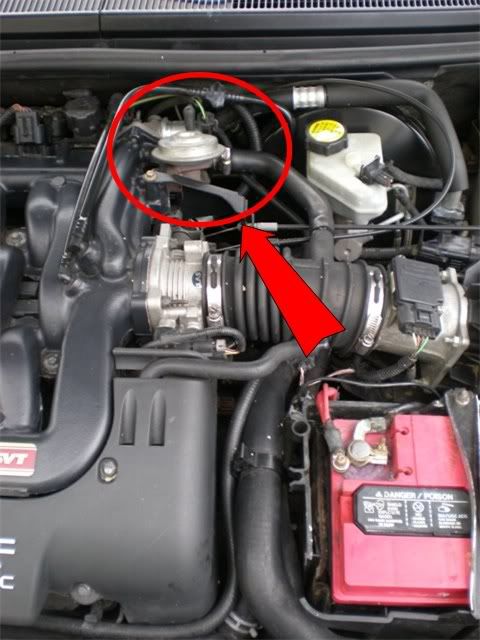
The silver "Flying saucer" shaped part is the Exhaust Gas Recirculation valve (EGR valve). The brake fluid resevoir is to the right of the EGR valve, pictured with the black filler cap with a yellow sticker on it. We will be working on the rubber hose behind the EGR valve and next to the brake fluid resevior. The location is very easy to get to and is shown in the picture below.
To prevent scratching the paint as you lean into the engine bay to work, you may want to put a soft cotton towel over the fender and take off or cover any metal belt buckles, zipper pulls or pocket rivets on your jeans at this time.
PROCEDURE
STEP 1. Start with a clean and safe work area.
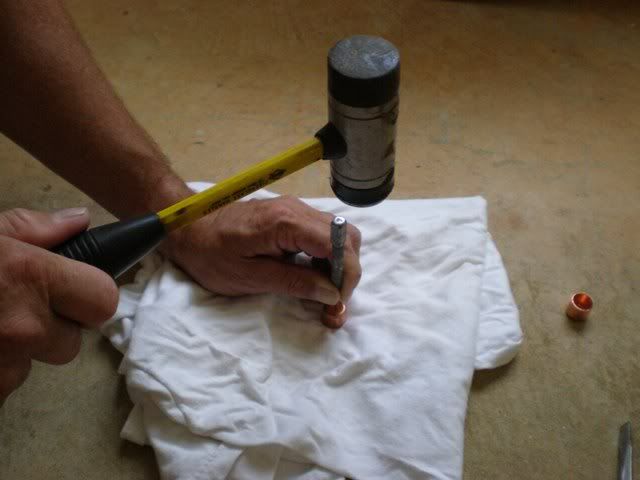
STEP 2. If you have a centerpunch and hammer, make a small identation on one of the pipe caps so that the drill bit has a place to sit when it starts turning. Doing so prevents the drill bit from "Skating" off to the side as you start to drill.
Remember that copper is an extremely soft metal and so you will not need to hit the centerpunch hard to make even a slight indentation. Tap it lightly and if you need to, you can tap it harder a second time until you get it right. It is best to do this to two of the pipe caps at this time.
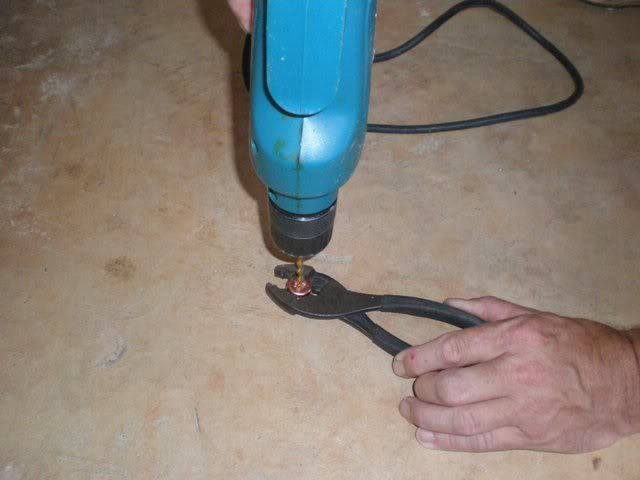
Step 3. For safety reasons, do not hold the pipe cap in your hands while drilling! If the drill bit should slide or "Skate" while you are drilling, it could cause serious injury to your fingers or hands. This warning should be enough for you to want to hold the pipe caps with something like a pair of pliers. If you have access to a bench vise, that would be the best way to go.
Again, note that copper is an extremely soft metal and so sqeezing the pipe cap hard with pliers or a vise could easily crush it.
For an SVT, drill a hole into one of the pipe caps with a 3/16 drill bit and drill a hole into another pipe cap with a 7/32 drill bit. For a non-SVT, drill a hole into the pipe cap with a 15/64 drill bit.
The drill bit may bind in the hole it is creating just as it is completely breaking through the metal. The pipe cap may try to twist out of the pliers when this happens. It is important to grip the pipe cap firmly enough to prevent this from happening while not gripping it so hard that you deform it's shape. A feel for this can only be learned from experience so if you are not used to performaning this type of mechanical work, be prepared for it to happen.
It may seem obvious to experienced mechanics but to the beginner, it needs to be stated; if the pipe cap gets stuck on the drill bit, UNPLUG THE DRILL BEFORE TRYING TO GET IT OFF!!!
For safety reasons, if you have access to a bench vise, us it instead of pliers to hold the pipe cap while drilling.
You can use a little sand paper to sand off any burrs or sharp edges left over from drilling if you want. At a minimum, make sure that no loose burrs or sharp shards of metal are left hanging around which could get sucked into the engine. You do not want metal shards getting sucked into your engine!
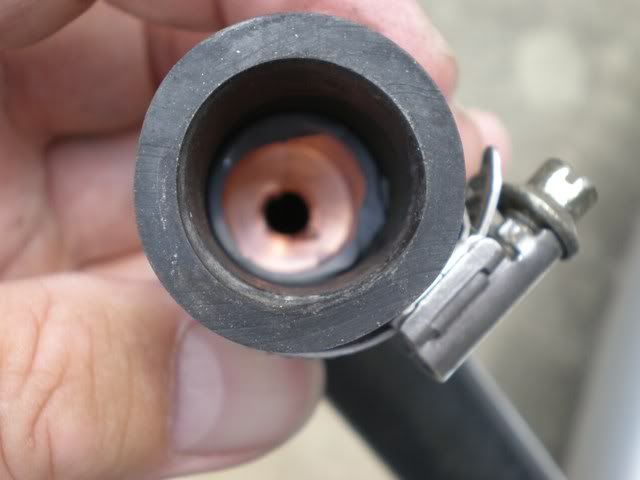
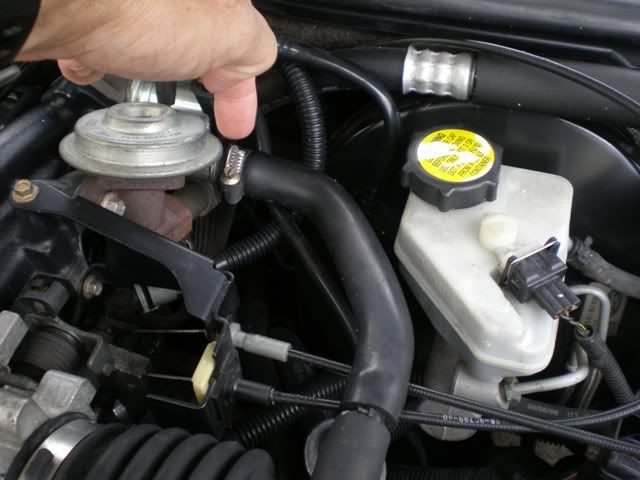
Step 4. Loosen the hose clamp which holds the rubber hose in place. The location is pictured below. Slide the hose off of the metal pipe to which it is mounted.
You will not need to completely unscrew the hose clamp; just loosen it enough so that you can wiggle the hose and slide it off. Don't be afraid to pull the hose off; this is an air hose so no fluid will leak out.
Be sure not to let the hose clamp fall off into the engine bay! The engine will not run properly without the hose in place and you could get stuck without it properly attached.
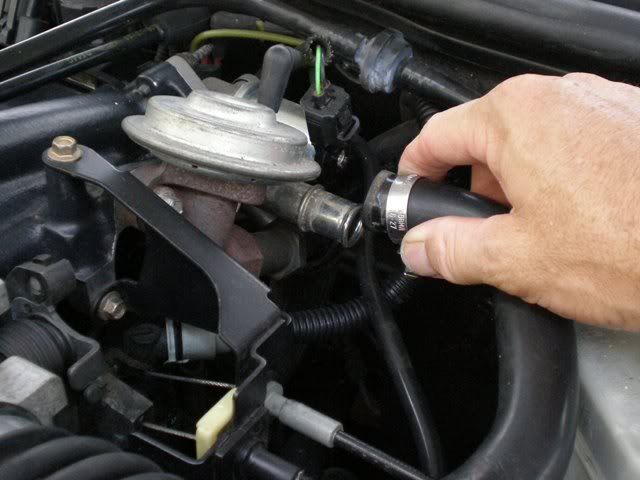
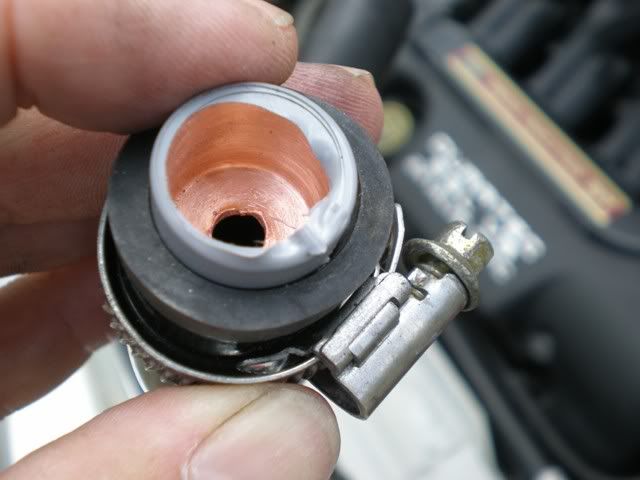
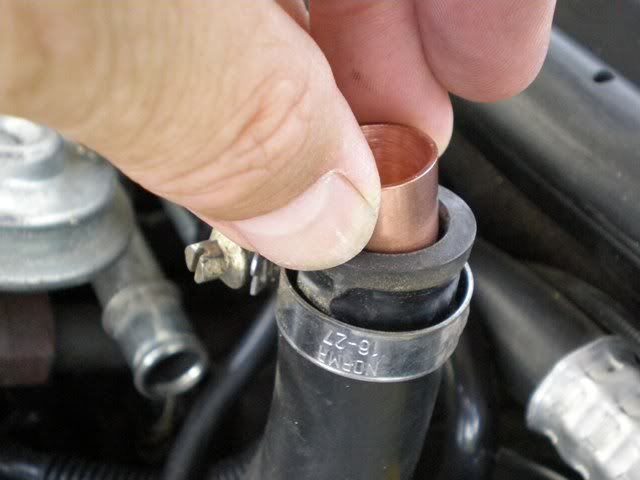
Step 6. Push one of the pipe caps down into the hose and check the fit at this time. When installed, the pipe cap will be pushed about 3/4 of an inch to one inch into the hose.
It is important that the pipe cap fits snugly and that it does not rattle around inside the hose or cock to one side. In the picture below, you can see that the cap isn't quite big enough to fill up the entire hose. Note that the hose, having been stretched open at it's mounting point, may be have a slightly larger diameter at the end and a slightly smaller diameter further down where the pipe cap will sit.
CONTINUED NEXT POST
Whether you are fixing a problem, improving performance or simply doing regular maintenance, there is nothing like the pride one feels after having worked on his own car with his own hands. If you are not mechanically inclined or simply lack experience but want to get started on doing your own work, fixing the throttle hang on the contour V6 is a great project to get your feet wet and build confidence.
The throttle hang experienced by V6 contours is annoying but fortunately, the fix is extremely simple, inexpensive and takes very little time.
So...
In recognition that not everyone is comfortable under the hood of a car and that many of those who are not would like to be, The Contour Throttle Hang Fix is presented here for your edification.
BACKGROUND
You may want to read the article at http://www.contour.org/FAQ/FAQ.php?s=probs&displayid=3 and that may be enough for you to have a go at it. If you are still shy, fear not and read on.
THINGS YOU WILL NEED
You will need a V6 Contour of course. An SVT is preferred but a non-SVT will work just fine too.
You will also need some 1/2 inch diameter pipe caps, available for about fifty cents each at the home improvement store.
You will also need a selection of tools. The picure shows just about every tool you could possibly need. At a minimum, plan on having:
- A drill
- 3/16" and 7/32" drill bits if you have an SVT
- A 15/64" drill bit if you have a non-SVT
- A pair of pliers or a bench vise, extremely important so you don't injure yourself!
- Flat blade screw driver
- Electrical tape
WHERE UNDER THE HOOD WILL WE BE WORKING? IS THE SPOT EASY TO GET TO?
We will be working under the hood in the location shown below, at the rear of the engine compartment, slightly to the driver's side of center.
The silver "Flying saucer" shaped part is the Exhaust Gas Recirculation valve (EGR valve). The brake fluid resevoir is to the right of the EGR valve, pictured with the black filler cap with a yellow sticker on it. We will be working on the rubber hose behind the EGR valve and next to the brake fluid resevior. The location is very easy to get to and is shown in the picture below.
To prevent scratching the paint as you lean into the engine bay to work, you may want to put a soft cotton towel over the fender and take off or cover any metal belt buckles, zipper pulls or pocket rivets on your jeans at this time.
PROCEDURE
STEP 1. Start with a clean and safe work area.
STEP 2. If you have a centerpunch and hammer, make a small identation on one of the pipe caps so that the drill bit has a place to sit when it starts turning. Doing so prevents the drill bit from "Skating" off to the side as you start to drill.
Remember that copper is an extremely soft metal and so you will not need to hit the centerpunch hard to make even a slight indentation. Tap it lightly and if you need to, you can tap it harder a second time until you get it right. It is best to do this to two of the pipe caps at this time.
Step 3. For safety reasons, do not hold the pipe cap in your hands while drilling! If the drill bit should slide or "Skate" while you are drilling, it could cause serious injury to your fingers or hands. This warning should be enough for you to want to hold the pipe caps with something like a pair of pliers. If you have access to a bench vise, that would be the best way to go.
Again, note that copper is an extremely soft metal and so sqeezing the pipe cap hard with pliers or a vise could easily crush it.
For an SVT, drill a hole into one of the pipe caps with a 3/16 drill bit and drill a hole into another pipe cap with a 7/32 drill bit. For a non-SVT, drill a hole into the pipe cap with a 15/64 drill bit.
The drill bit may bind in the hole it is creating just as it is completely breaking through the metal. The pipe cap may try to twist out of the pliers when this happens. It is important to grip the pipe cap firmly enough to prevent this from happening while not gripping it so hard that you deform it's shape. A feel for this can only be learned from experience so if you are not used to performaning this type of mechanical work, be prepared for it to happen.
It may seem obvious to experienced mechanics but to the beginner, it needs to be stated; if the pipe cap gets stuck on the drill bit, UNPLUG THE DRILL BEFORE TRYING TO GET IT OFF!!!
For safety reasons, if you have access to a bench vise, us it instead of pliers to hold the pipe cap while drilling.
You can use a little sand paper to sand off any burrs or sharp edges left over from drilling if you want. At a minimum, make sure that no loose burrs or sharp shards of metal are left hanging around which could get sucked into the engine. You do not want metal shards getting sucked into your engine!
Step 4. Loosen the hose clamp which holds the rubber hose in place. The location is pictured below. Slide the hose off of the metal pipe to which it is mounted.
You will not need to completely unscrew the hose clamp; just loosen it enough so that you can wiggle the hose and slide it off. Don't be afraid to pull the hose off; this is an air hose so no fluid will leak out.
Be sure not to let the hose clamp fall off into the engine bay! The engine will not run properly without the hose in place and you could get stuck without it properly attached.
Step 6. Push one of the pipe caps down into the hose and check the fit at this time. When installed, the pipe cap will be pushed about 3/4 of an inch to one inch into the hose.
It is important that the pipe cap fits snugly and that it does not rattle around inside the hose or cock to one side. In the picture below, you can see that the cap isn't quite big enough to fill up the entire hose. Note that the hose, having been stretched open at it's mounting point, may be have a slightly larger diameter at the end and a slightly smaller diameter further down where the pipe cap will sit.
CONTINUED NEXT POST